Build new functionality with Change Data Capture - Instructions

1. Your lab environment

Before your proceed it is critical that your lab environment is completely ready before executing the lab instructions.

  • Access the Workshop Deployer browser tab and check if the Build new functionality with Change Data Capture has turned green. This indicates that the module has been fully deployed and is ready to use.

cdc workshop deployer
Figure 1. Module Readiness on Workshop Deployer

2. Deployment Overview

The architecture of the Cashback service looks as follows:

globex deployment 3

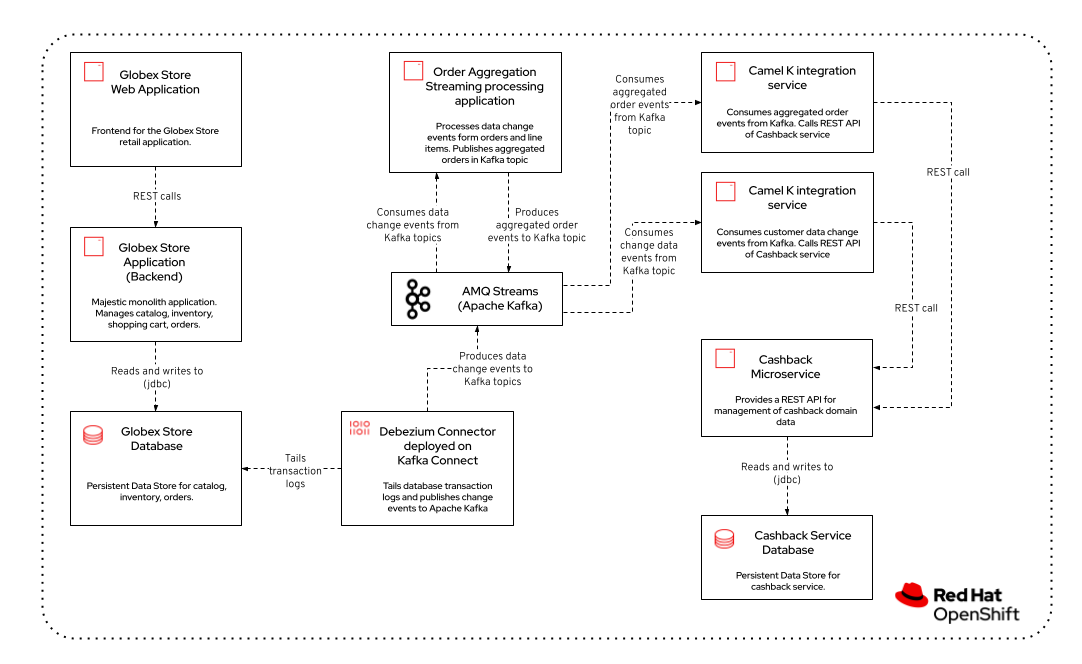
Most of the components have been deployed for you as part of the provisioning of the lab. What is missing is the Debezium connector to power Change Data Capture, and the Camel K integration services to populate the cashback service with customer and order data.

3. Deploy the Debezium Connector

Let’s start with deploying the Debezium Connector. With AMQ Streams, a Kafka Connect connector can be deployed as a Kubernetes Custom Resource, which is picked up and processed by the AMQ Streams operator.

To deploy the connector, you are going to use OpenShift Dev Spaces. OpenShift Dev Spaces uses Kubernetes and containers to provide a consistent, secure, and zero-configuration development environment, accessible from a browser window.

  • In a browser window, navigate to the browser tab pointing to the Developer perspective of the OpenShift cluster. If you don’t have a browser tab open on the console, navigate to {openshift_cluster_console}[OpenShift Console, window="console"] to launch the console. If needed login with your username and password ({user_name}/{user_password}).

  • On the top menu of the console, click on the openshift application menu icon, and in the drop-down box, select Red Hat OpenShift Dev Spaces.

    openshift application menu 2
  • Login in with your OpenShift credentials ({user_name}/{user_password}). If this is the first time you access Dev Spaces, you have to authorize Dev Spaces to access your account. In the Authorize Access window click on Allow selected permissions.

  • You are directed to the Dev Spaces overview page, which shows the workspaces you have access to. You should see a single workspace, called cloud-architecture-workshop. The workspace needs a couple of seconds to start up.

    devspaces workspace starting
  • Click on the Open link of the workspace.

    devspaces workspace started 1
  • This opens the workspace, which will look pretty familiar if you are used to work with VS Code. Before opening the workspace, a pop-up might appear asking if you trust the contents of the workspace. Click Yes, I trust the authors to continue.

    devspaces trust contents
  • The workspace contains all the resources you are going to use during the workshop, including the Debezium connector. In the project explorer on the left of the workspace, navigate to the workshop/module-cdc folder and open the debezium-connector.yaml file.

    devspaces workspace debezium connector
  • The debezium-connector.yaml file describes the Debezium Connector. It contains all the details the connector needs to know in order to start capturing changes in the target database tables. Some important configuration details:

    • class: the Debezium connector implementation class. We’re using PostgreSQL as source database, so the approriate connector is io.debezium.connector.postgresql.PostgresConnector.

    • plugin.name: The Debezium connector supports different mechanisms to read from the PostgreSQL transaction logs. pgoutput is the standard logical decoding output plug-in since PostgreSQL 10.

    • database.*: the connection details for the database. Note that PostgreSQL is setup with a specific user (debezium) which has the required privileges to read from the transaction logs.

    • topic.prefix: the prefix of the Kafka topics which will receive the Debezium change events. The full name of the topics is <prefix>.<schema>.<table>.

    • schema.include.list: the schema’s to include in the change data capture process.

    • table.include.list: the name of the tables to include. For our use case we are interested in the customer, orders and line_item tables.

  • Before deploying the connector, you need to substitute the placeholder for the database hostname with the actual value. On line 14, replace

    <REPLACE WITH DATABASE HOSTNAME>

    with

    globex-db.globex-{user_name}.svc.cluster.local

    which is the internal DNS name of the Globex retail application database.

  • You can deploy the connector to the OpenShift cluster directly from Dev Spaces. To do so, click on the devspaces menu icon on the top of the left menu, and select Terminal/New Terminal from the drop-down menu.

    devspaces menu new terminal
  • This opens a terminal in the bottom half of the workspace.

    devspaces menu terminal
  • The OpenShift Dev Spaces environment has access to a plethora of command line tools, including oc, the OpenShift command line interface. Through OpenShift Dev Spaces you are automatically logged in into the OpenShift cluster. You can verify this with the command oc whoami.

    oc whoami
    Output
    {user_name}

    If the output of the oc whoami command does not correspond to your username ({user_name}), you need to logout and login again with the correct username.

    oc logout
    oc login -u {user_name} -p {user_password} {openshift_api_internal}
  • Deploy the Debezium connector by copying the following command to the terminal:

    oc apply -f workshop/module-cdc/debezium-connector.yaml -n globex-cdc-{user_name}
    Output
    kafkaconnector.kafka.strimzi.io/globex created
  • After a few seconds, the Debezium connector will start monitoring the PostgreSQL database for changes in the customer, orders and line_item tables, and will produce a change event to the corresponding Kafka topic for each change detected.

  • One way to verify that the connector is working as expected is to check the Kafka topics that receive the change events.
    If you still have a browser tab pointing to AMQ Streams Console, open the tab. If not, navigate to AMQ streams console.

    • This redirects you to the AMQ streams console login page.

    • For the purpose of this workshop, choose Sign in with Anonymous Session to access the console if you are not already signed in.

      amqconsole anon session
  • Navigate to Kafka Clusters → kafka → Topics.

    Filter the topics by Name by the term`globex.updates`. You will see the three topics that will receive the change events.

    amqconsole debezium topics
  • The Globex application database contains records for a couple of hundred customers in the customer table, so we can expect a change event for each of these records. In the AMQ Streams console’s topics page, click on the globex.updates.public.customer topic. This opens a view with details on the topic. Notice that the Offset of the topmost (latest) message is 199, which corresponds to the number of records in the customer table.
    Note: that Offsets start at 0. An Offset of 199 means that there are 200 messages in the topic.

    amqconsole debezium topic customers
  • You can expand every message to inspect its content. In this case, the body of each message consists of a Debezium change event in JSON format.

    amqconsole debezium topic customers 200
  • A Debezium change event has a well-defined structure. Take particular note of the following elements:

    • before: the state of the record before the transaction. As the change events correspond to newly read records, there is no previous state.

    • after: the state of the record after the transaction. This is a JSON representation of the current state of the record in the database (every column in the table becomes a JSON field).

    • op: The operation that leads to the change event. Possible values are 'c' for create, 'u' for update, 'd' for delete and 'r' for read. As the records in the customer already existed when the Debezium connector was deployed, the operation is 'r'.

  • The Globex application database does not contain any order information at the moment, so the globex.updates.public.orders and globex.updates.public.line_item topics are empty. You can verify this through the AMQ streams console.
    In the next section of the workshop, you will create some orders, and verify that the corresponding change events are picked up by Debezium.

4. Create an Order in the Globex Retail Application

  • If you still have a browser tab open pointing to the Globex retail web application, open the tab. If not, navigate to {globex_web_url}[Globex retail web application, window="retail"].

  • In order to place an order, you need to login into the Globex application. Click on the Login link on the right of the top menu.

    globex login
  • The Globex web application uses OpenId Connect powered by Red Hat build of Keycloak to authenticate users. After clicking the Login link you are redirected to the login page of the SSO server, where you need to enter your credentials.
    The SSO server is set up with a number of users corresponding to customers in the Globex application. Login with one of the following users: asilva, mmiller, asanders, cjones or pwong. The password for all the users is {globex_user_password}.

    globex login sso
  • Once logged in, you can browse through the catalog and add items to the shopping cart.

    Note: When adding an item to the shopping cart, there is no "close" button for that item. You can use the browser "back" button to return to the catalog. The Globex UX team has been notified and is already working on adding a "close" button ;-)

  • To check out the cart and place an order, click on the Cart link in the top menu.

    globex goto cart
  • This brings you to the cart view. From there you can proceed to checkout by clicking Proceed to Checkout.

    globex cart checkout
  • In the checkout page, click the Autofill form to populate the form with the details of the logged in user.

    globex checkout 1
  • Finally, click Submit order to submit your order.

    globex checkout 3
  • If the order is submitted successfully, you will be redirected to a success page:

    globex order placed
  • At this point, an order has been added in the Globex application database. The records added to the orders and line_item tables have been detected by Debezium and produced as change events to Kafka topics.
    We can easily check this with AMQ streams console.

  • Open the browser tab pointing to the AMQ streams console UI. If you did close the tab, navigate to AMQ streams console.
    From the Topics page, open the globex.updates.public.orders topic, and verify that the topic contains 1 message.

    amq console debezium topic orders

    Wxpand the contents of the message. You should see a change event structure very similar to the ones for customers. Notice however that the operation is 'c', for create. This is expected as the change event corresponds to a new record in the order table.

    amq console debezium topic order details

    Go back to the AMQ Streams Console topics page, and this time open the globex.updates.public.line_item topic. You should see one message per item in the order you created previously.

    amqconsole debezium topic line items
  • If you want to simulate a larger number of orders, you can use the Order simulator application deployed in the globex-{user_name} namespace on OpenShift.

    • In the browser window, open the tab pointing to the OpenShift console. If you don’t have a tab open to the console, click navigate to {openshift_cluster_console}[OpenShift console, window="console"]. If needed login with your username and password ({user_name}/{user_password}).

    • Select the Topology view in the Developer perspective. If needed, switch to the globex-{user_name} namespace by selecting the namespace from the namespace selection drop-down menu in the top left.

      openshift console developer select namespace
    • In the Topology view, click on the openshift console open url symbol next to the order-simulator deployment.

      openshift console open url 4
    • This opens a Swagger UI page showing the REST API of the simulator.
      Click on the POST link, and then on the Try it out link on the right. From the Examples drop down, select random customers to create orders for random customers. Feel free to change the numbers of orders you want to simulate (the default is 50).

      order simulator random customer
    • Click Execute to execute the REST call to the simulator.

    • Check in AMQ streams console that new messages are produced to the globex.updates.public.orders and globex.updates.public.line_item topics.

5. Streaming processing of events with Kafka Streams

Debezium produces a stream of data change events in one or more Kafka topics. In some cases the data in these topics need to be transformed, combined or aggregated before they can be consumed by target services.

In our use case for instance, the cashback service is interested in the total value of an order, not necessarily the value of each individual line item. However, The orders table in the Globex retail database does not contain the total value, as you can see in the entity relationship diagram.

globex db erd orders

So we need to somehow combine the data change events streams from the orders table with the stream of the line_items table to obtain the total value for each order.

This is where stream processing libraries or frameworks come in. Libraries like Kafka Streams or Apache Flink allow to process streams of data consumed from a Kafka cluster in a continuous fashion. The result of the processing is typically stored in topics on the Kafka cluster. Processing capabilities can be stateless or stateful. Stateless processing include data transformations, filtering, mapping and so on. Stateful operations include aggregations and joins.

The processing logic of a Kafka Streams application is defined in a topology, which forms a graph of stream processors, where each processor represents a processing step in the processing topology. Kafka Streams comes with a Domain Specific Language (DSL) to define the topology in Java.

If you are familiar with SQL, a topology is quite similar to a set of SQL queries, but then applied on a stream of data rather then on static tables.

The order-aggregator service uses Kafka Streams to calculate the total value of an order out of the data change events of the orders and line_items tables. The topology does the following:

  • Consumes from the globex.updates.public.orders and globex.updates.public.line_item topics.

  • Joins the LineItem events with the Order events by Order ID. This produces a new stream of events which contain both the Order and the LineItem.

  • Groups the joined stream by Order ID

  • Aggregates the joined stream to produce a stream of AggregatedOrder events. The aggregation function adds the value of each individual line item to the total order value.

  • Publishes the aggregated order events in a Kafka topic, in this case the globex.order-aggregated topic.

In case you want to see how this looks like in code, click on the link below:

Click to see the code
    public Topology buildTopology() {

        StreamsBuilder builder = new StreamsBuilder();

        final Serde<Long> orderKeySerde = DebeziumSerdes.payloadJson(Long.class);
        orderKeySerde.configure(Collections.emptyMap(), true);
        final Serde<Order> orderSerde = DebeziumSerdes.payloadJson(Order.class);
        orderSerde.configure(Collections.singletonMap(JsonSerdeConfig.FROM_FIELD.name(), "after"), false);

        final Serde<Long> lineItemKeySerde = DebeziumSerdes.payloadJson(Long.class);
        lineItemKeySerde.configure(Collections.emptyMap(), true);
        final Serde<LineItem> lineItemSerde = DebeziumSerdes.payloadJson(LineItem.class);
        lineItemSerde.configure(Collections.singletonMap(JsonSerdeConfig.FROM_FIELD.name(), "after"), false);

        final Serde<OrderAndLineItem> orderAndLineItemSerde = new ObjectMapperSerde<>(OrderAndLineItem.class);

        final Serde<AggregatedOrder> aggregatedOrderSerde = new ObjectMapperSerde<>(AggregatedOrder.class);


        // KTable of Order events
        KTable<Long, Order> orderTable = builder.table(orderChangeEventTopic, Consumed.with(orderKeySerde, orderSerde));

        // KTable of Lineitem events
        KTable<Long, LineItem> lineItemTable = builder.table(lineItemChangeEventTopic, Consumed.with(lineItemKeySerde, lineItemSerde));

        // Join LineItem events with Order events by foreign key, aggregate Linetem price in Order
        KTable<Long, AggregatedOrder> aggregatedOrders = lineItemTable
                .join(orderTable, LineItem::getOrderId, (lineItem, order) -> new OrderAndLineItem(order, lineItem),
                        Materialized.with(Serdes.Long(), orderAndLineItemSerde))
                .groupBy((key, value) -> KeyValue.pair(value.getOrder().getOrderId(), value),
                        Grouped.with(Serdes.Long(), orderAndLineItemSerde))
                .aggregate(AggregatedOrder::new, (key, value, aggregate) -> aggregate.addLineItem(value),
                        (key, value, aggregate) -> aggregate.removeLineItem(value),
                        Materialized.with(Serdes.Long(), aggregatedOrderSerde));

        aggregatedOrders.toStream().to(aggregatedOrderTopic, Produced.with(Serdes.Long(), aggregatedOrderSerde));

        Topology topology = builder.build();
        LOGGER.debug(topology.describe().toString());
        return topology;

You can see the result of the streaming processing by inspecting the contents of the globex.order-aggregated topic in AMQ streams console.

  • Open the browser tab pointing to the AMQ Streams console. If you have closed the tab, navigate to AMQ streams console.

  • From the Topics page, open the globex.order-aggregated topic, and verify that the topic contains one or more messages (the exact number depends on how many orders were created in the previous paragraph).

    amqconsole order aggregated topic
  • Expand the contents of a message. You should see a JSON structure which contains the order ID, the customer ID, the order creation date and the total value of the order.

    amqconsole order aggregated topic 2

6. Build and deploy integrations with Camel K

Apache Camel is an open source integration framework that allows you to quickly and easily integrate various systems consuming or producing data. It is based on the well known Enterprise Integration patterns and allows you to define routing and mediation rules in a variety of domain-specific languages (such as Java, XML, Groovy, Kotlin, and YAML). It does so by providing over 300 components and connectors.

Apache Camel K is a lightweight integration framework built from Apache Camel that runs natively on Kubernetes or OpenShift and is specifically designed for microservice and serverless architectures. When using Camel K you can instantly run integration code written in Camel DSL on Kubernetes or OpenShift, without having to package the code into an application and building a container image.

In this workshop we leverage Camel and Camel K to bridge between the Kafka topics which contain the customer data change events and the aggregated orders, and the Cashback service.

The first integration we need is pretty simple: we need to consume the aggregated order records from the Kafka globex.order-aggregated topic, and call a REST endpoint on the Cashback service. No data transformation is required. A relatively simple integration like this one is ideally suited to be expressed in YAML.

  • In a browser window, navigate to the browser tab pointing to the Dev Spaces workspace you opened earlier to inspect and deploy the Debezium connector. If you don’t have a browser tab open on the Dev Spaces workspace, refer to the instructions in the Deploy the Debezium Connector section.

  • The Camel K connector for the aggregated orders is defined in the workshop/module-cdc/order-connector/cashback-order-connector.yaml file.

    devspaces workspace order connector
  • Take note of the following elements:

    • from: Camel integrations are defined as routes, a set of processing steps that are applied to a message as it travels from a source to a destination. An integration contains 1 or more routes. A route typically starts with a from statement, which defines the source of the route.

    • from.uri: the source of the route, typically expressed as a URI. The scheme (kafka) defines which connector to use. The {{ }} placeholders refer to properties defined in a properties file.

    • steps: the different steps in the integration. In this simple integration, the body contents of the incoming message is logged, and a couple of headers are set on the message.

    • to: the destination of the integration. In this case a HTTP endpoint on the Cashback service is called. The headers set previously determine how to handle the HTTP call (POST with JSON payload)

    • traits: the comment lines at the top of the file provide additional configuration settings for the integration. Here we define a property file (cashback-order-connector.properties) which contain the properties for the integration, as well as a secret which contains the connection details for the Kafka broker.

  • The connector YAML file can be deployed as such to the OpenShift cluster using the kamel CLI. Under the hood the CLI will transform the YAML file into an Integration Custom Resource. When deployed to OpenShift, the Camel K operator processes the Integration Custom Resource and transforms the Integration into a running application.

    • Go into the terminal of the Dev Spaces workspace. If you don’t have an open terminal, you can open a new one by selecting the devspaces menu icon on the top of the left menu, and selecting Terminal/New Terminal from the drop-down menu.

    • In the terminal, issue the following command:

      kamel run -n globex-cdc-{user_name} workshop/module-cdc/order-connector/cashback-order-connector.yaml --trait container.limit-memory=250Mi
      Output
      Modeline options have been loaded from source files
      Full command: kamel run -n globex--{user_name} workshop/module-cdc/order-connector/cashback-order-connector.yaml --trait container.limit-memory=250Mi --property=file:workshop/module-cdc/order-connector/cashback-order-connector.properties --dependency=camel:http --config=secret:kafka-client-secret
      No IntegrationPlatform resource in globex-cdc--{user_name} namespace
      Integration "cashback-order-connector" created
    • The Camel K operator starts building the integration and packages it in a container image. The first time this can take quite a while during which nothing seems to happen.
      One way to check that the integration is actually being built is by checking its status with the oc command line tool.
      In the terminal in Dev Spaces, you can issue the following command:

      oc get integration -n globex-cdc-{user_name}
      Output
      NAME                       PHASE          KIT                        REPLICAS
      cashback-order-connector   Building Kit   kit-cglu6cgm540hobmmt1r0
    • After a while (this can take a couple of minutes), the build is finished, and the integration moves to running state:

      oc get integration -n globex-cdc-{user_name}
      Output
      NAME                       PHASE     KIT                        REPLICAS
      cashback-order-connector   Running   kit-cglu6cgm540hobmmt1r0   1
    • At this point, the integration is deployed. In the Topology view of the OpenShift console, select the the globex-cdc-{user_name} namespace. You should see the integration that was just deployed:

      openshift console topology integration
    • You can inspect the logs of the pod to check that the connector is working as expected. To do so, click on the center of the deployment in the Topology view, and in the pop-up pane on the right, click View logs.

      openshift console topology integration logs
    • This opens a window with the logs of the pod. You should see a log statement for every Kafka message that was processed by the connector.

      2023-04-04 08:48:22,325 INFO [cam.yaml:4] (Camel (camel-1) thread #1 - KafkaConsumer[globex.order-aggregated]) Order event received: {"orderId":93,"customer":"mhurst","date":"2023-04-04T08:37:11.430+0000","total":64.45}
      2023-04-04 08:48:22,417 INFO [cam.yaml:4] (Camel (camel-1) thread #1 - KafkaConsumer[globex.order-aggregated]) Order event received: {"orderId":94,"customer":"amurphy","date":"2023-04-04T08:37:11.436+0000","total":89.3}
      2023-04-04 08:48:22,422 INFO [cam.yaml:4] (Camel (camel-1) thread #1 - KafkaConsumer[globex.order-aggregated]) Order event received: {"orderId":95,"customer":"eburke","date":"2023-04-04T08:37:11.520+0000","total":61.75}
      2023-04-04 08:48:22,426 INFO [cam.yaml:4] (Camel (camel-1) thread #1 - KafkaConsumer[globex.order-aggregated]) Order event received: {"orderId":96,"customer":"fflores","date":"2023-04-04T08:37:11.615+0000","total":37.5}
      2023-04-04 08:48:22,429 INFO [cam.yaml:4] (Camel (camel-1) thread #1 - KafkaConsumer[globex.order-aggregated]) Order event received: {"orderId":97,"customer":"aoconnell2","date":"2023-04-04T08:37:11.621+0000","total":86.6}
      2023-04-04 08:48:22,518 INFO [cam.yaml:4] (Camel (camel-1) thread #1 - KafkaConsumer[globex.order-aggregated]) Order event received: {"orderId":98,"customer":"rkennedy","date":"2023-04-04T08:37:11.627+0000","total":149.0}
      2023-04-04 08:48:22,522 INFO [cam.yaml:4] (Camel (camel-1) thread #1 - KafkaConsumer[globex.order-aggregated]) Order event received: {"orderId":99,"customer":"onorris","date":"2023-04-04T08:37:11.633+0000","total":100.7}
      2023-04-04 08:48:22,526 INFO [cam.yaml:4] (Camel (camel-1) thread #1 - KafkaConsumer[globex.order-aggregated]) Order event received: {"orderId":100,"customer":"ejackson","date":"2023-04-04T08:37:11.717+0000","total":11.0}
      2023-04-04 08:48:22,530 INFO [cam.yaml:4] (Camel (camel-1) thread #1 - KafkaConsumer[globex.order-aggregated]) Order event received: {"orderId":101,"customer":"mmitchell","date":"2023-04-04T08:37:11.722+0000","total":140.8}

The second integration we need is slightly more complex: we need to consume the change events from the customer table from the Kafka topic, determine whether the change event corresponds to a create/read or update change, transform the data and finally call a REST endpoint (POST for create, PUT for update) on the Cashback service.
This time the integration logic is expressed in Groovy, a dynamic language for the Java virtual machine.

  • In a browser window, navigate to the browser tab pointing to the Dev Spaces workspace you opened earlier. If you don’t have a browser tab open on the Dev Spaces workspace, refer to the instructions in the Deploy the Debezium Connector section.

  • The Camel K integration for the customer change events is defined in the workshop/module-cdc/customer-connector/cashback-customer-connector.groovy file.

    devspaces workspace customer connector

    Reading through the code should give you an idea what the code actually does.
    In a nutshell, messages are consumed from the Kafka topic and marshalled into a JSON object. The payload is introspected using JSONPath to determine the nature of the change event, and set headers on the message accordingly. Finally the payload for the REST call is built and the REST endpoint called.

  • The deployment of the integration is very similar to what you did for the order integration.

    • Go into the terminal of the Dev Spaces workspace. If you don’t have an open terminal, you can open a new one by selecting the devspaces menu icon on the top of the left menu, and selecting Terminal/New Terminal from the drop-down menu.

    • In the terminal, issue the following command:

      kamel run -n globex-cdc-{user_name} workshop/module-cdc/customer-connector/cashback-customer-connector.groovy --trait container.limit-memory=512Mi
      Output
      Modeline options have been loaded from source files
      Full command: kamel run -n globex-cdc-{user_name} workshop/module-cdc/customer-connector/cashback-customer-connector.groovy --trait container.limit-memory=512Mi --dependency=camel:http --property=file:workshop/module-cdc/customer-connector/cashback-customer-connector.properties --config=secret:kafka-client-secret
      No IntegrationPlatform resource in globex-cdc-{user_name} namespace
      Integration "cashback-customer-connector" created
    • Follow the build process with the following command:

      oc get integration -n globex-cdc-{user_name}
      Output
      NAME                          PHASE          KIT                        REPLICAS
      cashback-customer-connector   Building Kit   kit-cgluf9om540hobmmt1rg
      cashback-order-connector      Running        kit-cglu6cgm540hobmmt1r0   1
    • The build process should be quite a lot faster than the the first one. After a while the integration proceeds to the running phase, and becomes visible in the Topology view of the OpenShift console:

      openshift console topology integration 2
    • Open the logs of the pod, by clicking on the deployment in the Topology view and selecting View logs from the popup pane on the right.
      You should see some log statements for every customer data change event processed by the connector.

      2023-04-04 09:03:30,628 INFO [route1] (Camel (camel-1) thread #1 - KafkaConsumer[globex.updates.public.customer]) Create customer arussell
      2023-04-04 09:03:30,629 INFO [route1] (Camel (camel-1) thread #1 - KafkaConsumer[globex.updates.public.customer]) Customer event received: {before=null, after={id=196, user_id=lsexton, first_name=Landon, last_name=Sexton, email=lsexton@firstsimple.com, phone=(302) 741-6817}, source={version=2.1.1.Final, connector=postgresql, name=globex.updates, ts_ms=1680596868520, snapshot=true, db=globex, sequence=[null,"24054160"], schema=public, table=customer, txId=1182, lsn=24054160, xmin=null}, op=r, ts_ms=1680596868929, transaction=null}
      2023-04-04 09:03:30,629 INFO [route1] (Camel (camel-1) thread #1 - KafkaConsumer[globex.updates.public.customer]) Create customer lsexton
      2023-04-04 09:03:30,631 INFO [route1] (Camel (camel-1) thread #1 - KafkaConsumer[globex.updates.public.customer]) Customer event received: {before=null, after={id=197, user_id=lortiz, first_name=Leila, last_name=Ortiz, email=lortiz@forfree.com, phone=(214) 450-3883}, source={version=2.1.1.Final, connector=postgresql, name=globex.updates, ts_ms=1680596868520, snapshot=true, db=globex, sequence=[null,"24054160"], schema=public, table=customer, txId=1182, lsn=24054160, xmin=null}, op=r, ts_ms=1680596868929, transaction=null}
      2023-04-04 09:03:30,631 INFO [route1] (Camel (camel-1) thread #1 - KafkaConsumer[globex.updates.public.customer]) Create customer lortiz
      2023-04-04 09:03:30,633 INFO [route1] (Camel (camel-1) thread #1 - KafkaConsumer[globex.updates.public.customer]) Customer event received: {before=null, after={id=198, user_id=arobinson, first_name=Arianna, last_name=Robinson, email=arobinson@firstsimple.com, phone=(458) 478-1118}, source={version=2.1.1.Final, connector=postgresql, name=globex.updates, ts_ms=1680596868520, snapshot=true, db=globex, sequence=[null,"24054160"], schema=public, table=customer, txId=1182, lsn=24054160, xmin=null}, op=r, ts_ms=1680596868929, transaction=null}
      2023-04-04 09:03:30,633 INFO [route1] (Camel (camel-1) thread #1 - KafkaConsumer[globex.updates.public.customer]) Create customer arobinson
      2023-04-04 09:03:30,634 INFO [route1] (Camel (camel-1) thread #1 - KafkaConsumer[globex.updates.public.customer]) Customer event received: {before=null, after={id=199, user_id=mperry, first_name=Maren, last_name=Perry, email=mperry@yihaa.com, phone=(916) 601-7486}, source={version=2.1.1.Final, connector=postgresql, name=globex.updates, ts_ms=1680596868520, snapshot=true, db=globex, sequence=[null,"24054160"], schema=public, table=customer, txId=1182, lsn=24054160, xmin=null}, op=r, ts_ms=1680596868929, transaction=null}
      2023-04-04 09:03:30,634 INFO [route1] (Camel (camel-1) thread #1 - KafkaConsumer[globex.updates.public.customer]) Create customer mperry
      2023-04-04 09:03:30,636 INFO [route1] (Camel (camel-1) thread #1 - KafkaConsumer[globex.updates.public.customer]) Customer event received: {before=null, after={id=200, user_id=mballard, first_name=Miguela, last_name=Ballard, email=mballard@random.com, phone=(484) 646-1017}, source={version=2.1.1.Final, connector=postgresql, name=globex.updates, ts_ms=1680596868520, snapshot=last_in_data_collection, db=globex, sequence=[null,"24054160"], schema=public, table=customer, txId=1182, lsn=24054160, xmin=null}, op=r, ts_ms=1680596868929, transaction=null}
      2023-04-04 09:03:30,636 INFO [route1] (Camel (camel-1) thread #1 - KafkaConsumer[globex.updates.public.customer]) Create customer mballard

7. End-to-end Scenario

With the Debezium connector and the two Camel K integrations deployed, you have all the pieces of the solution in place:

  • Data change events from the Globex web application are captured by Debezium and produced to Kafka topics.

  • A Kafka Streams application combines and aggregates the data change event streams for orders and line_item at real time to produce a new stream of aggregated order events.

  • Camel K integrations consume from Kafka topics and call REST endpoints on the Cashback service, to build a local view of customers and orders, and calculate the cashback amounts.

The cashback service has a rudimentary UI that allows to verify the generated cashbacks.

  • In the browser window, open the tab pointing to the OpenShift console. If you don’t have a tab open to the console, click to navigate to {openshift_cluster_console}[OpenShift console, window="console"]. If needed login with your username and password ({user_name}/{user_password}). Select the Topology view in the Developer perspective and make sure you are on the globex-cdc-{user_name} namespace.

  • In the Topology view, locate the Cashback service deployment, and click on the Open URL symbol next to it.

    openshift console topology cashback service
  • This opens a browser window with the cashback UI, which shows the list of customers together with their earned cashbacks.

    cashback service ui
  • You should see some customers with a cashback greater than $0. You might need to advance through several pages if you don’t see any customers with a cashback value grater than 0$. If you still don’t see any, please simulate some orders as detailed earlier in this chapter.
    Click on a cashback with value greater then $0. You should see the list of orders leading to the cashback.

    cashback service ui 2
  • At this point, you can demonstrate the end-to-end flow starting from creating an order in the Globex web application.

    • Create an order in the Globex application.

    • Verify in AMQ Streams console that the order and line items are picked up by the Debezium connector.

    • Still in AMQ Streams console, verify that an aggregated order event is created by the Kafka Streams application.

    • In the logs of the Camel K order connector, check that the aggregated order is sent to the Cashback service.

    • In the Cashback service UI, locate the customer you created the order for, and check that it appears in the Cashback list.

Congratulations

Congratulations! With this you have completed the Change Data Capture module! You successfully leveraged Change Data Capture to create change event streams, and consume these streams to power new services and functionality.

Please close all but the Workshop Deployer browser tab to avoid proliferation of browser tabs which can make working on other modules difficult.

Proceed to the Workshop Deployer to choose your next module.