Configure 3scale API Management to secure and manage Mobile Gateway API
The Mobile API has now been designed by API Designer, and is governed by Red Hat Service Registry.
Let us fast forward a bit in time, and the backend developers team has built the Mobile Gateway server-side code using Quarkus. This service has been pre-deployed under the module-apim-{user_name} namespace on OpenShift.
In this section you will manage and secure the Mobile Gateway API endpoints so that the Mobile App can access them securely. To create these API endpoints, and secure and manage them, we will need to configure them on 3scale API management.
1. Section Goals
-
Use Red Hat 3scale API Management to manage Mobile Gateway APIs
-
As a Mobile Developer, request API Access through the Developer Portal
2. Create Mobile Gateway Backend, Product and ActiveDoc on 3scale
To integrate and manage the Mobile Gateway API in 3scale API Management Platform, you will use the preinstalled 3scale Operator to create and manage the 3scale resources - Backend, Products and ActiveDocs - on OpenShift with Custom Resource Definitions (CRDs).
|
Backends are implementations of an API deployed in a host. One or more backends are bundled as a Product. The 3scale ActiveDoc is based on the Open API Specification (OAS) of the REST APIs. |
2.1. Create 3scale Backend for Mobile Gateway service
-
Navigate to OpenShift console {openshift_cluster_console}[OpenShift Console^, window="console"] and if needed login with ({user_name}/{user_password}).
-
From the the top right corner of the OpenShift console, click on the (+) button and then Import Yaml dropdown option

-
Paste the following YAML content in the Import YAML text area.
This YAML creates a 3scale Backend for the Mobile Gateway service that is running on OpenShift. The privateBaseURL in this YAML is the Service endpoint of Globex Mobile gateway service running on OpenShift. If interested, click to view the {openshift_cluster_console}/k8s/ns/globex-apim-{user_name}/services/globex-mobile-gateway[globex-mobile-gateway service URL^, window="_blank"]. The URL is diplayed under the Service routing section. apiVersion: capabilities.3scale.net/v1beta1 kind: Backend metadata: name: globex-mobile-gateway-backend namespace: globex-apim-{user_name} spec: name: "Globex Mobile Gateway Backend" systemName: "globex-mobile-gateway-backend" privateBaseURL: "http://globex-mobile-gateway.globex-apim-{user_name}.svc.cluster.local:8080" providerAccountRef: name: 3scale-tenant-secret metrics: hits: description: Number of API hits friendlyName: Hits unit: "hit" mappingRules: - httpMethod: GET pattern: "/" increment: 1 metricMethodRef: hits -
Click on the Create button.
The Backend will be created, and the details page displays the the Synced condition asTrue.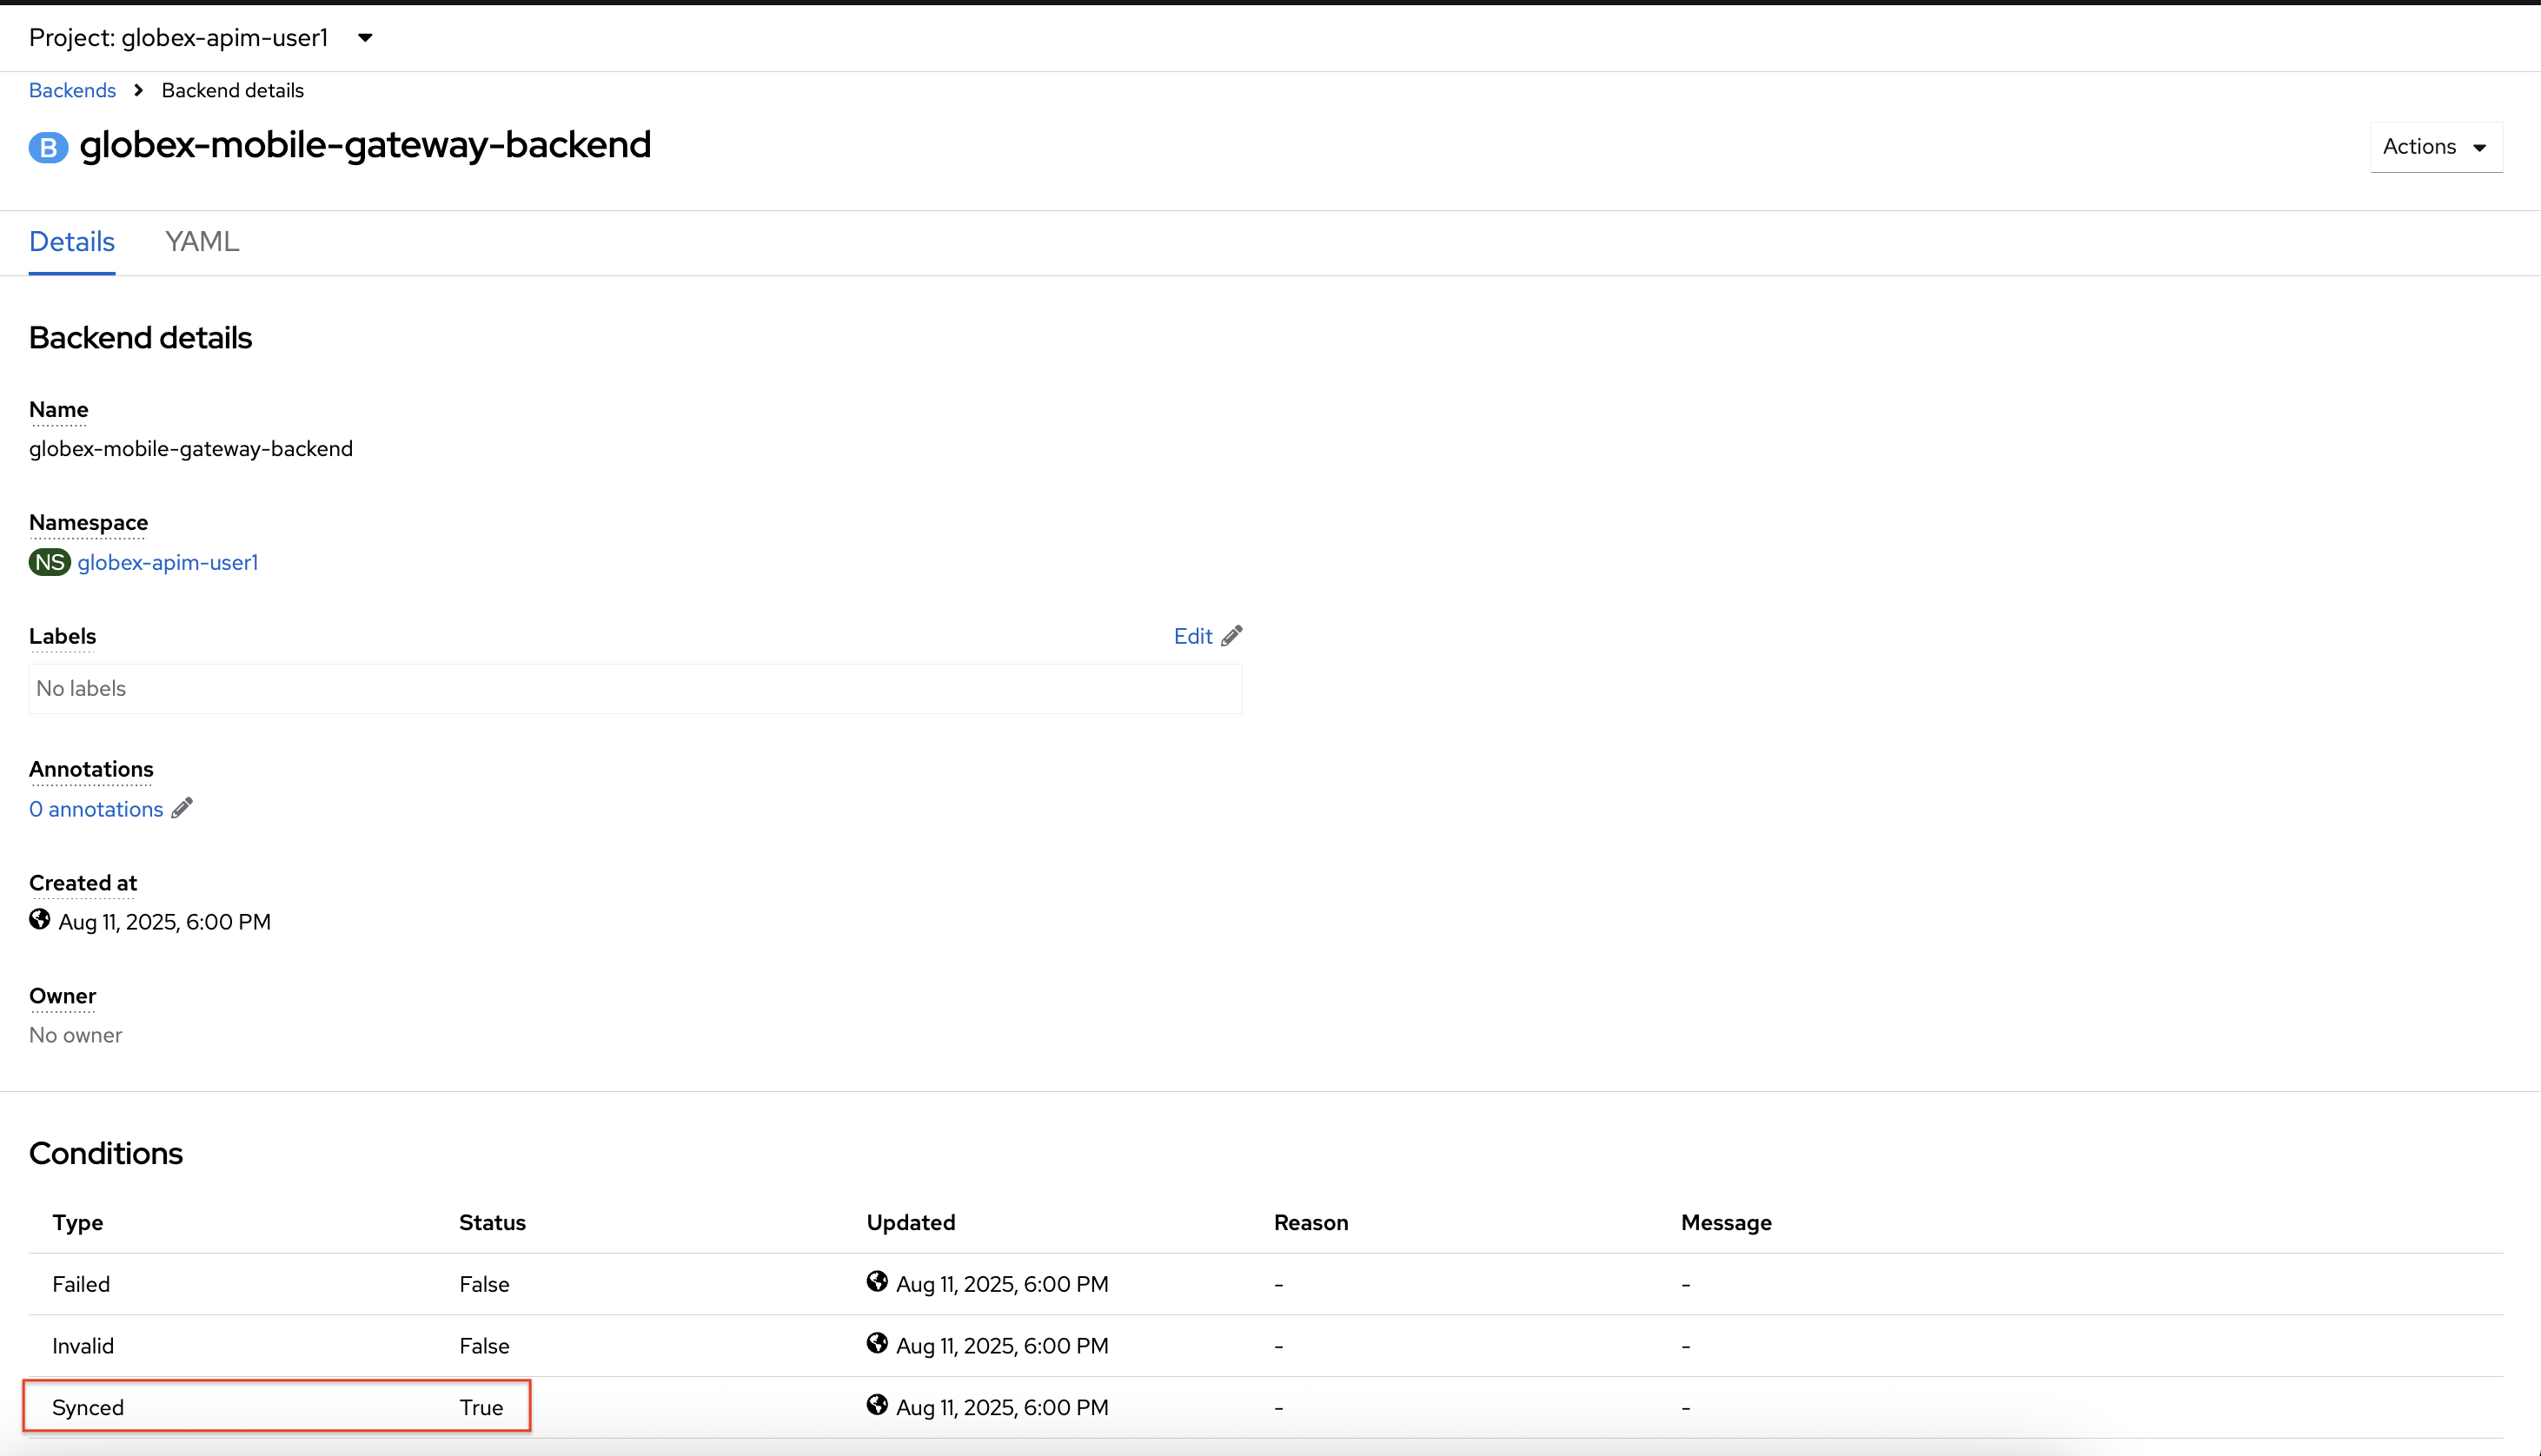
2.2. Create 3scale Product for MobileGateway API
-
From the OpenShift console, click on the (+) button and then Import Yaml dropdown option.
-
Paste the following YAML content in the Import YAML text area.
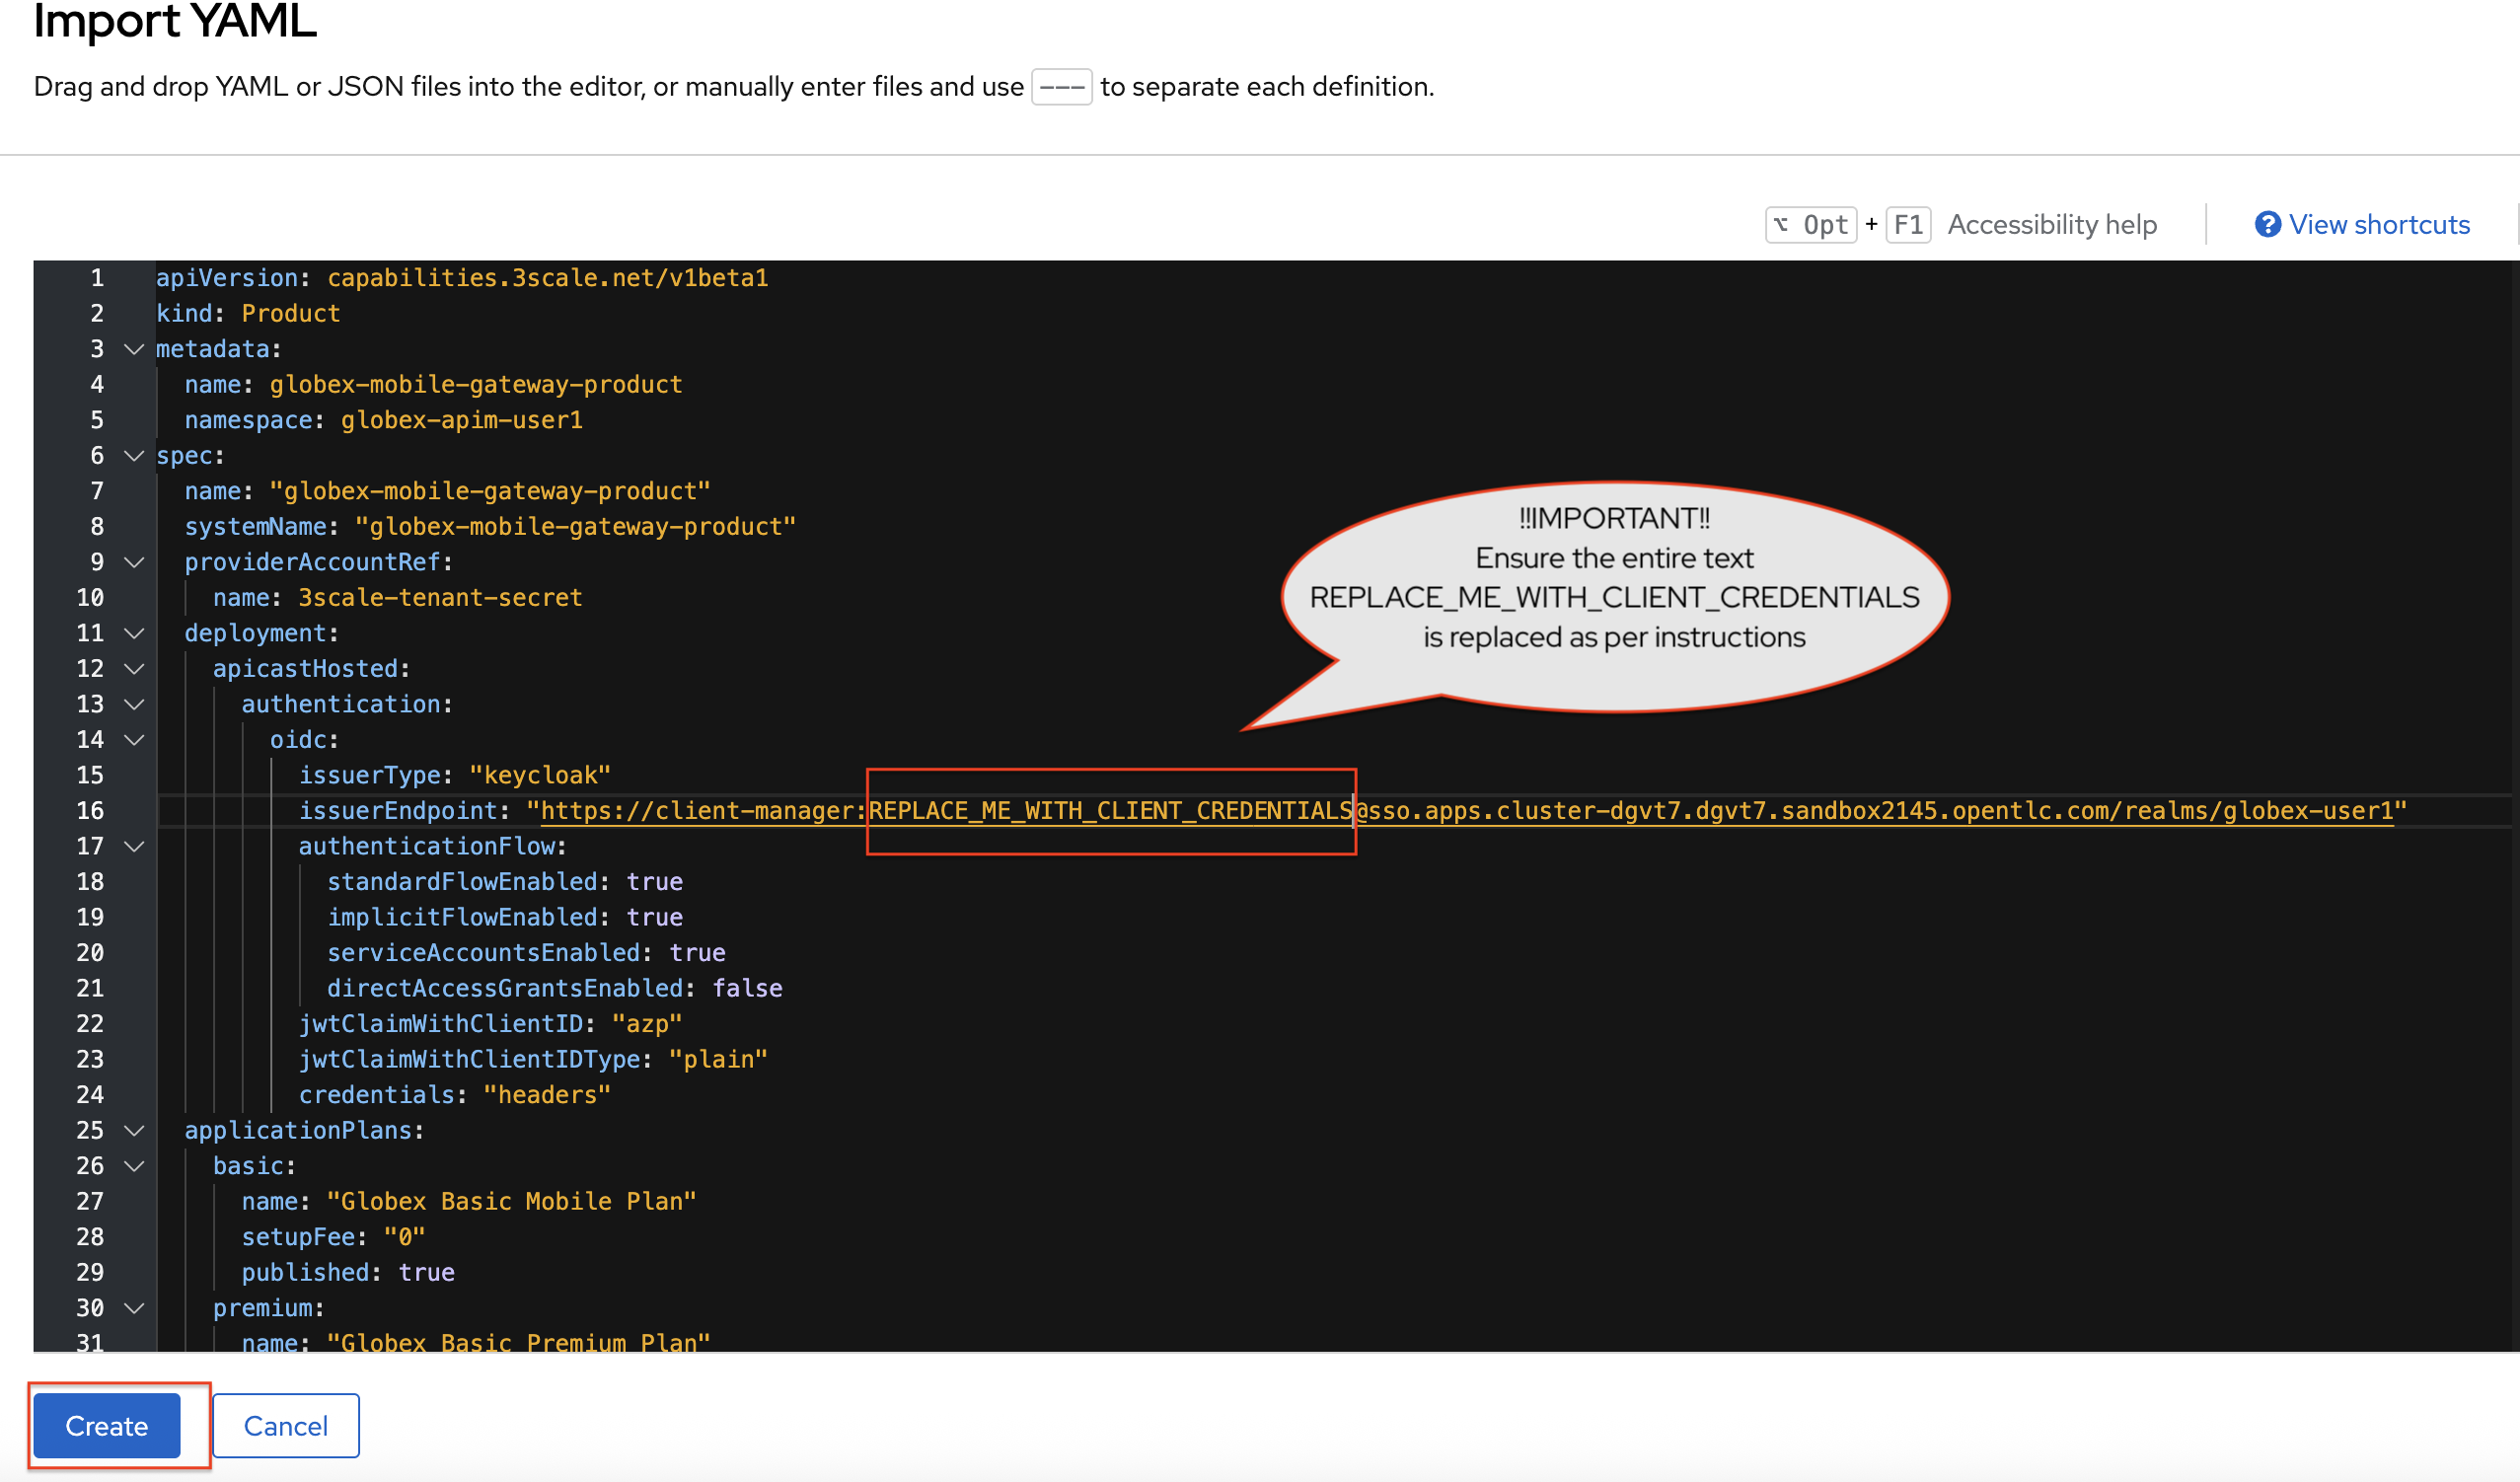
Do NOT click on the Create button yet, since the issuerEndpointvalue in the YAML needs to be replaced in the next step.The issuer endpoint contains the Keycloak OpenID Well-known Configuration , and the client credentials of the client-managerclient that you had created earlierapiVersion: capabilities.3scale.net/v1beta1 kind: Product metadata: name: globex-mobile-gateway-product namespace: globex-apim-{user_name} spec: name: "globex-mobile-gateway-product" systemName: "globex-mobile-gateway-product" providerAccountRef: name: 3scale-tenant-secret deployment: apicastHosted: authentication: oidc: issuerType: "keycloak" issuerEndpoint: "https://client-manager:REPLACE_ME_WITH_CLIENT_CREDENTIALS@sso.{openshift_subdomain}/realms/globex-{user_name}" authenticationFlow: standardFlowEnabled: true implicitFlowEnabled: true serviceAccountsEnabled: true directAccessGrantsEnabled: false jwtClaimWithClientID: "azp" jwtClaimWithClientIDType: "plain" credentials: "headers" applicationPlans: basic: name: "Globex Basic Mobile Plan" setupFee: "0" published: true premium: name: "Globex Basic Premium Plan" setupFee: "100" published: true backendUsages: globex-mobile-gateway-backend: path: / -
Replace the text
REPLACE_ME_WITH_CLIENT_CREDENTIALSin the YAML you just pasted with the Client Credentials of the client-manager client you created in Keycloak in the previous section.Don’t have it handy? No worries.
Navigate to the {sso_tenant_console}/#/globex-{user_name}/clients[Keycloak Clients List^, window="sso"]. Login if needed with ({user_name}/{user_password}). Click on the Client ID client-manager, and copy the credentials from the Credentials tab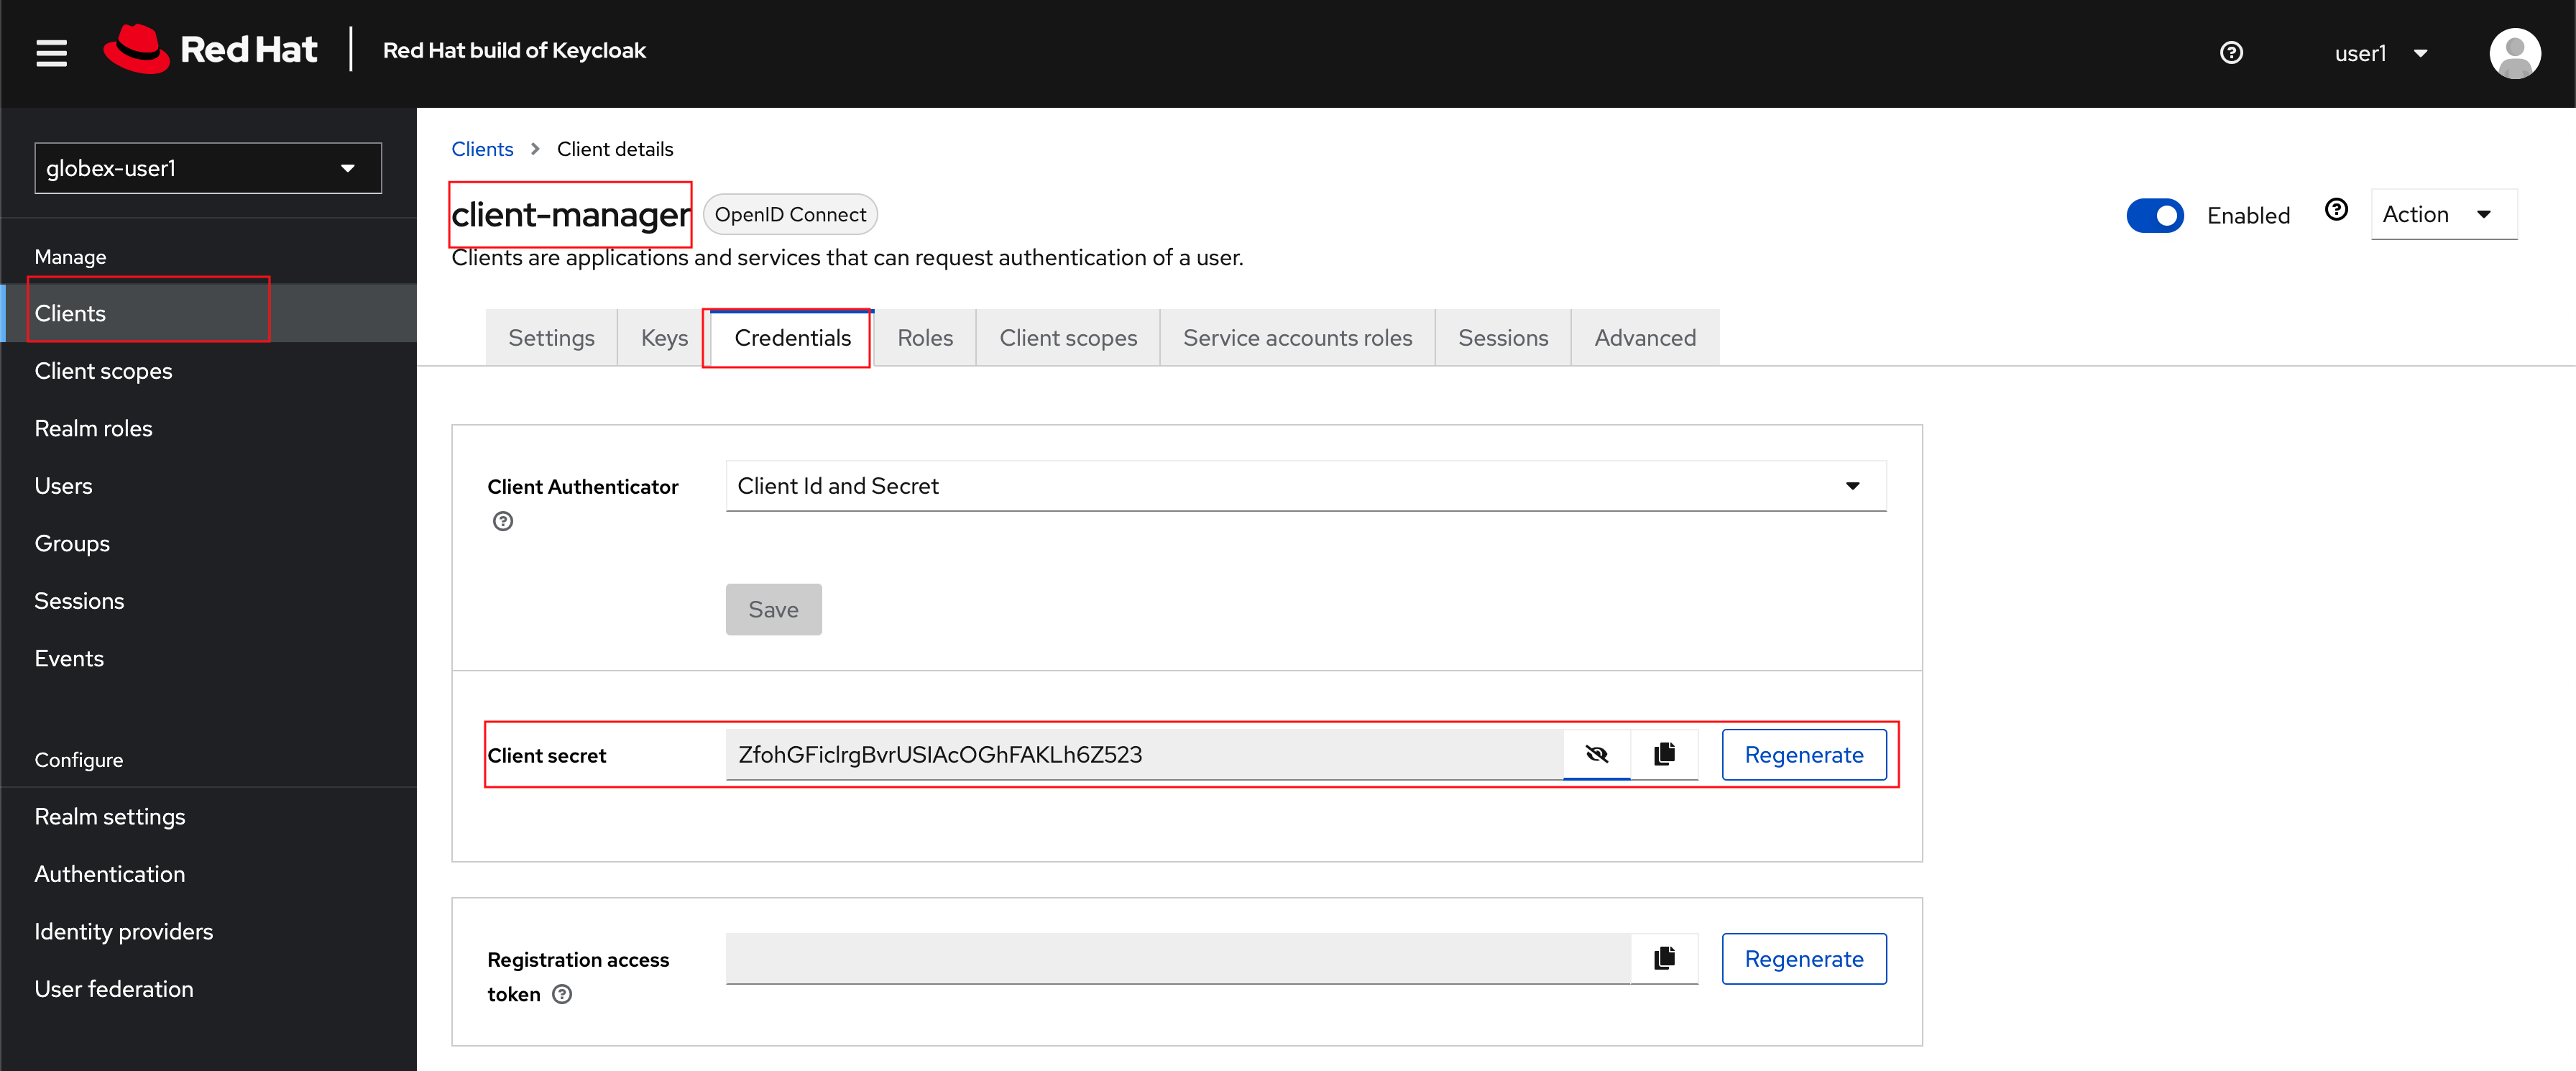
-
Click on the Create button now.
The 3scale Product will be created, and the details page displays the the Synced condition asTrue.
2.3. Create Active Doc for Mobile Gateway
-
From the OpenShift console, click on the (+) button and then Import Yaml dropdown option.
-
Paste the following YAML content in the Import YAML text area.
kind: ActiveDoc
apiVersion: capabilities.3scale.net/v1beta1
metadata:
  name: mobile-gateway-activedoc
  namespace: globex-apim-{user_name}
spec:
  activeDocOpenAPIRef:
    url: "https://service-registry-app-{user_name}.{openshift_subdomain}/apis/registry/v2/groups/globex/artifacts/mobileapi"
  published: true
  name: mobile-gateway-activedoc
  providerAccountRef:
    name: 3scale-tenant-secret
  productSystemName: globex-mobile-gateway-product
The activeDocOpenAPIRef.urlis of the OpenAPI spec that you setup on Service Registry. -
Click on the Create button.
The ActiveDoc will be created, and the details page will diplay the the Ready condition asTrue.
3. Setup Mobile users
The Globex mobile application developers will need access to the Developer Portal to signup for the APIs exposed to them. Typically they would access the developer portal and signup for an account which may as needed go through an approval process. For the purpose of this workshop we will use the inbuilt developer user John.
4. View the newly created Backend, Product and ActiveDoc
-
Navigate to the {3scale_tenant}[3scale admin portal^, window="3scale"] and login as {user_name}/{user_password}.
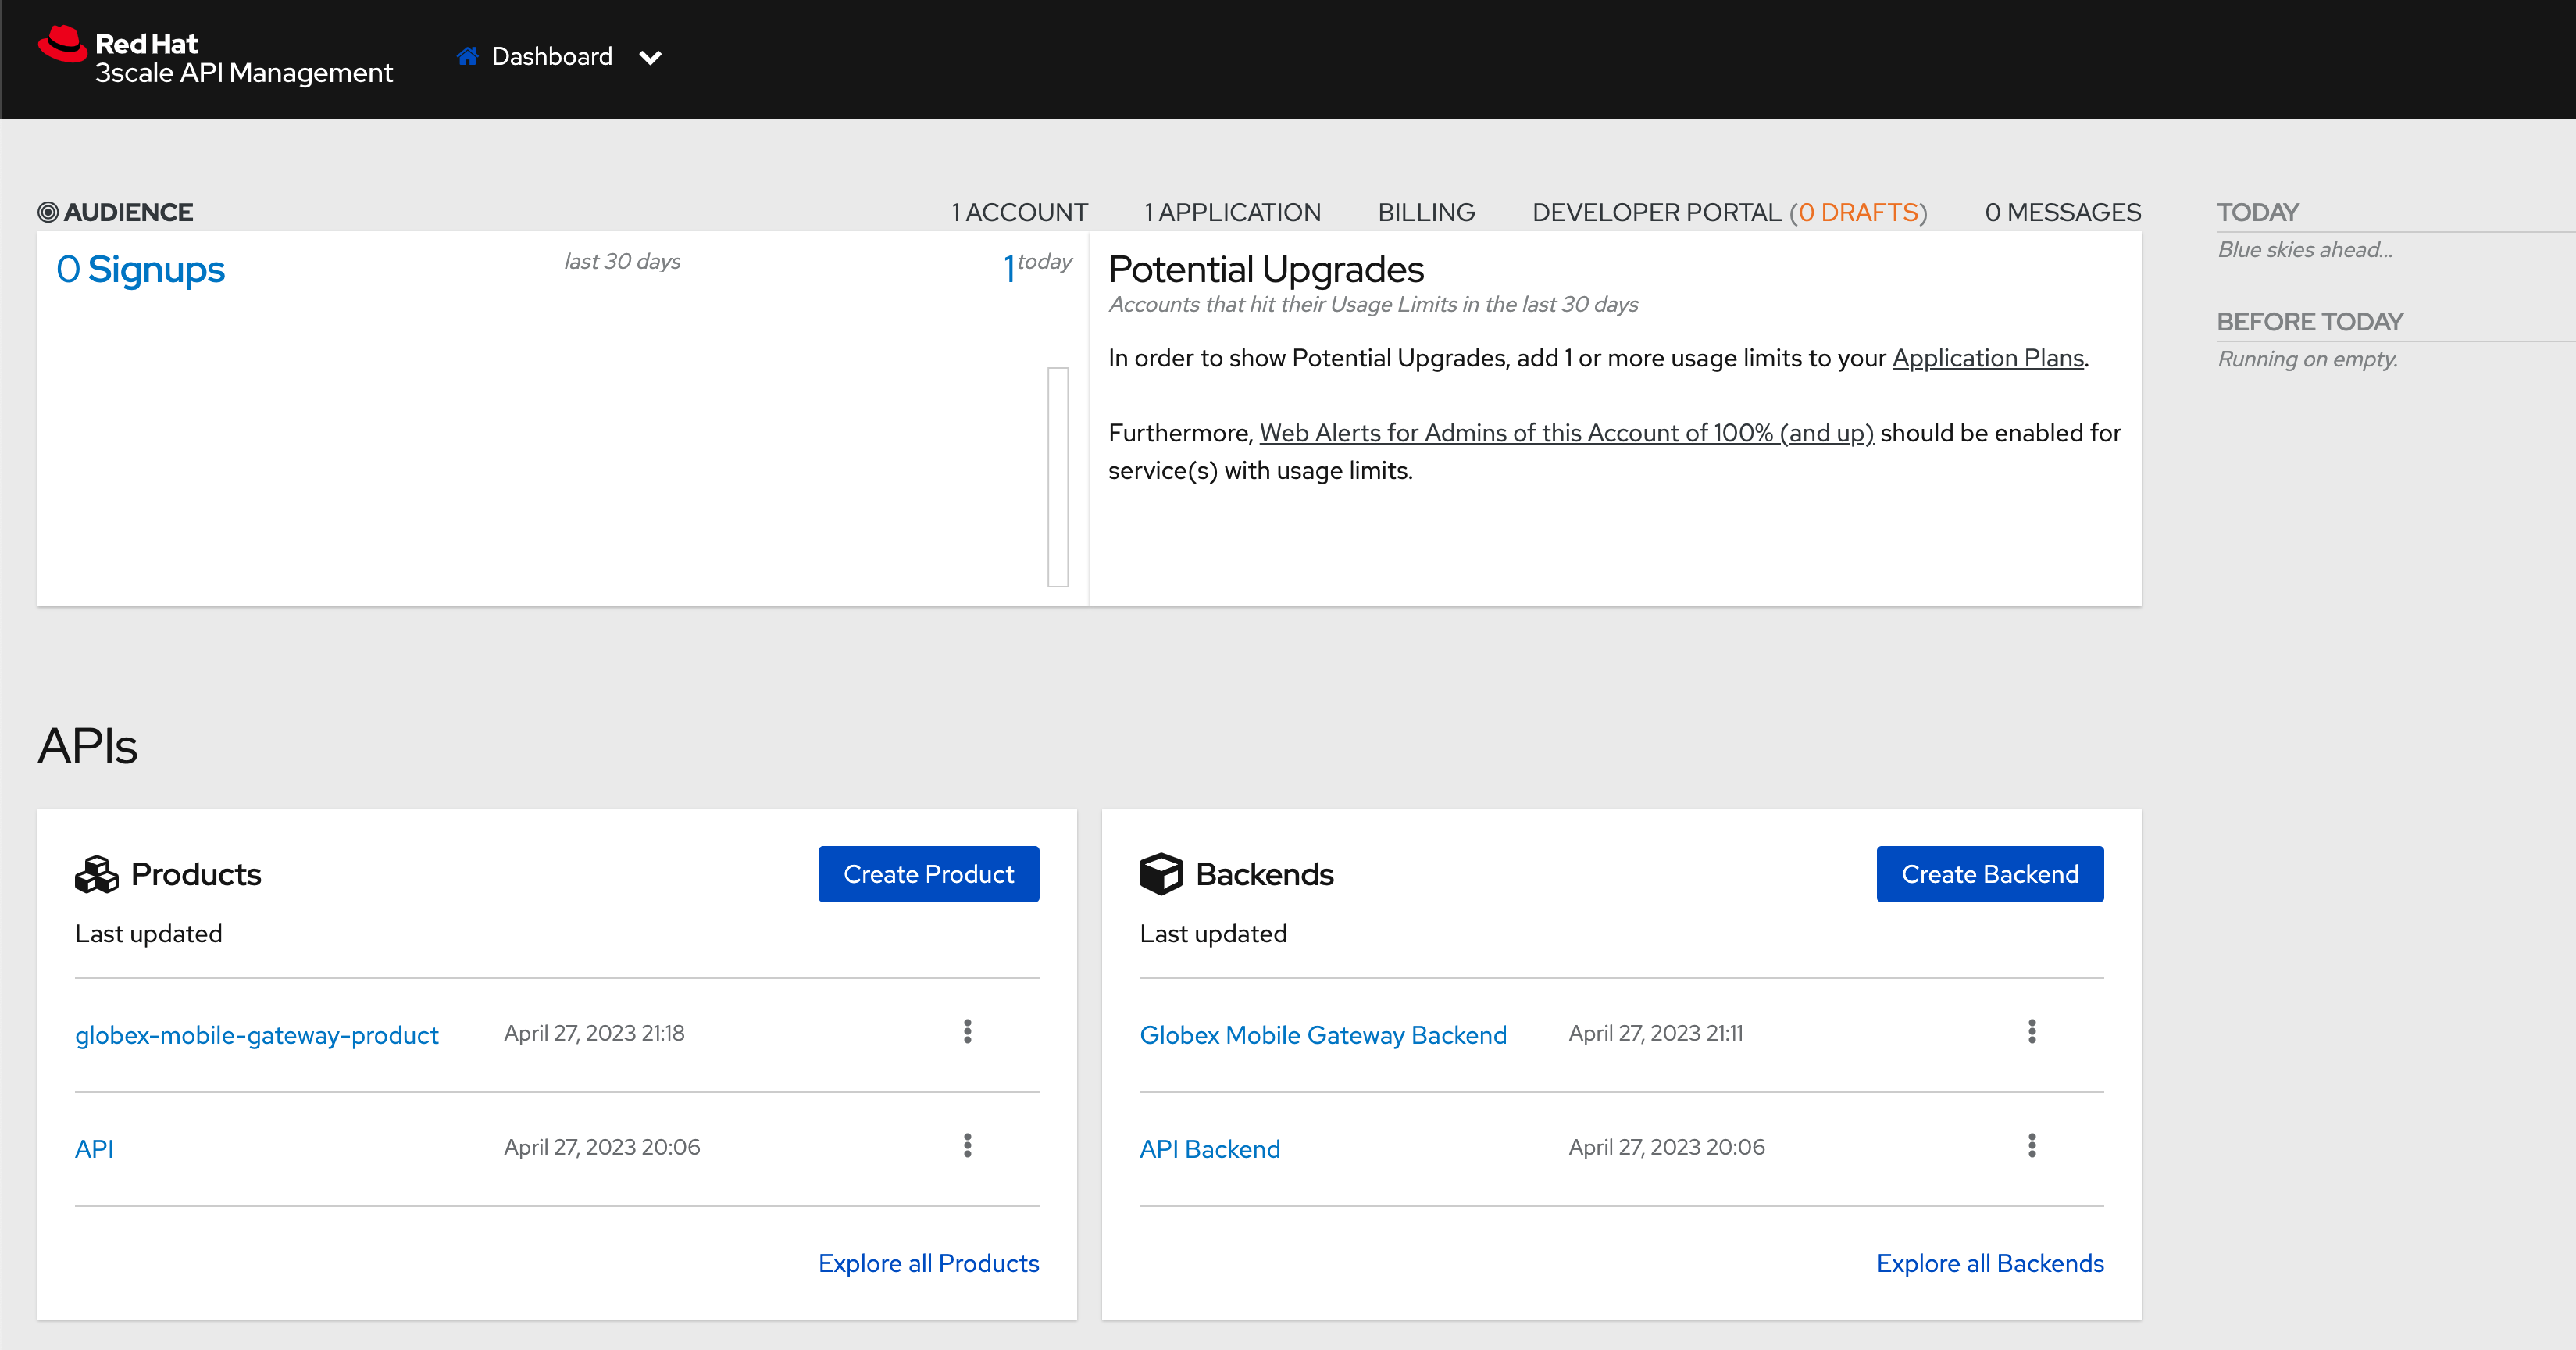 Figure 1. Launch 3scale
 -
You will notice that the Mobile Product and Backend have been created.
-
Click on globex-mobile-gateway-product under APIs → Products section.
-
You are presented with the Product overview page for the Mobile API Product you created. Note the following elements
-
Published Application Plans
Application Plans define the different sets of access rights you might want to allow for consumers of your API. These can determine anything from rate limits, which methods or resources are accessible and which features are enabled
-
Backend that has been attached to the Mobile Gateway Product
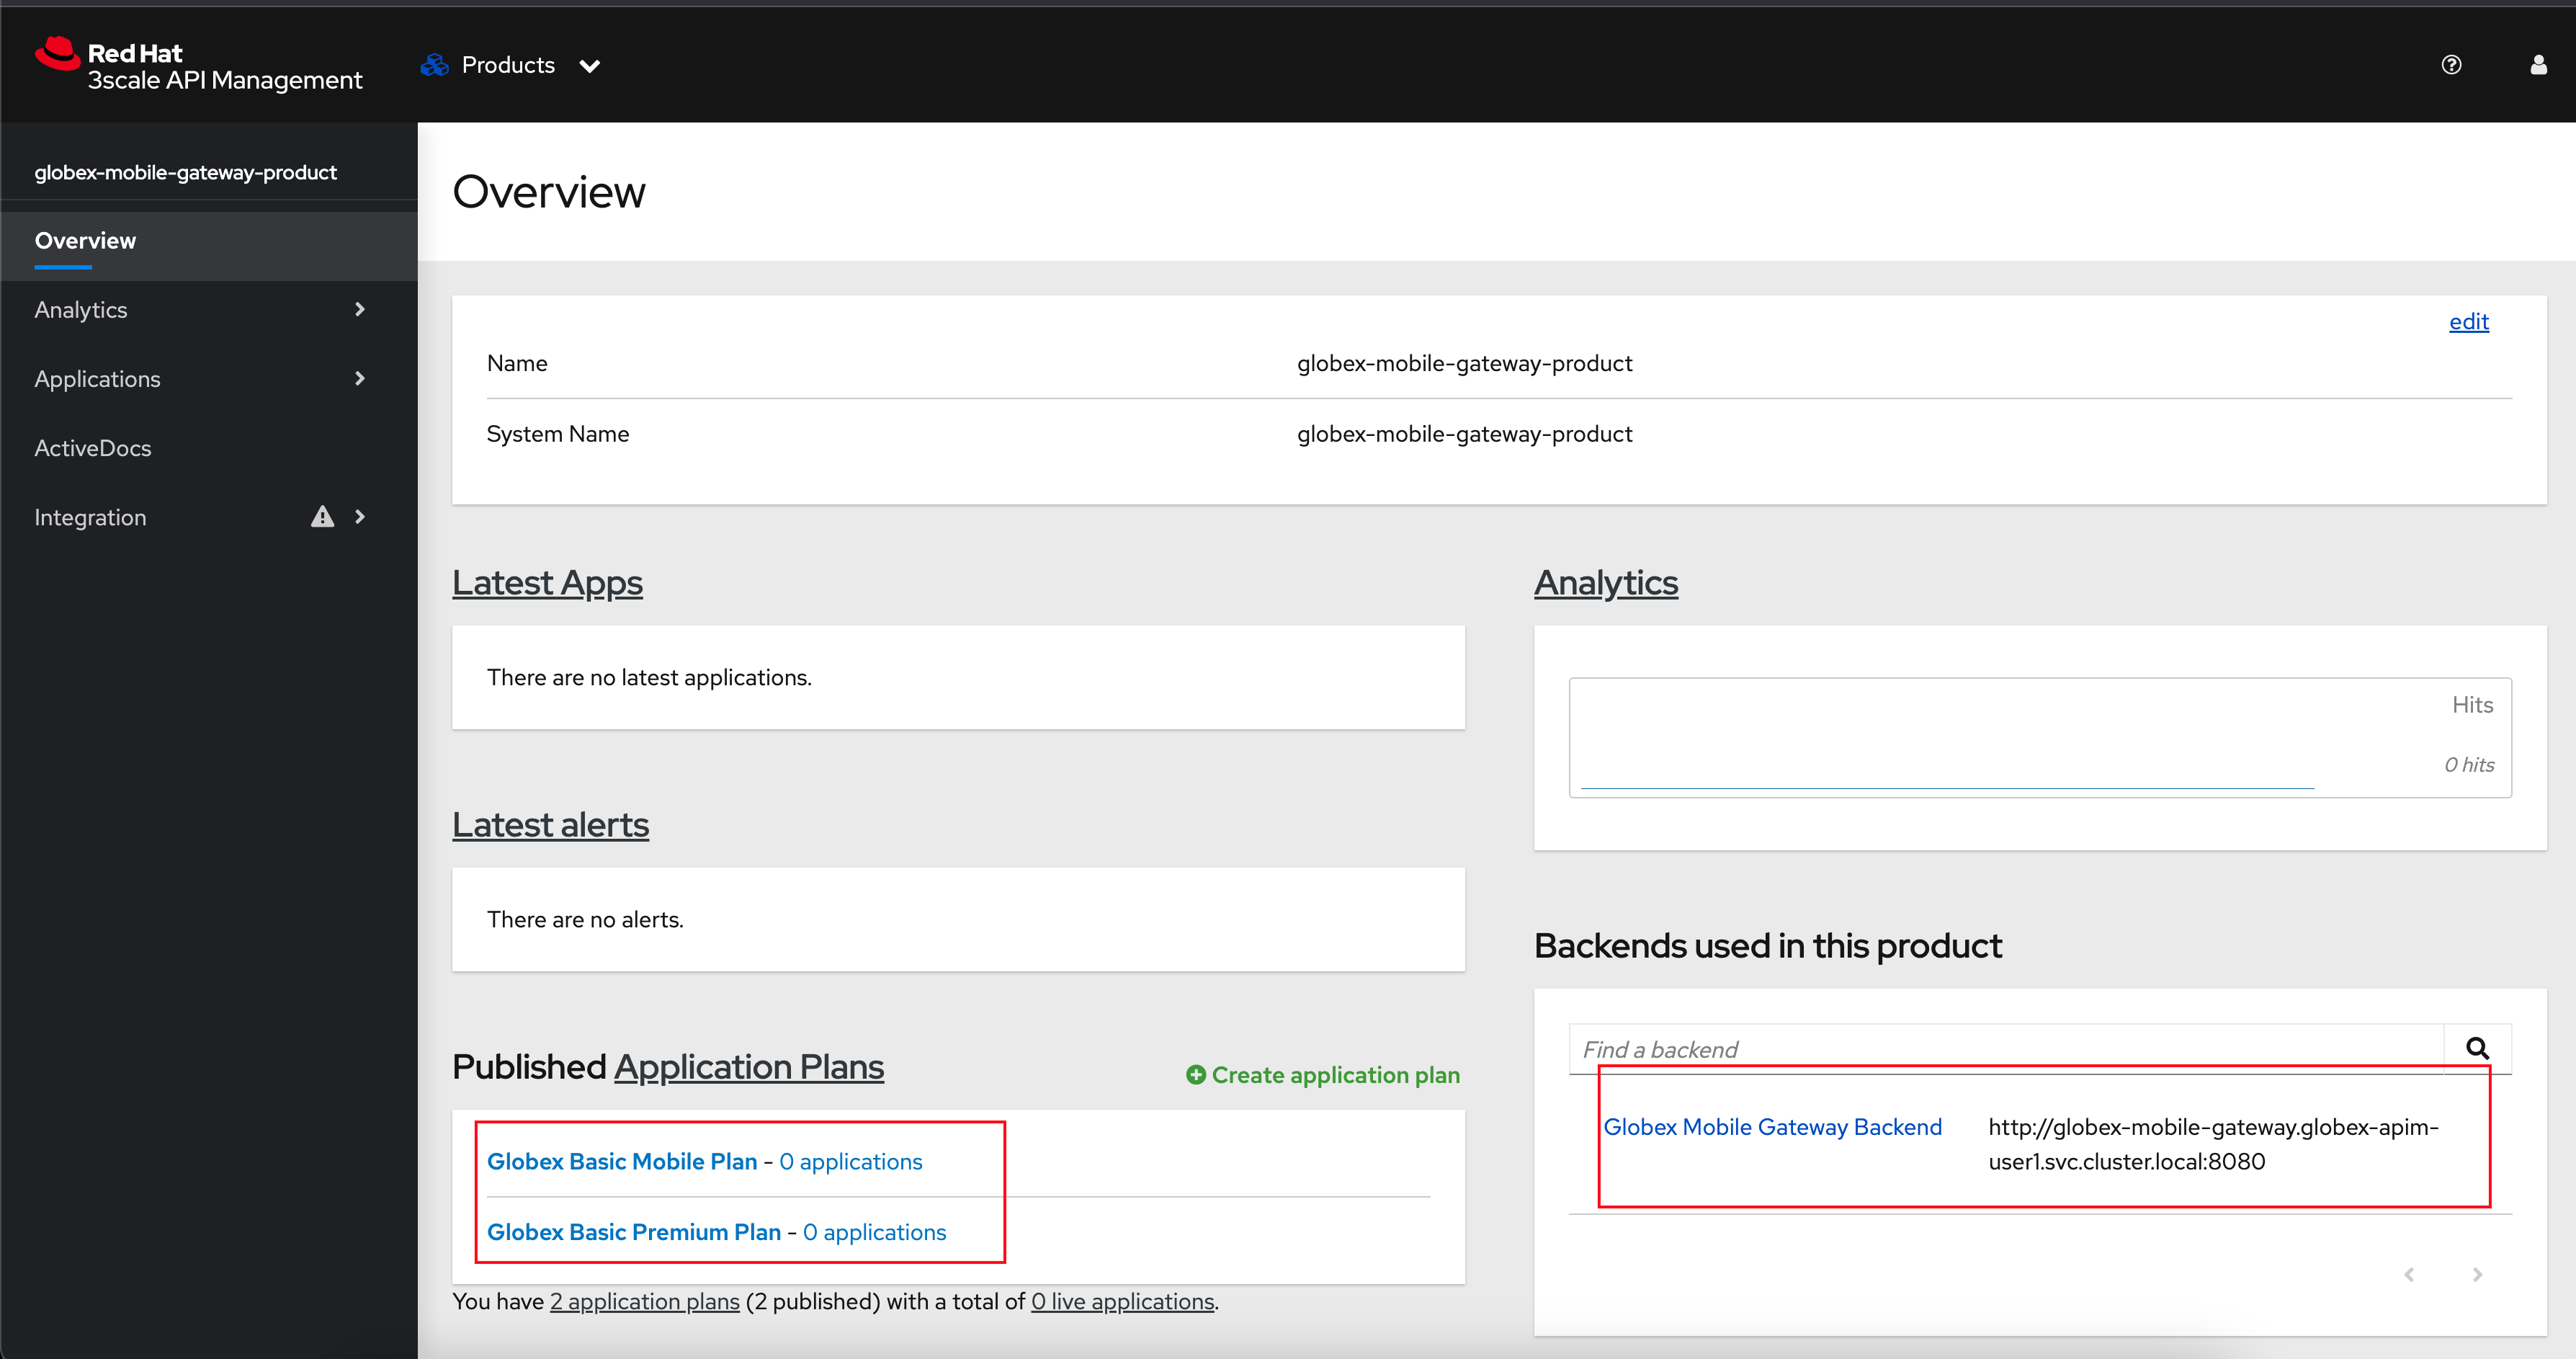 Figure 2. Mobile Gateway Product: Overview
-
-
Navigate to Integration → Settings page from the Product overview page. You will notice that the Product has been setup with
-
OpenID Connect as Authentication mechanism
-
client_manager client details that you had created in the previous steps.
-
OIDC Authorization Flow includes Implicit Flow because we would be authenticating the users single-sign-on as well access to the backend services
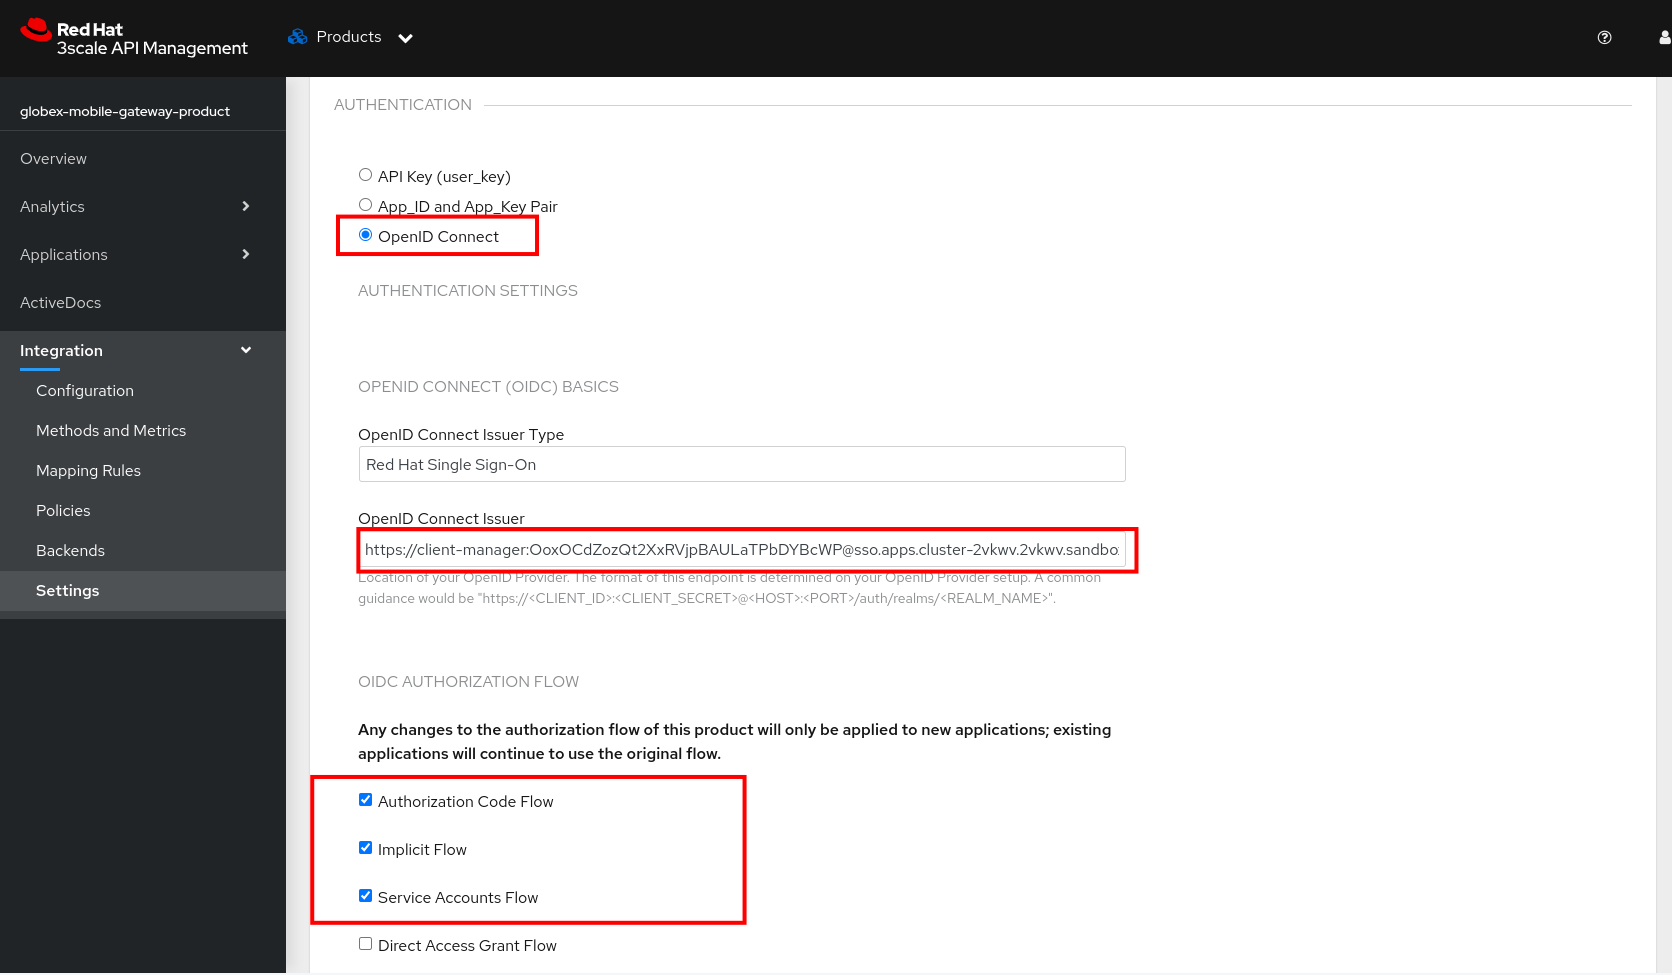 Figure 3. Mobile Gateway Product: Settings
-
-
The ActiveDoc is visible from the 3scale portal as well under Products. Click on the ActiveDoc to preview the OpenAPI specifications.
 Figure 4. Mobile Gateway Product: ActiveDoc
 -
Navigate to Integration → Configuration and click on the Promote to v.x Staging APIcast and then Promote to v.x Production APIcast to promote all the config changes
APIcast is an NGINX based API gateway used to integrate internal and external API services with the 3scale. APIcast can be hosted or self-managed. In this workshop we use the default self-managedoption. Figure 5. Promote Staging and Production APIcast
5. Setup Globex Developer Portal
A good developer portal is a must have to assure adoption of your API. In this section we will setup the Dev Portal so that it is ready to be used by Mobile Developers.
-
Navigate to 3scale’s Audience → Developer Portal → Settings by clicking on {3scale_tenant}/site/dns[Settings → Domains & Access section^, window="3scale"]
The Developer Portal Access Code hides the site from the world till you are ready. -
Remove the value in the textfield below the label Developer Portal Access Code as shown below. Click on the Update Account button. This opens up the Developer Portal to public access without the need for an Access Code.
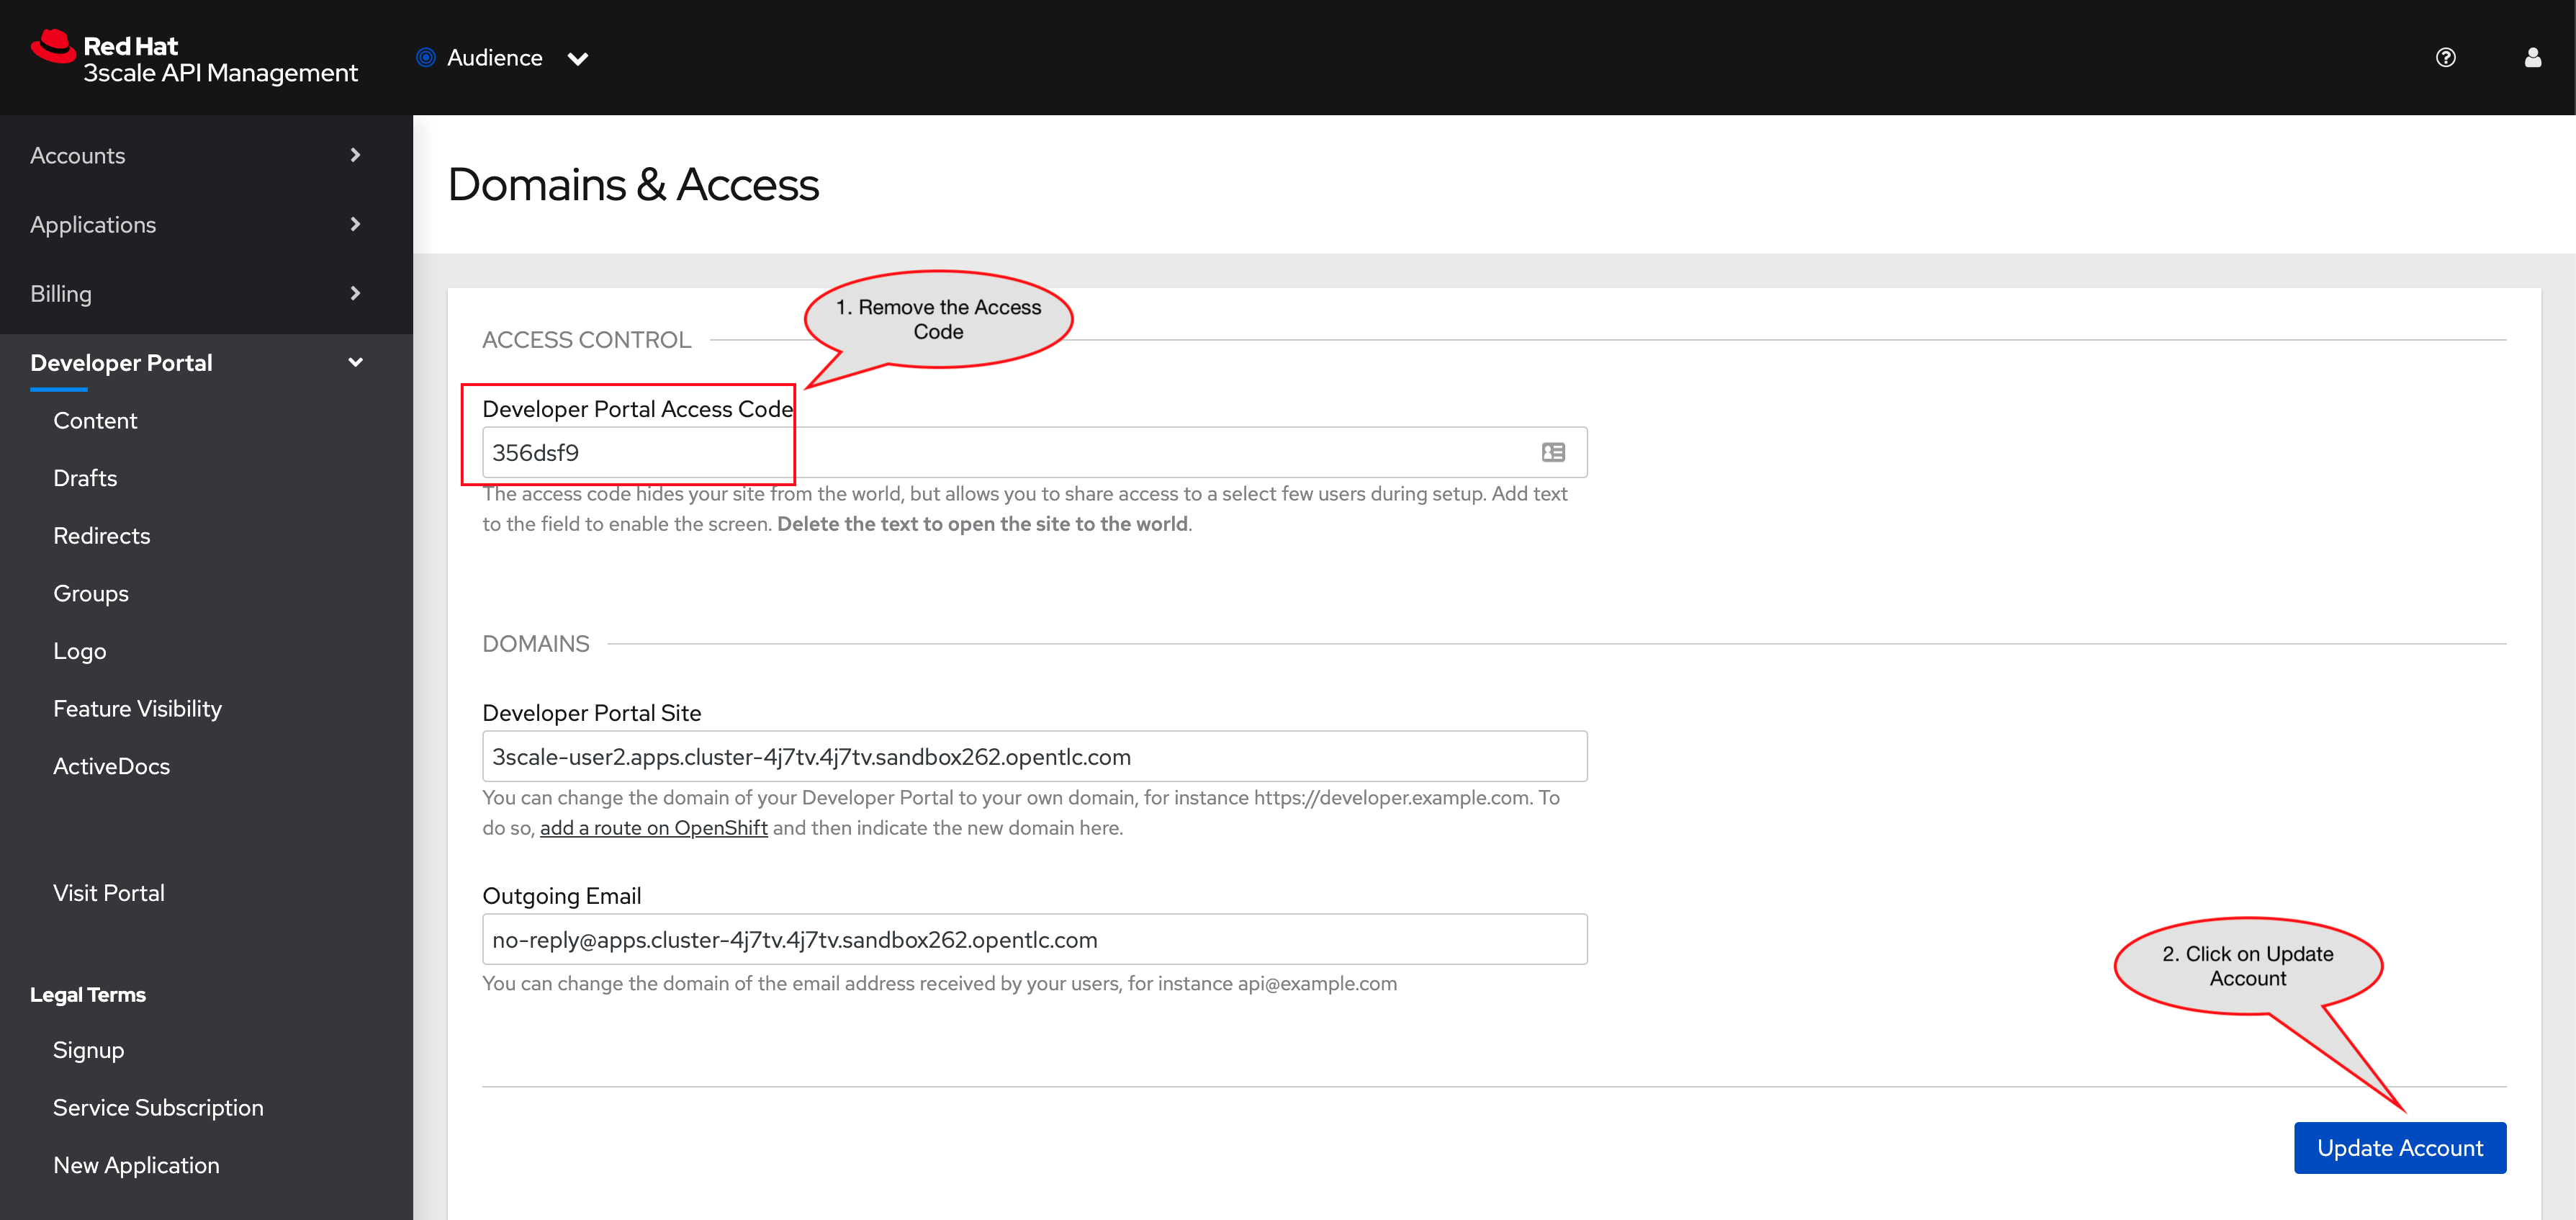 Figure 6. Remove Developer Portal Access Code
 -
The next step is to allow a Developer to access Multiple APIs (Services) and signup for Multiple Applications
-
Navigate to {3scale_tenant}/p/admin/cms/switches[Developer Portal → Feature Visibility section, window="3scale"]
-
Click on the Show button against the features Multiple Services and Multiple Applications. The changes are auto-saved.
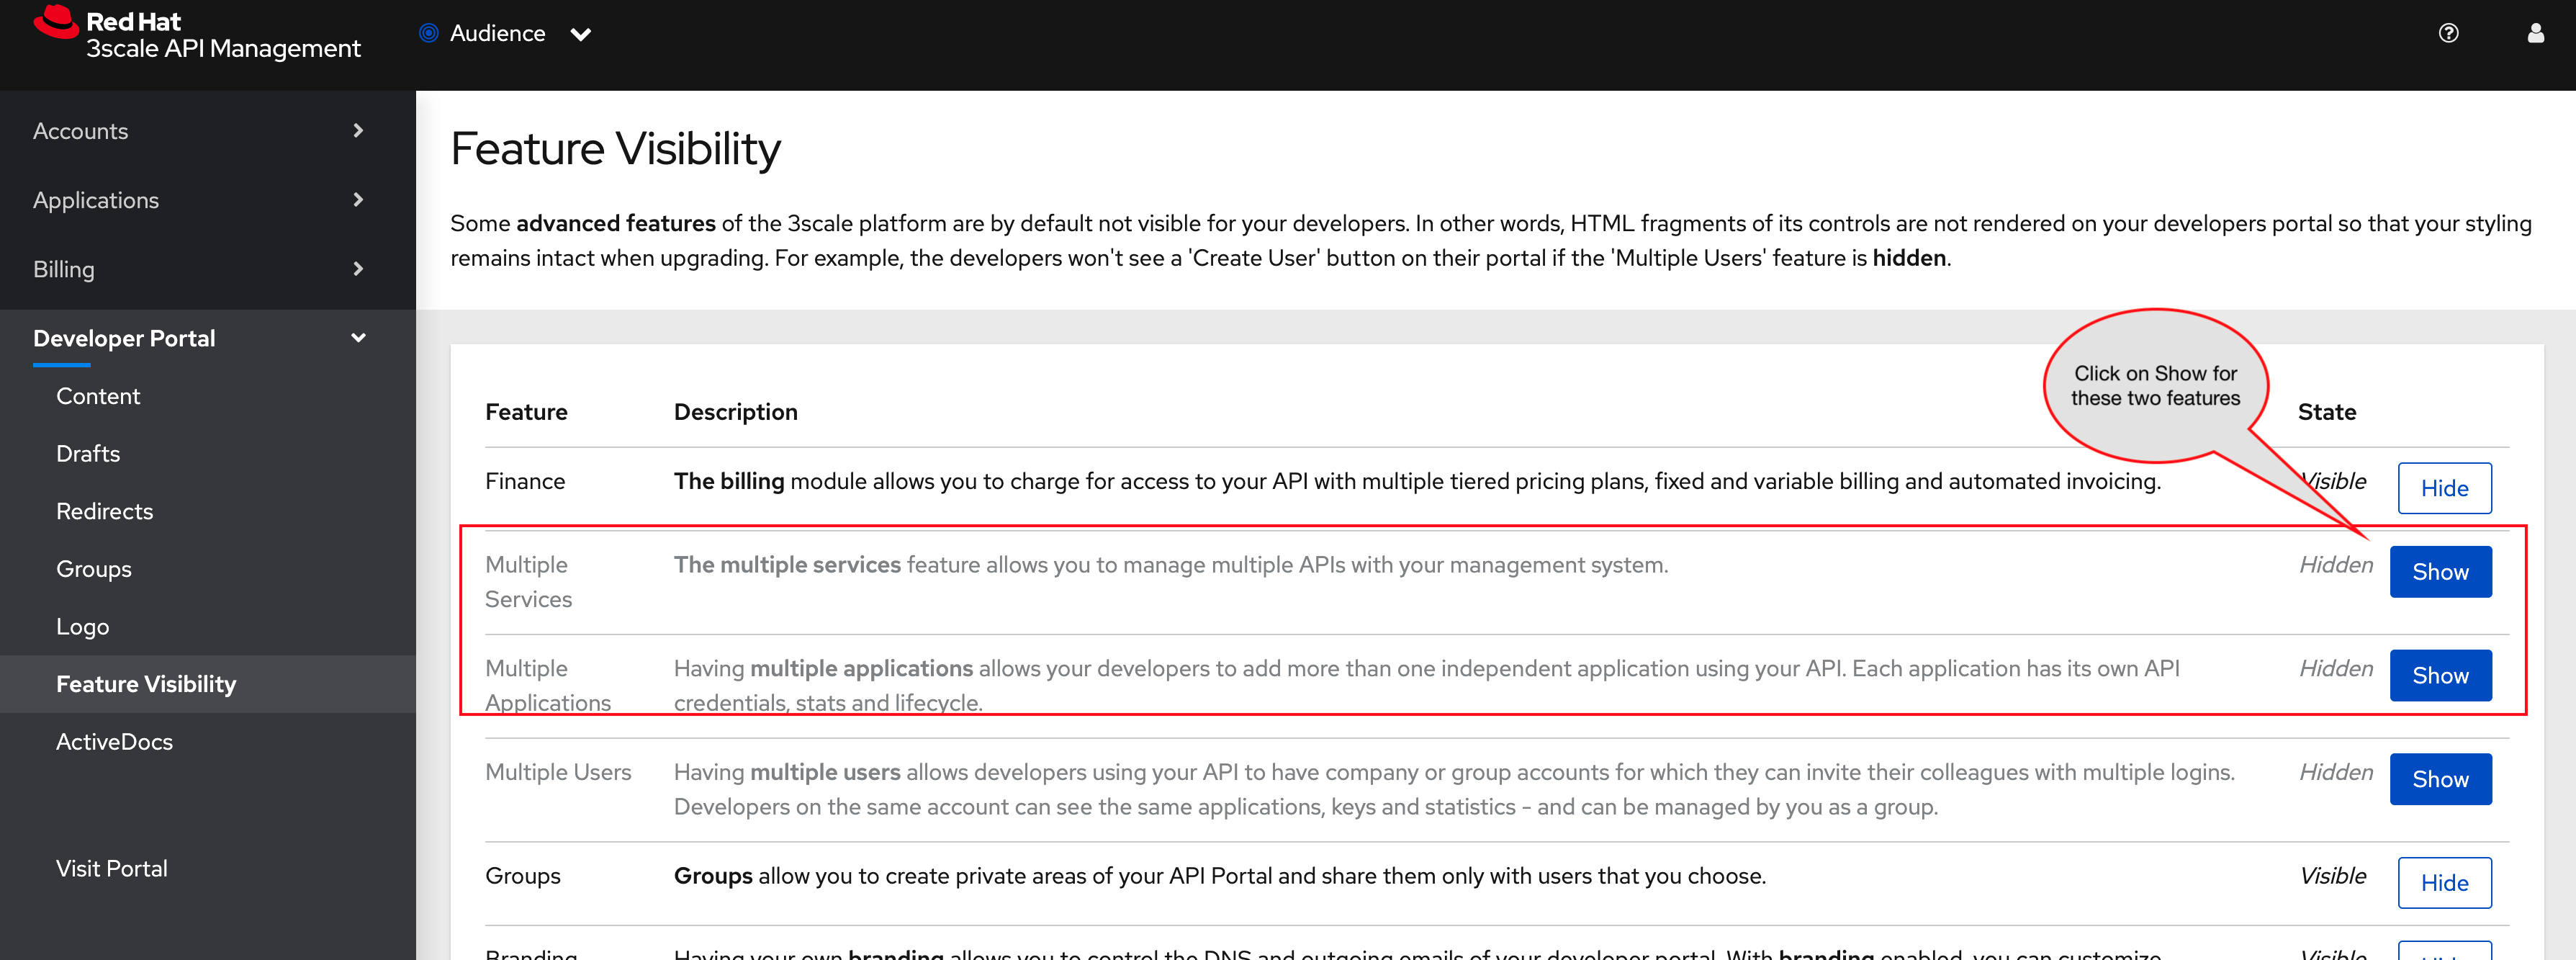 Figure 7. Feature Visibility section
 -
After updating the settings, this page should be seen as per the screenshot below.
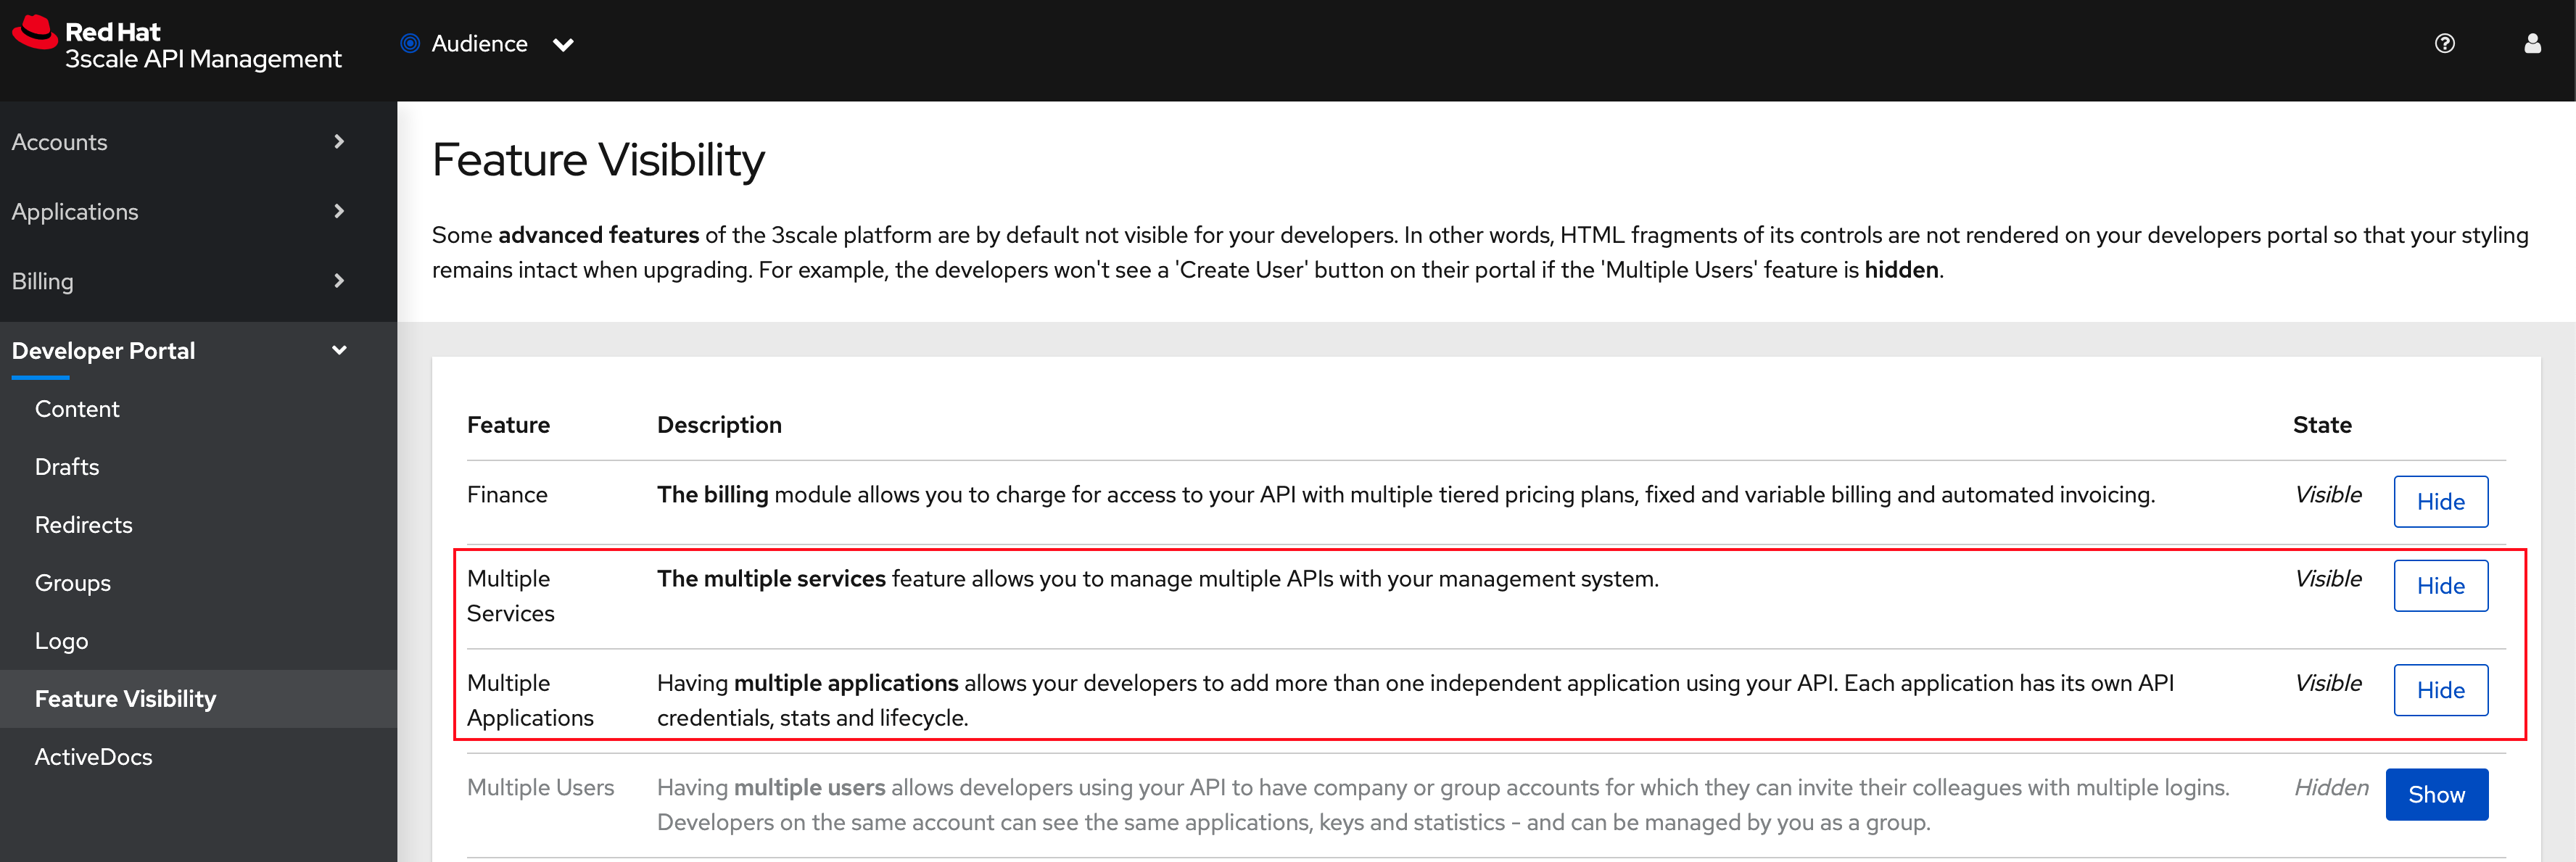 Figure 8. Feature Visibility settings altered
 -
The Globex Developer Portal is fully setup now for Mobile developers to signup.
6. Sign up as a Mobile Developer
In this section you will login as a Mobile Developer (with the built-in user as described earlier), and signup for API access
-
Launch the Globex Developer Portal by clicking on {globex_developer_portal}[Developer Portal^, window="devportal"]
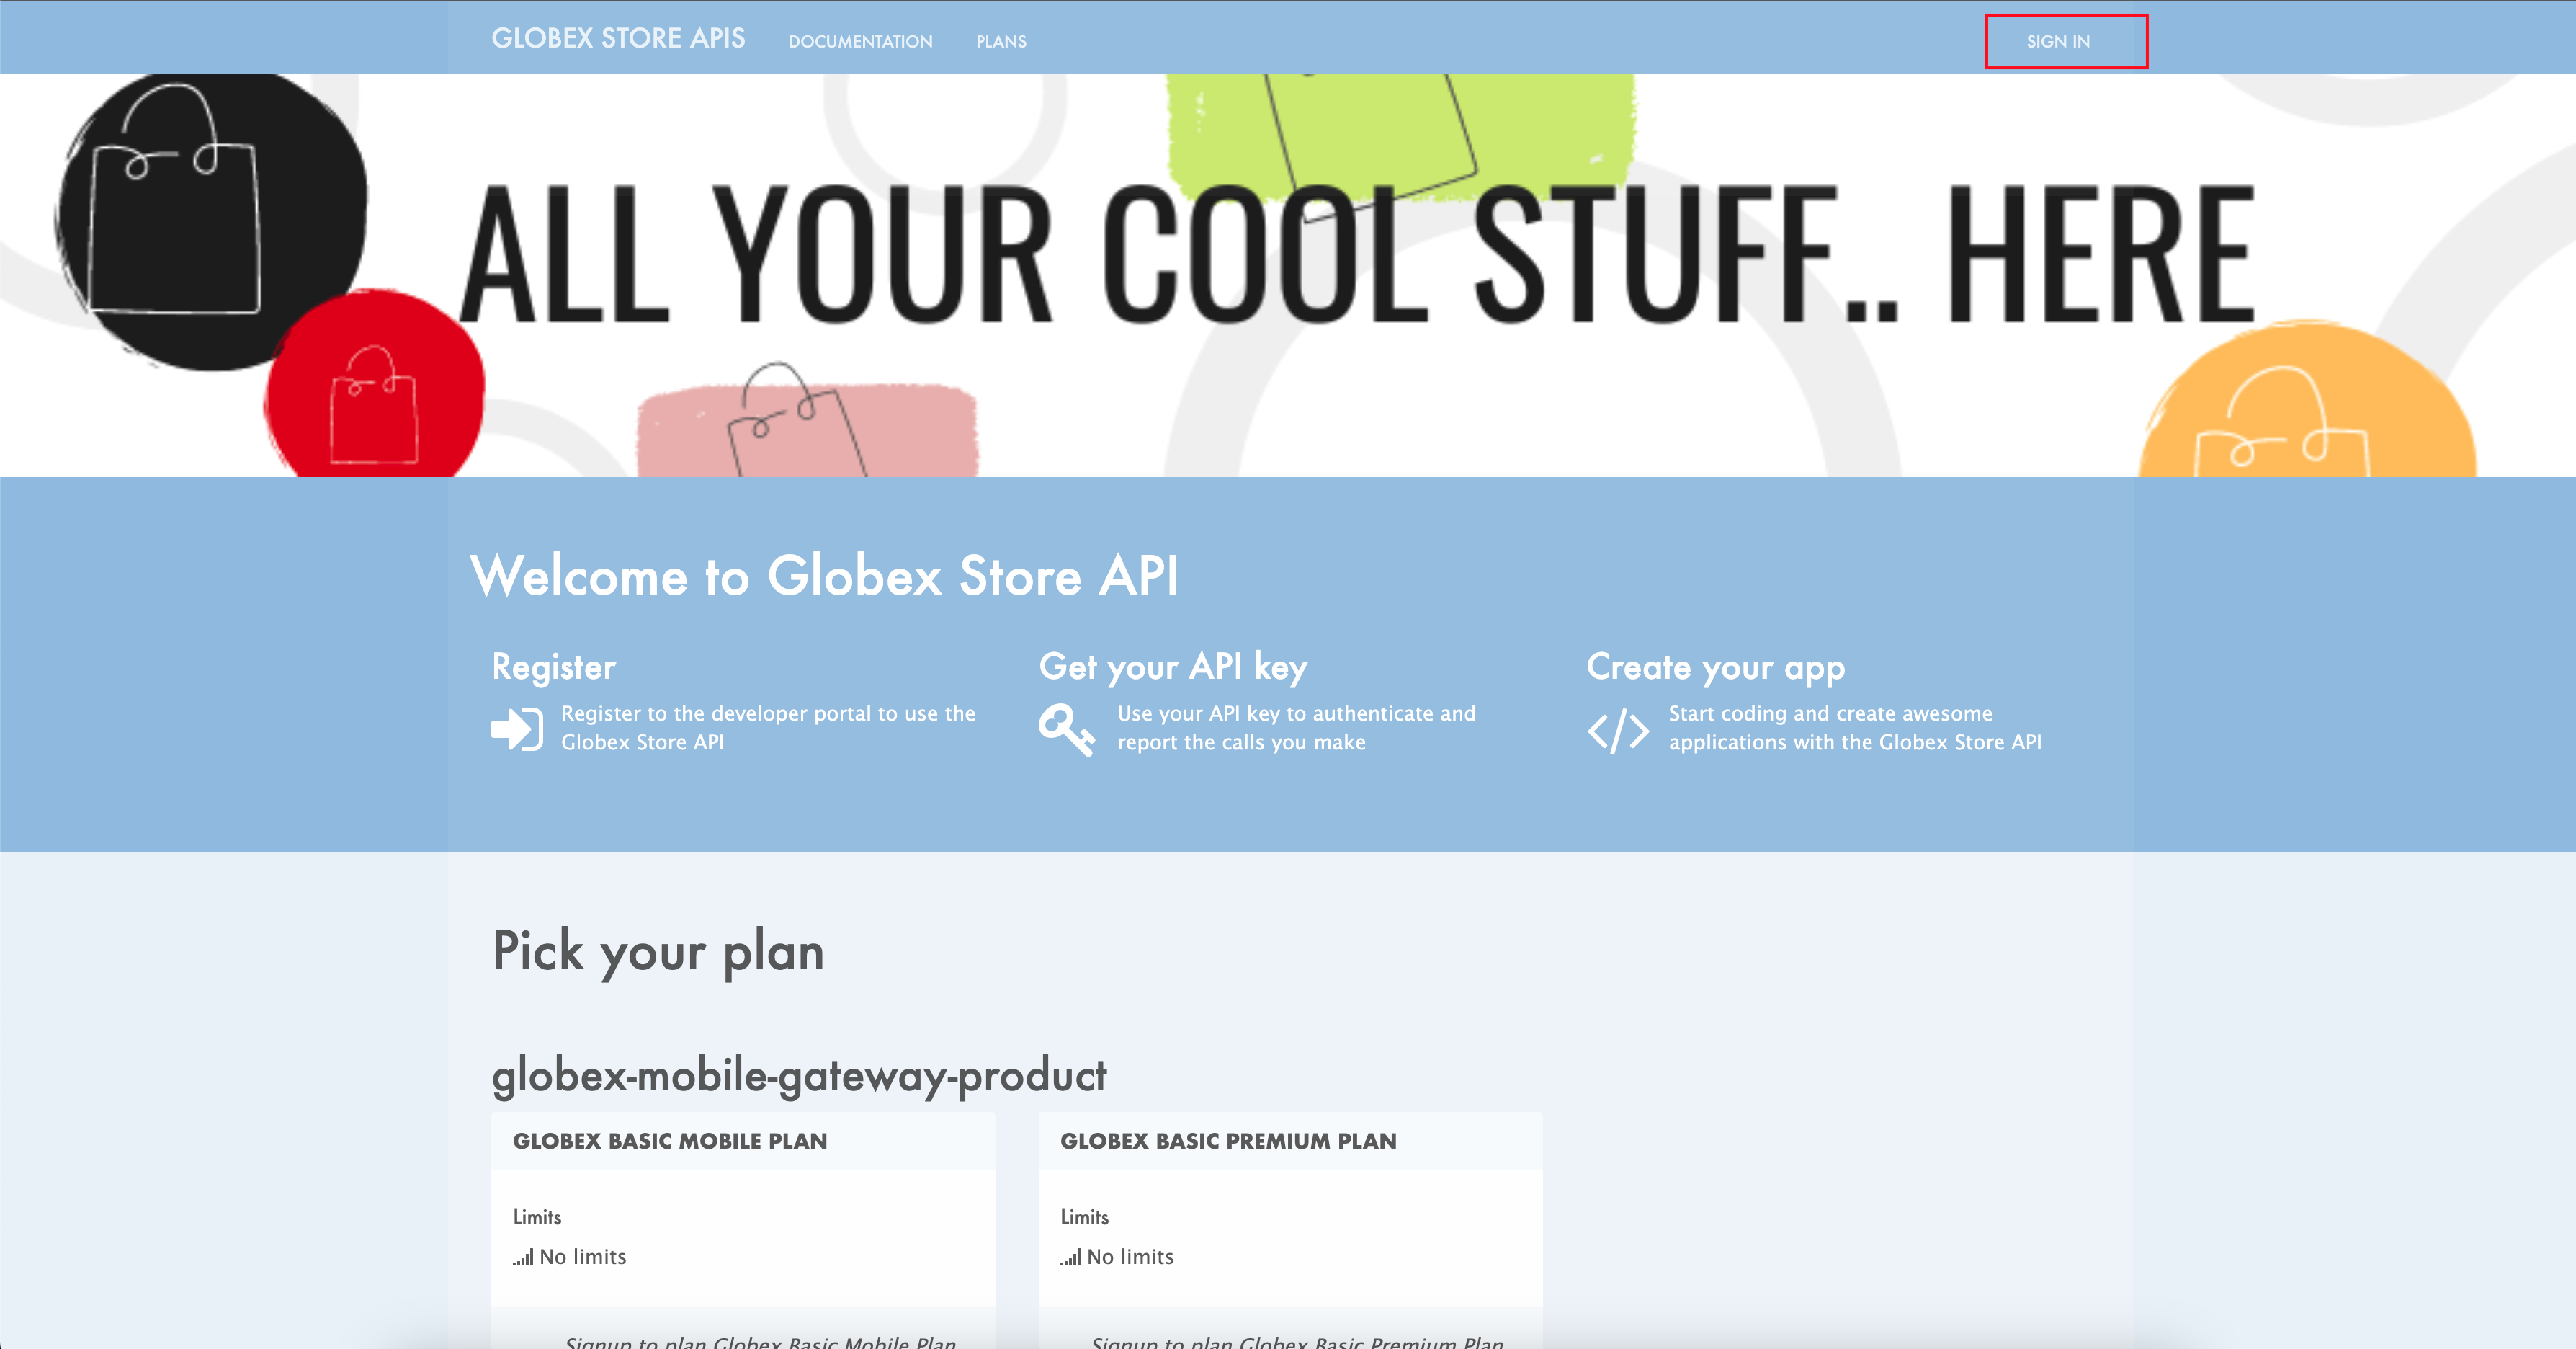 Figure 9. Developer Portal
 -
Click on the SIGN IN link found on top-right.
-
Sign in as one of the user you created in the previous section with
-
username:
john -
password:
123456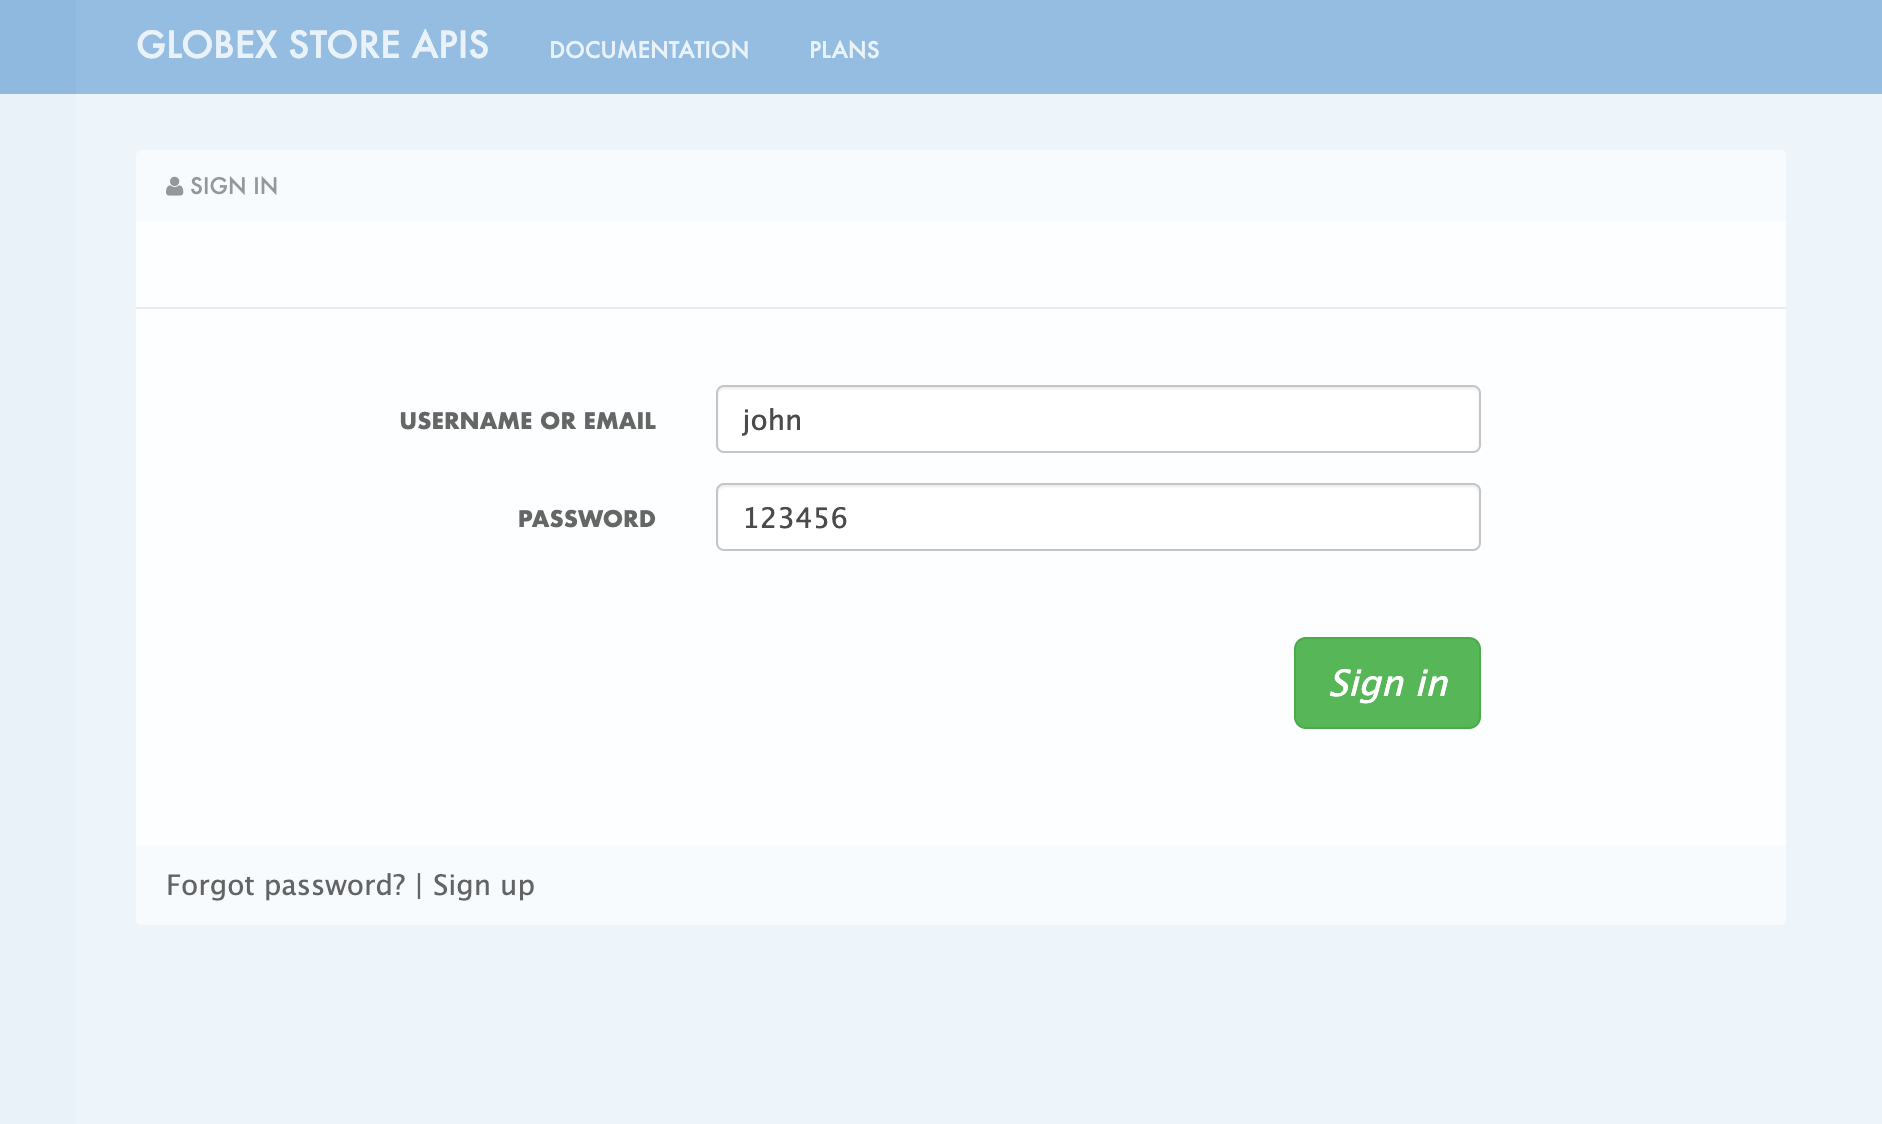 Figure 10. Developer Portal
-
-
Navigate to Applications Listing by choosing the APPLICATIONS menu on the top of the page.
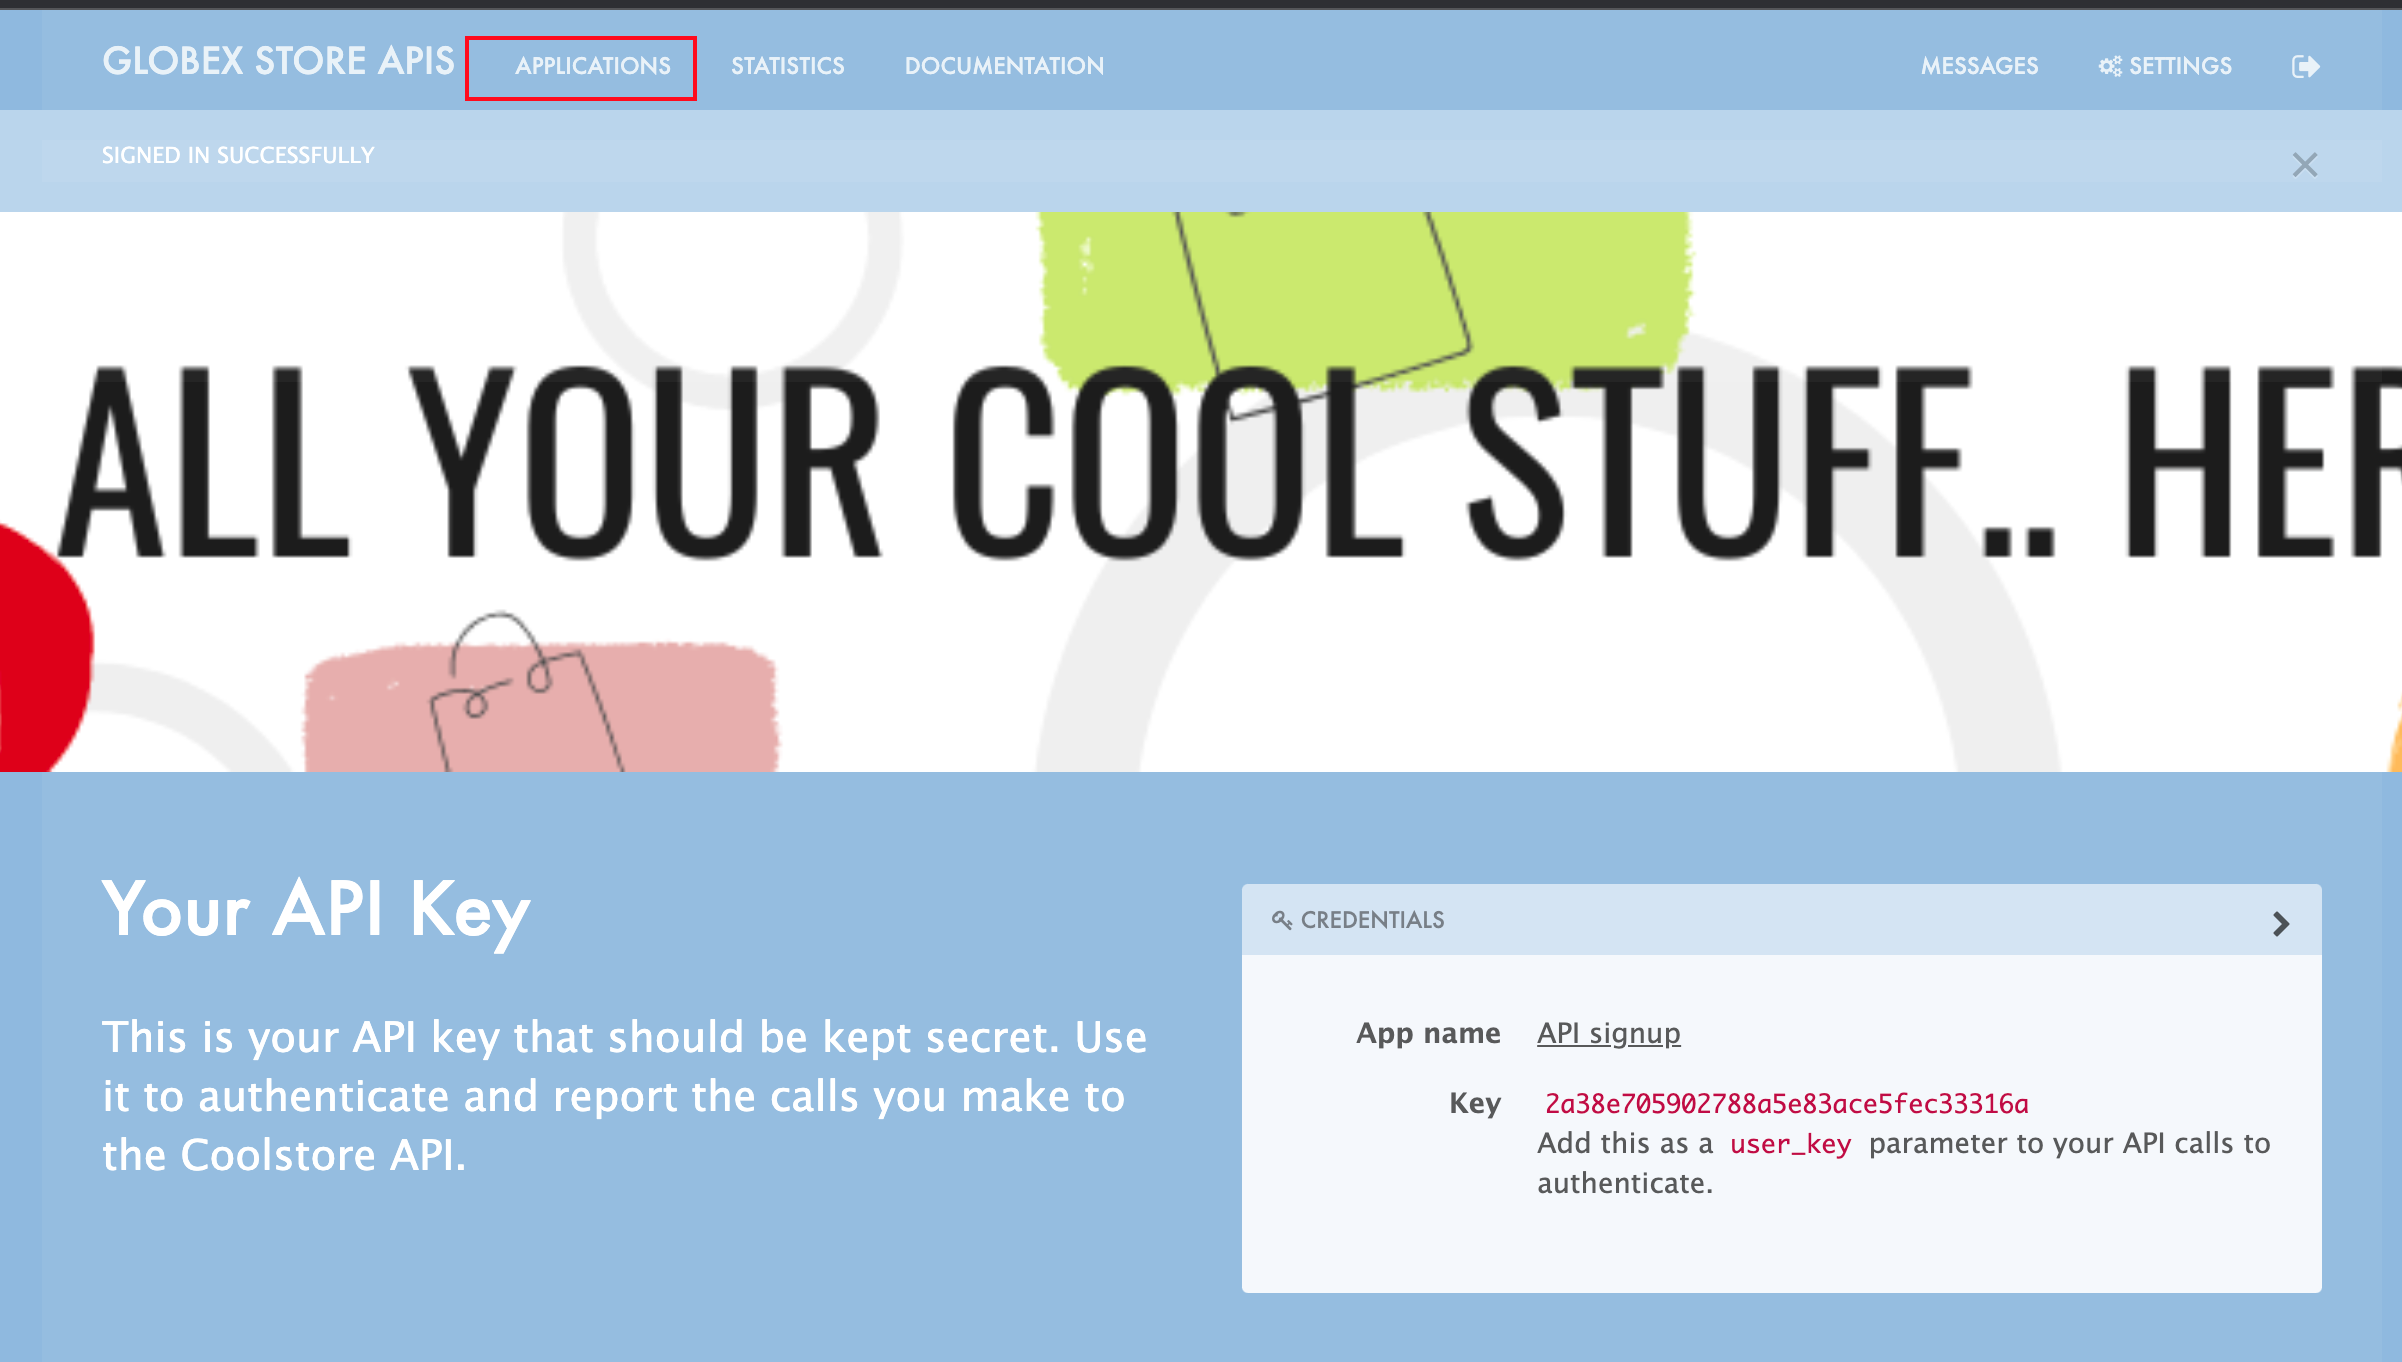 Figure 11. Developer Portal Landing Page
 -
In the Applications page you are invited to Create Application. Click on the Create new application button seen against
globex-mobile-gateway-product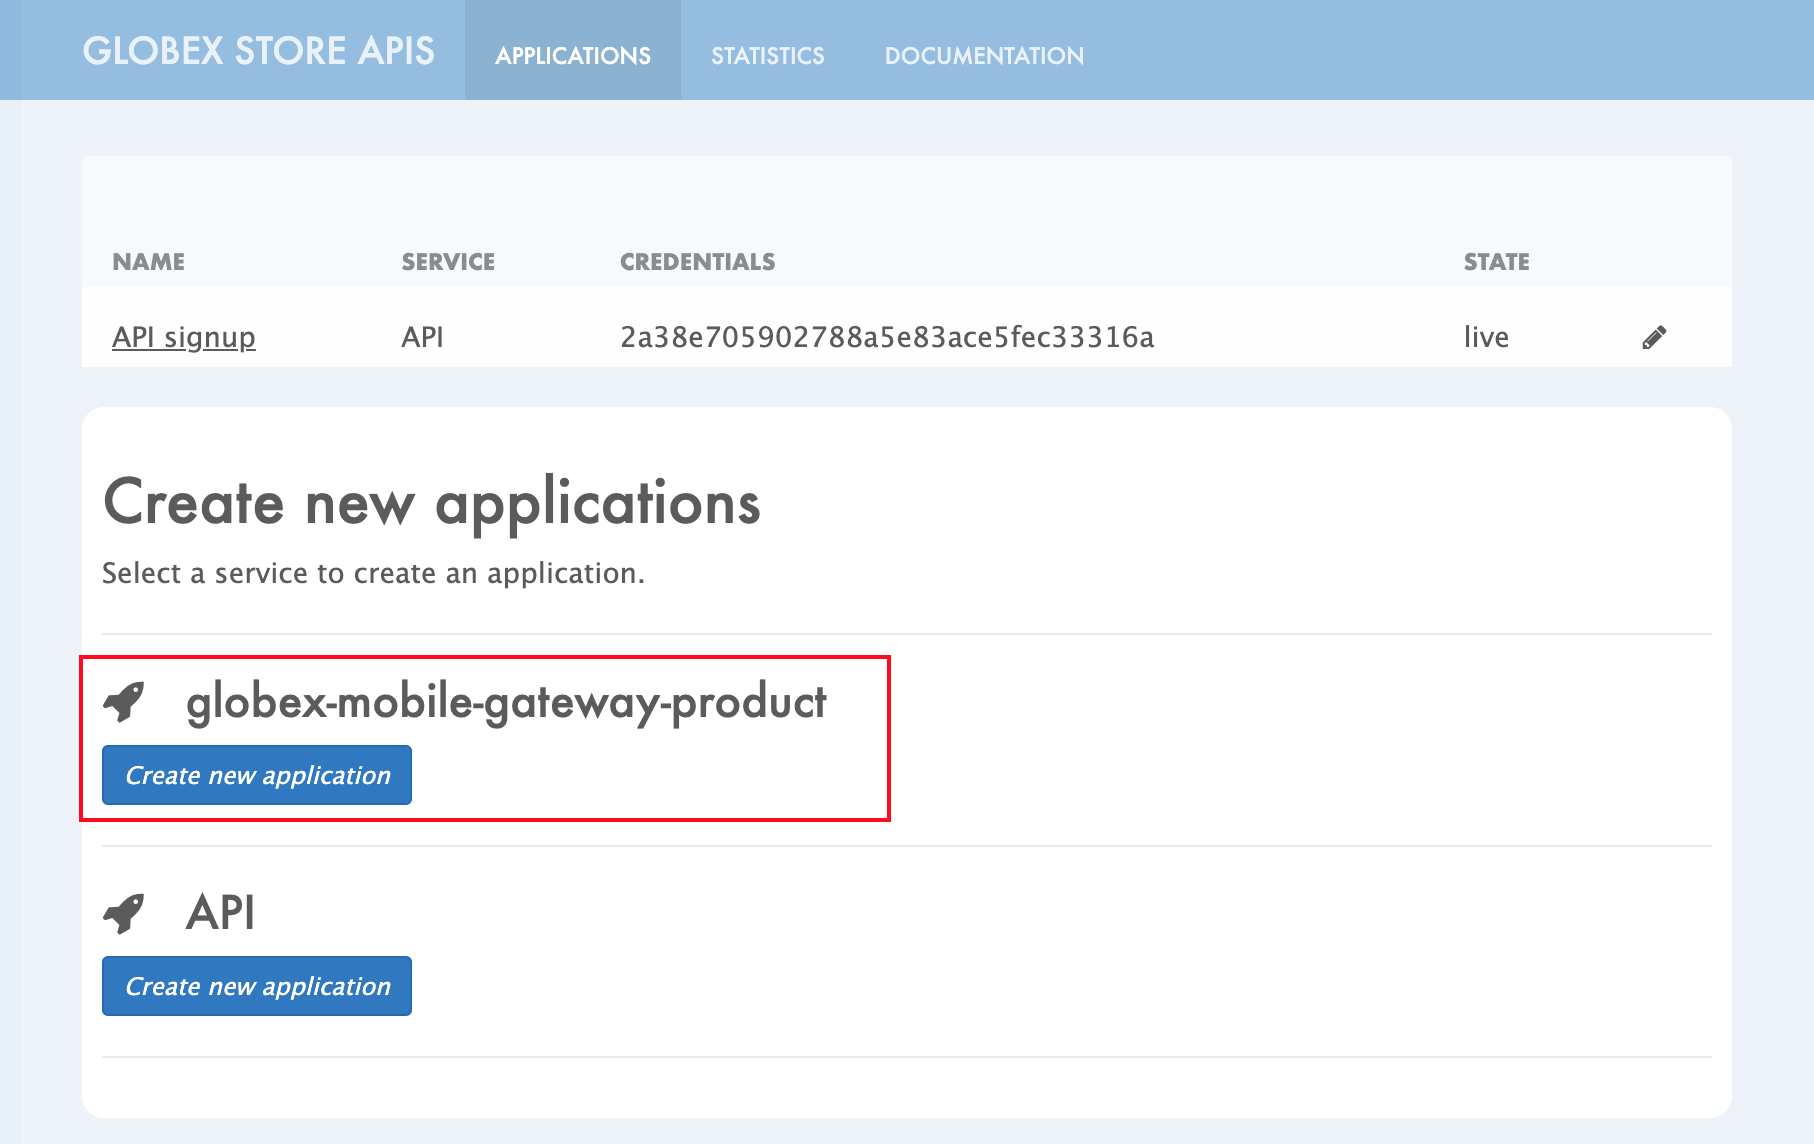 Figure 12. Developer Portal: Create new application
 -
Click on Subscribe to globex-mobile-gateway-product link
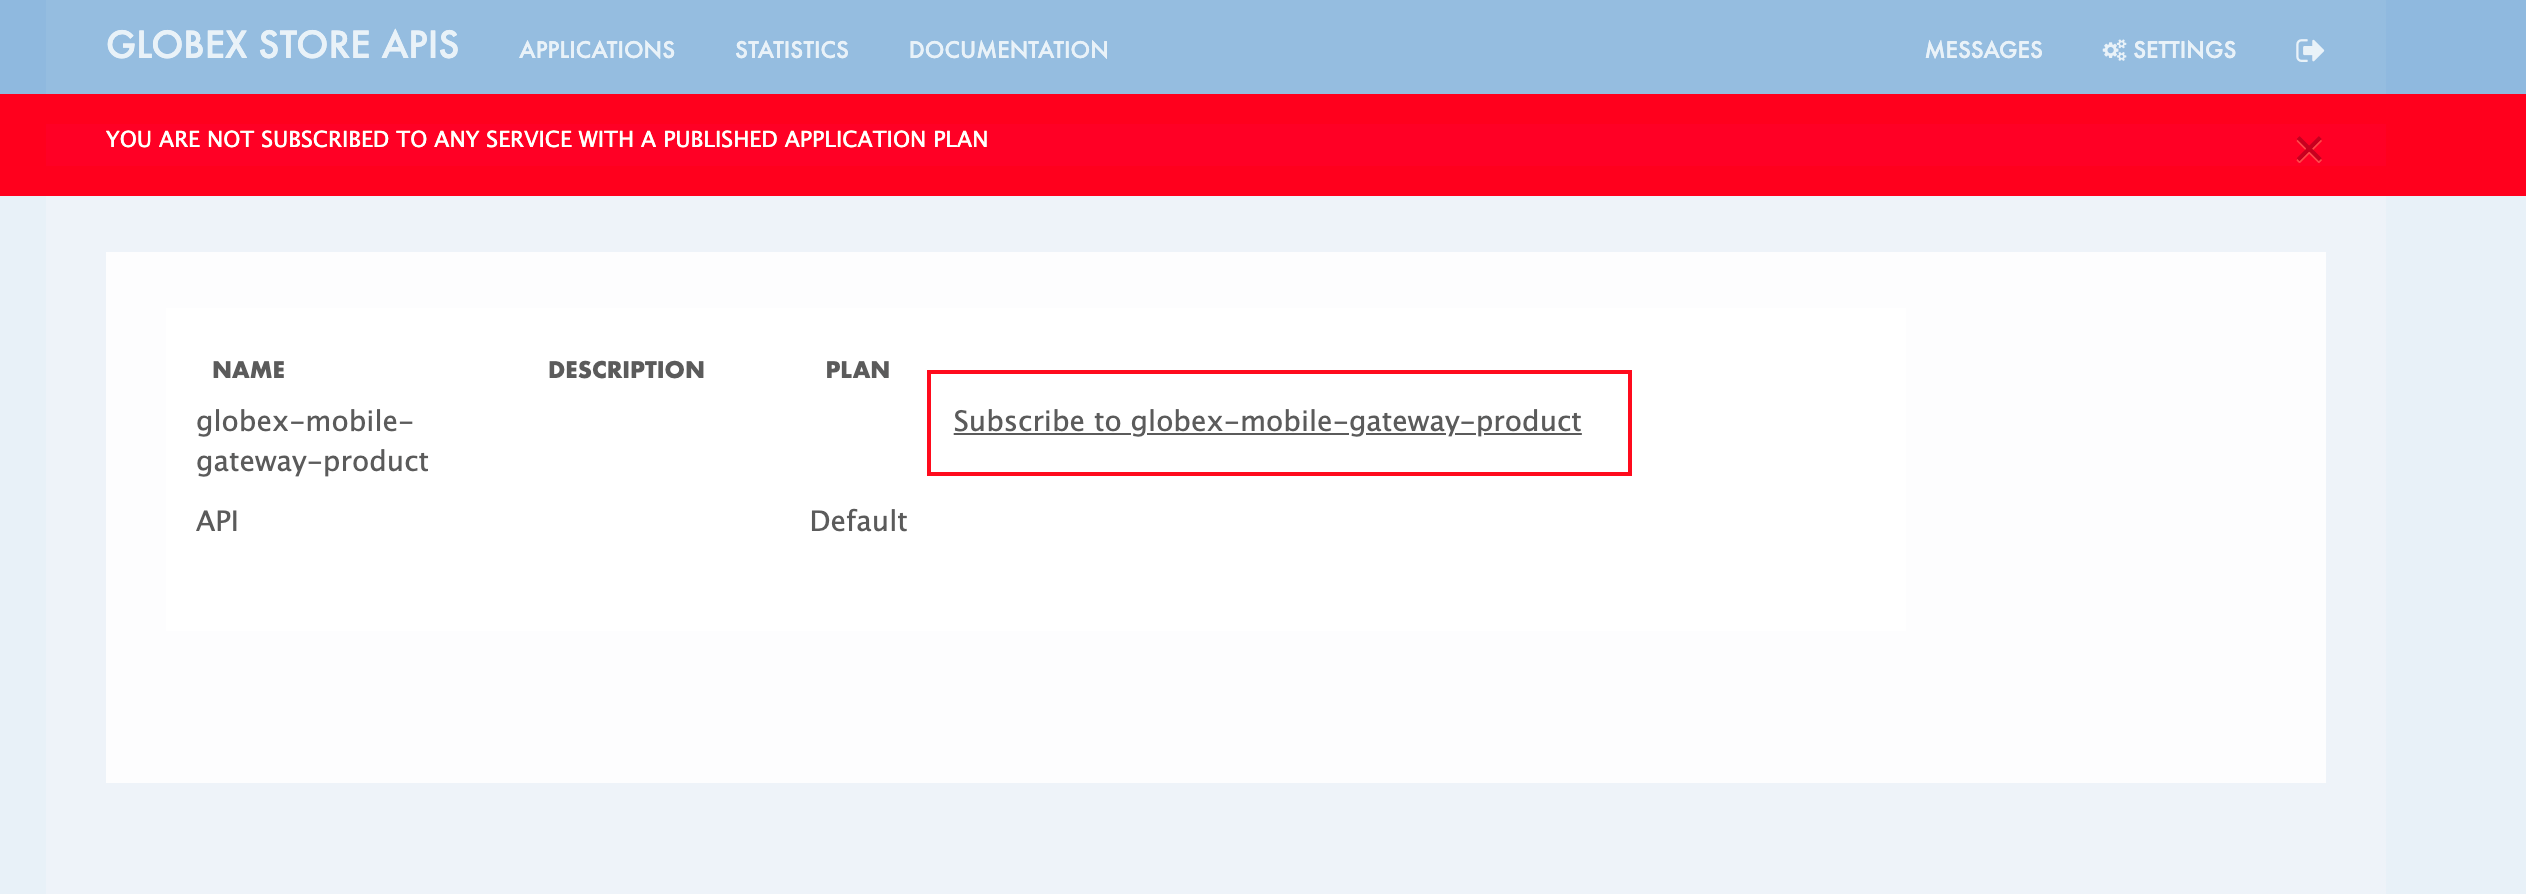 Figure 13. Subscribe to globex-mobile-gateway-product
 -
You are successfully subscribed to the service
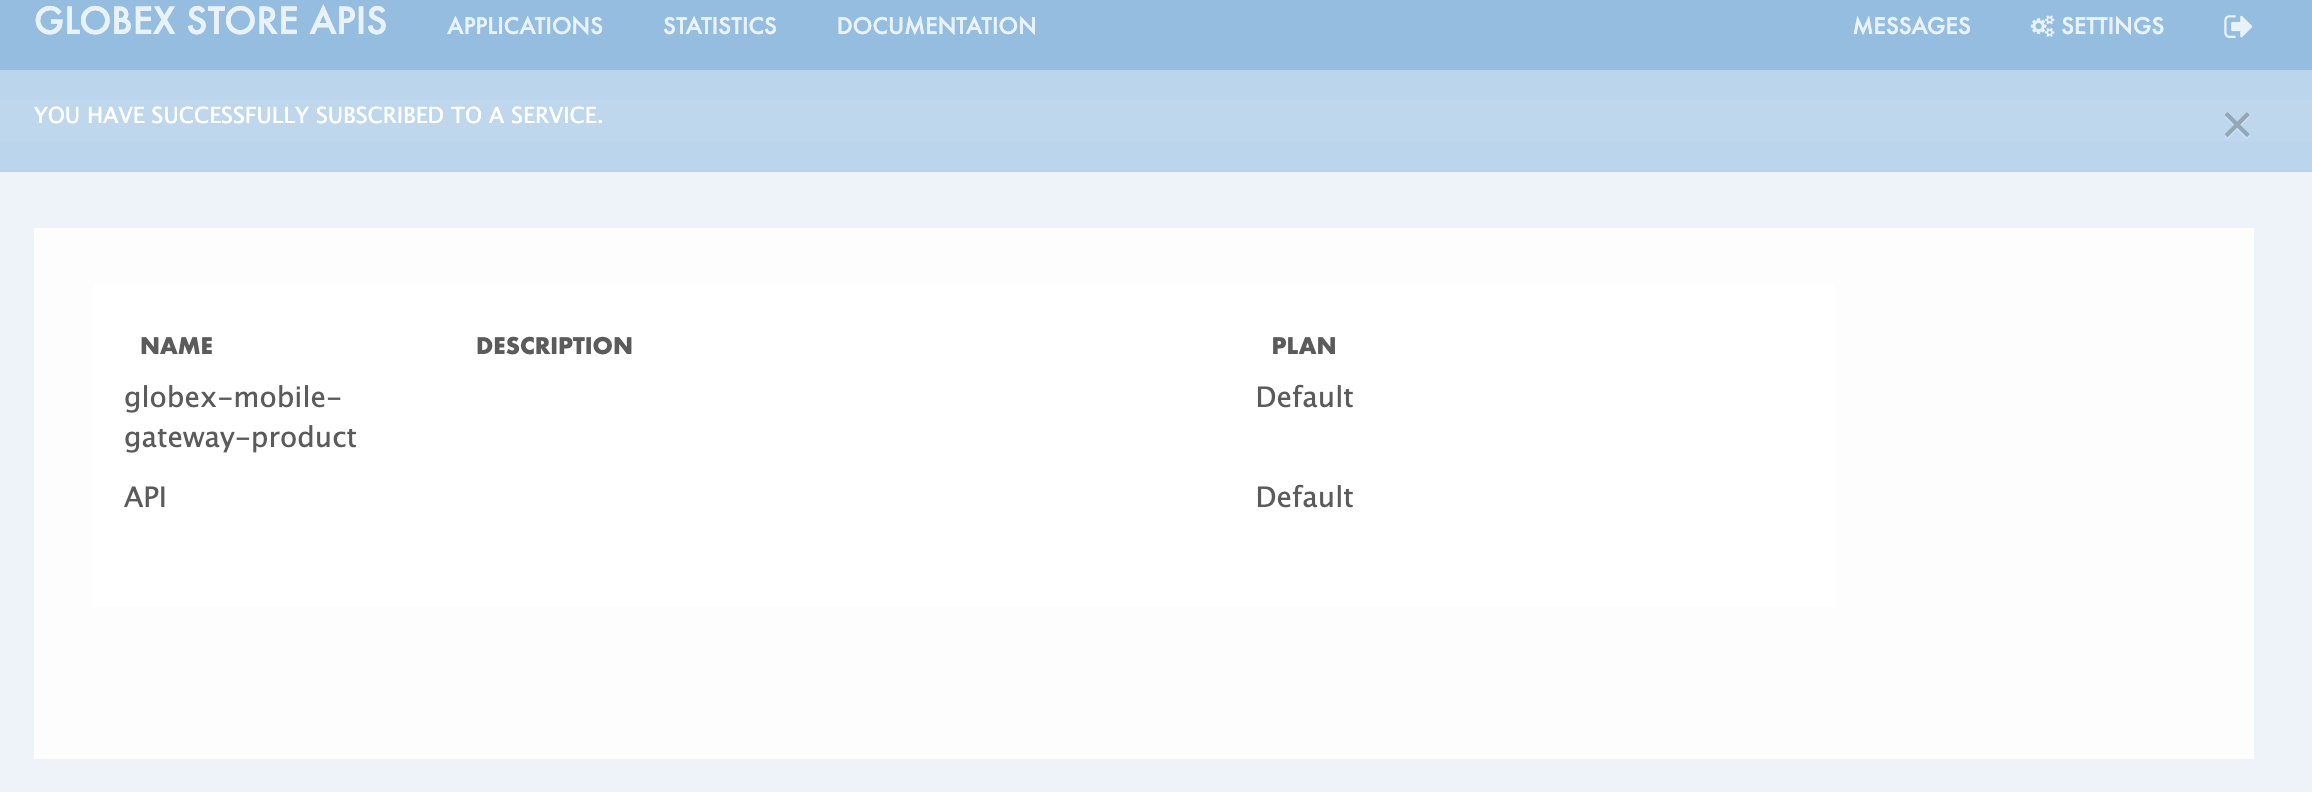 Figure 14. Successfully subscribed to the service
 -
Navigate back to the APPLICATIONS tab found on the top menu and click globex-mobile-gateway-product’s > Create new application link
Figure 15. Developer Portal: Create new application (again) -
Give the plan a Name and a Description and click on Create Application
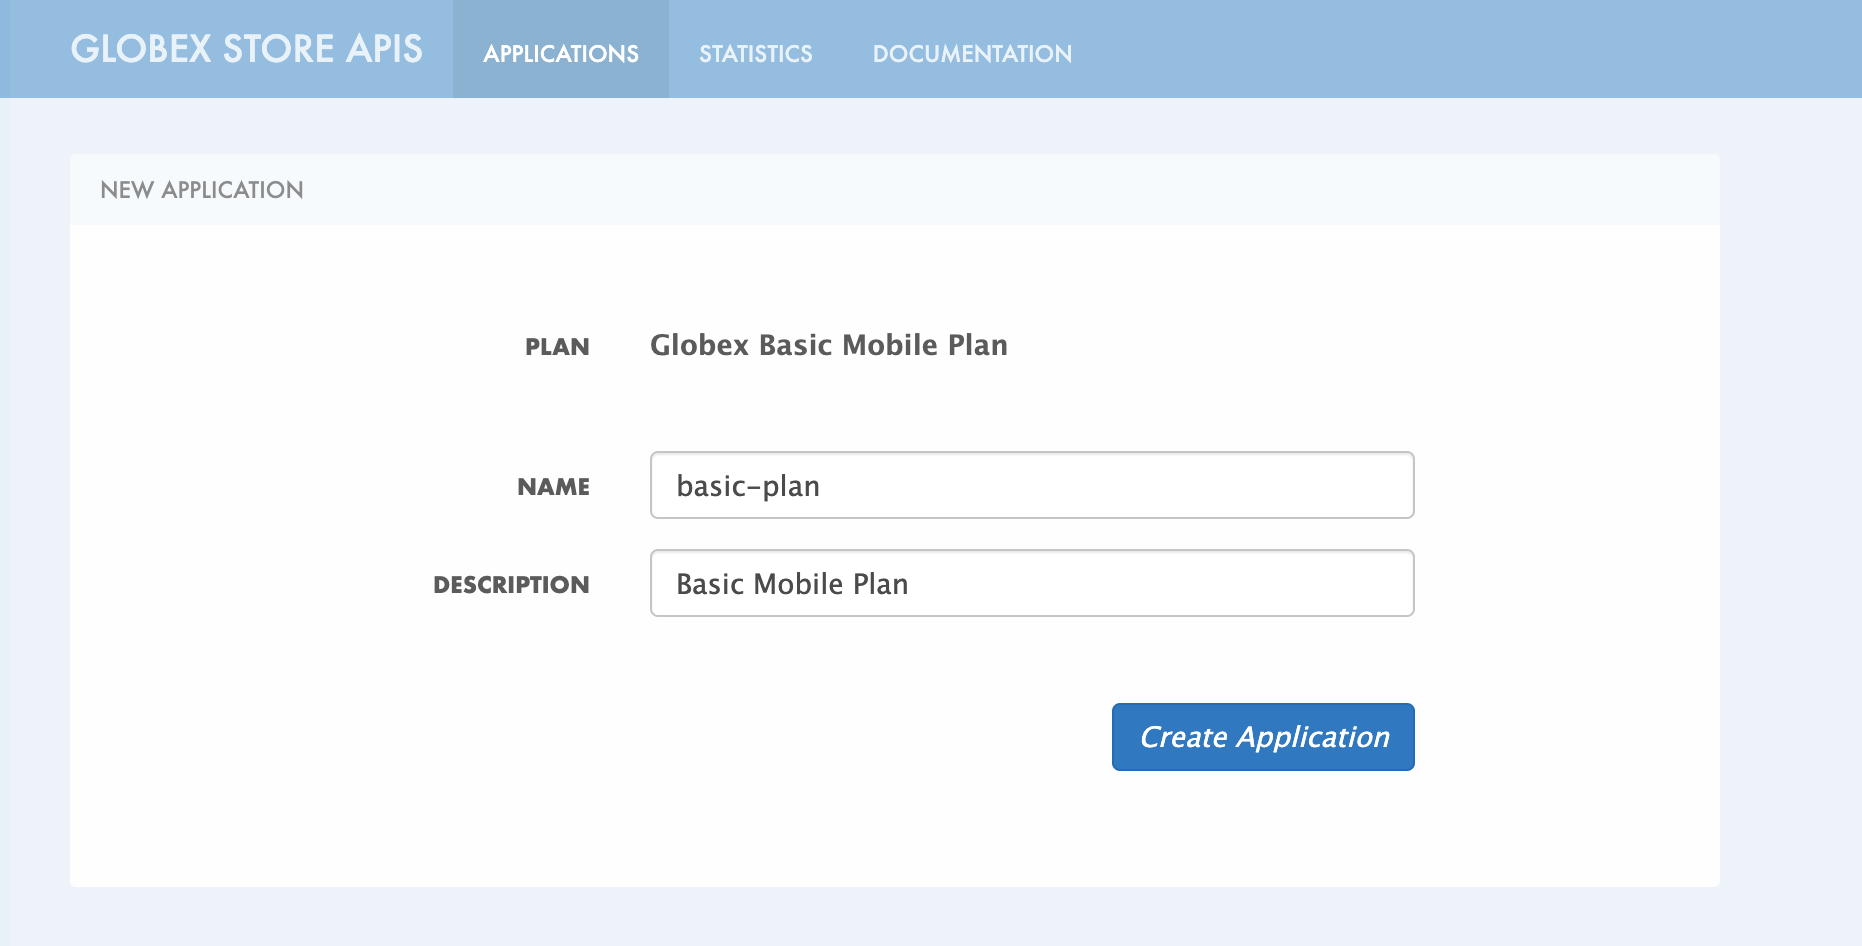 Figure 16. Developer Portal: New application
 -
An application is created successfully. Make a note of the Client ID and Client Secret. You will be using this in the Mobile App setup. Scratchpad can be used for this as well.
-
Enter the value asterisk (*) in the REDIRECT URL field and click on the Submit button. This is to setup the right Redirect URL for OAuth using Keycloak.
-
In real-life you would never mark this as (*), but provide the correct .URL based on your application.
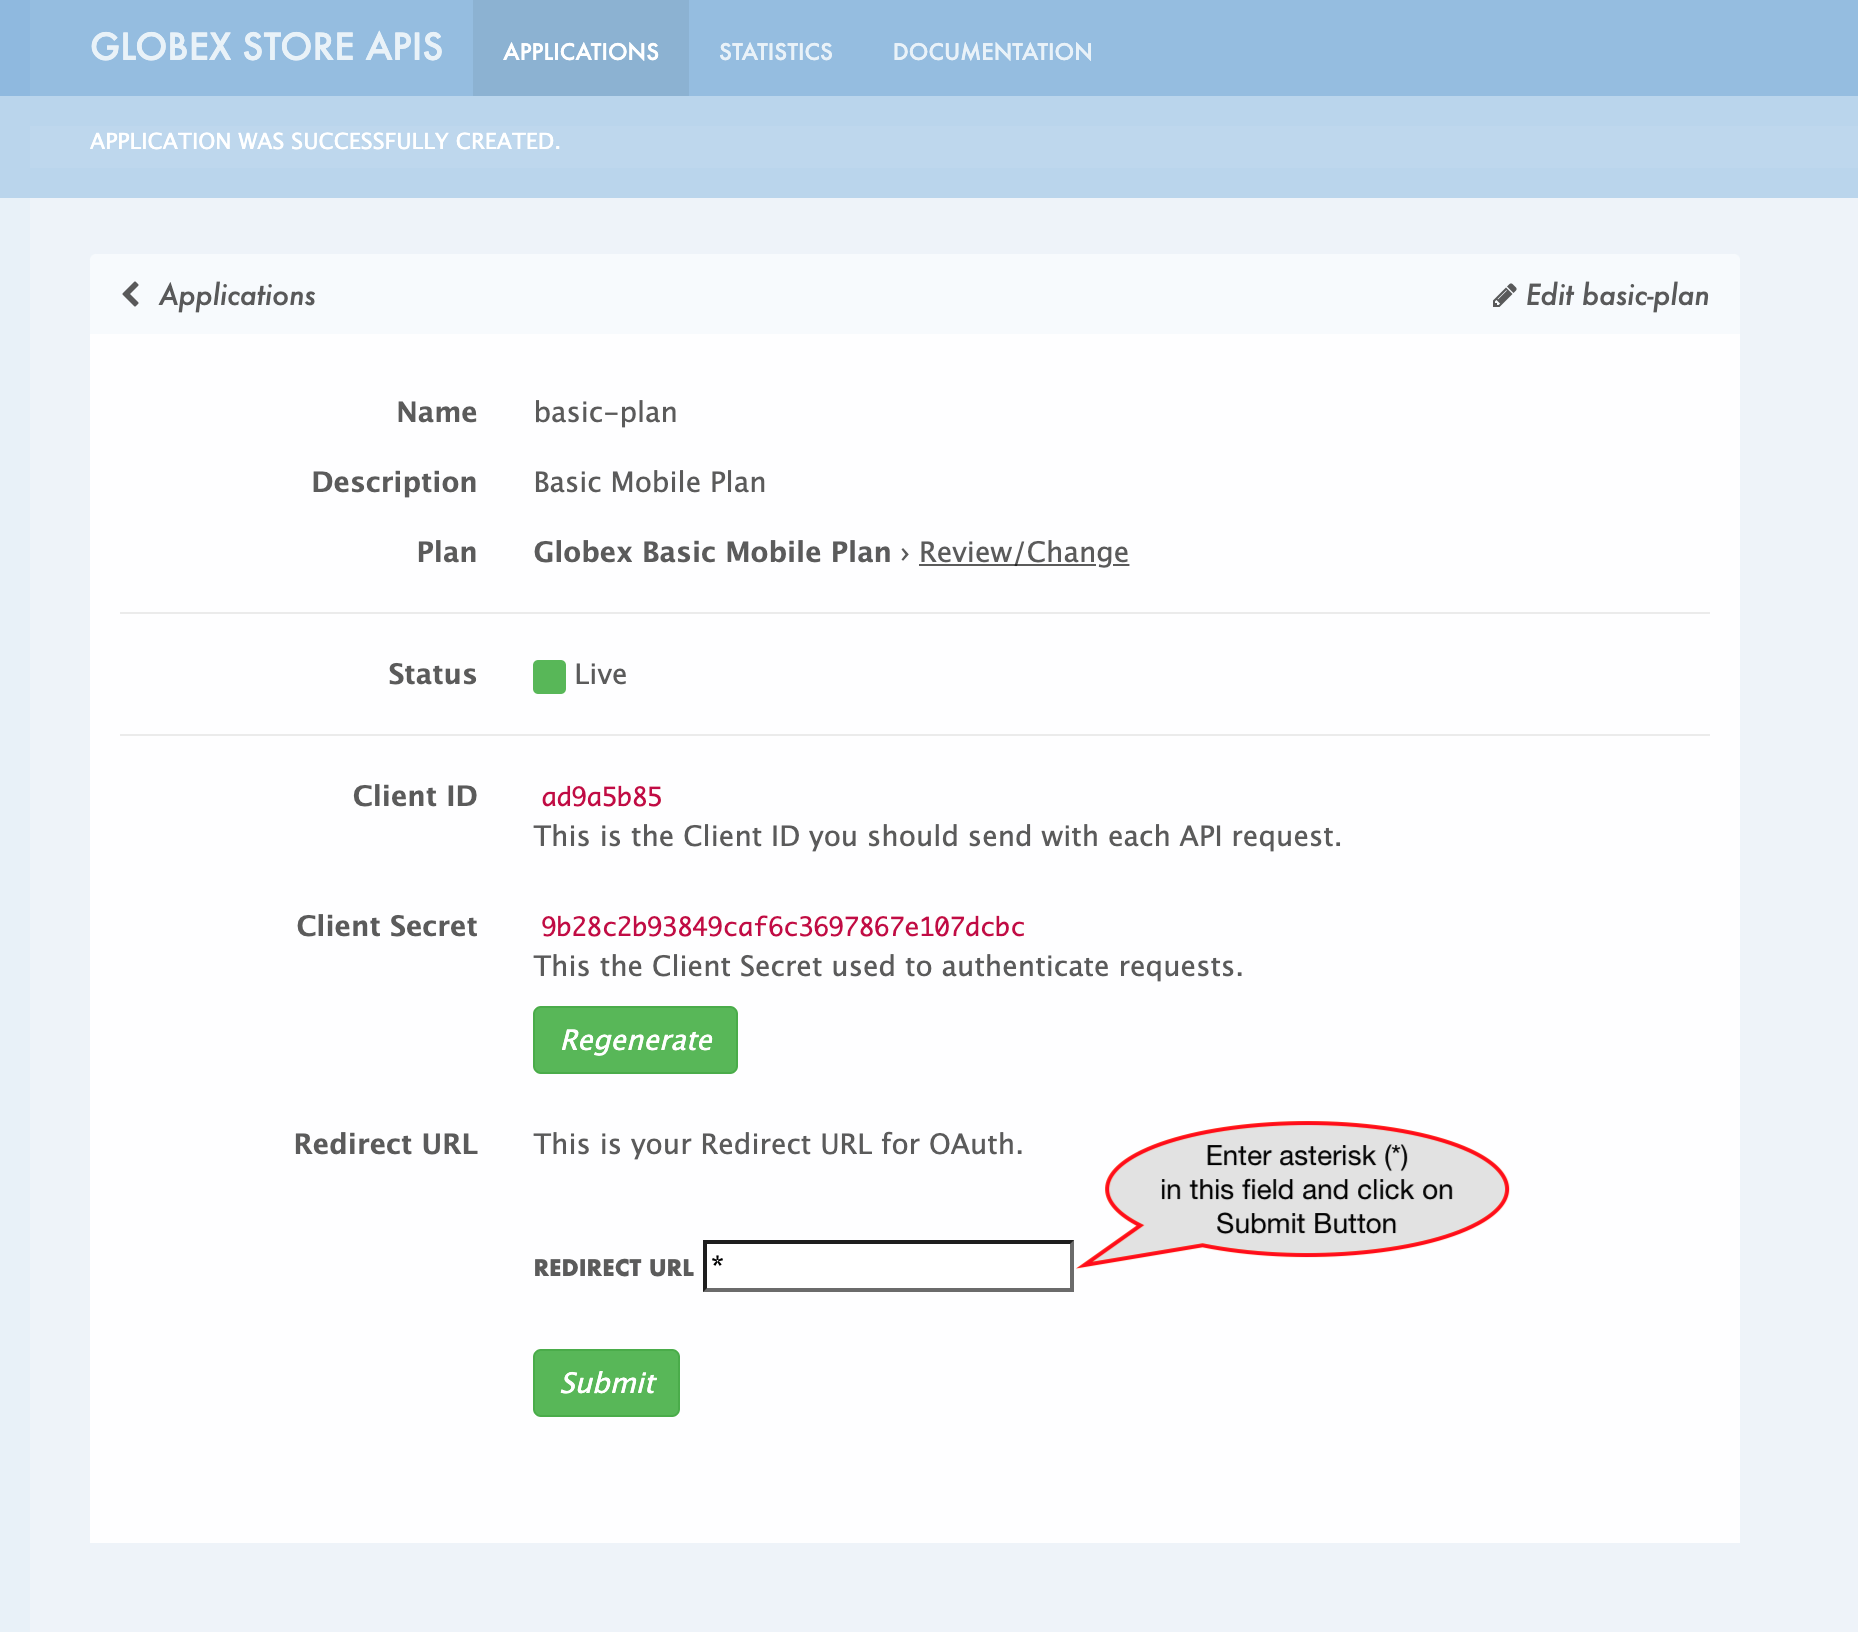 Figure 17. Update REDIRECT URL in the Application creates successfully for Mobile User
-
-
Keep this window open since you will need the Client ID from this page to setup Mobile App’s access to the Mobile Gateway API in the next section..
7. Update the Mobile App with access details
Now that you have the Client ID, you can update the Mobile App with the Client ID and other details needed to securely access the Mobile Gateway API that you have set up on 3scale.
-
Navigate to globex-mobile deployment to view the Environment variables of the deployment on OpenShift console.
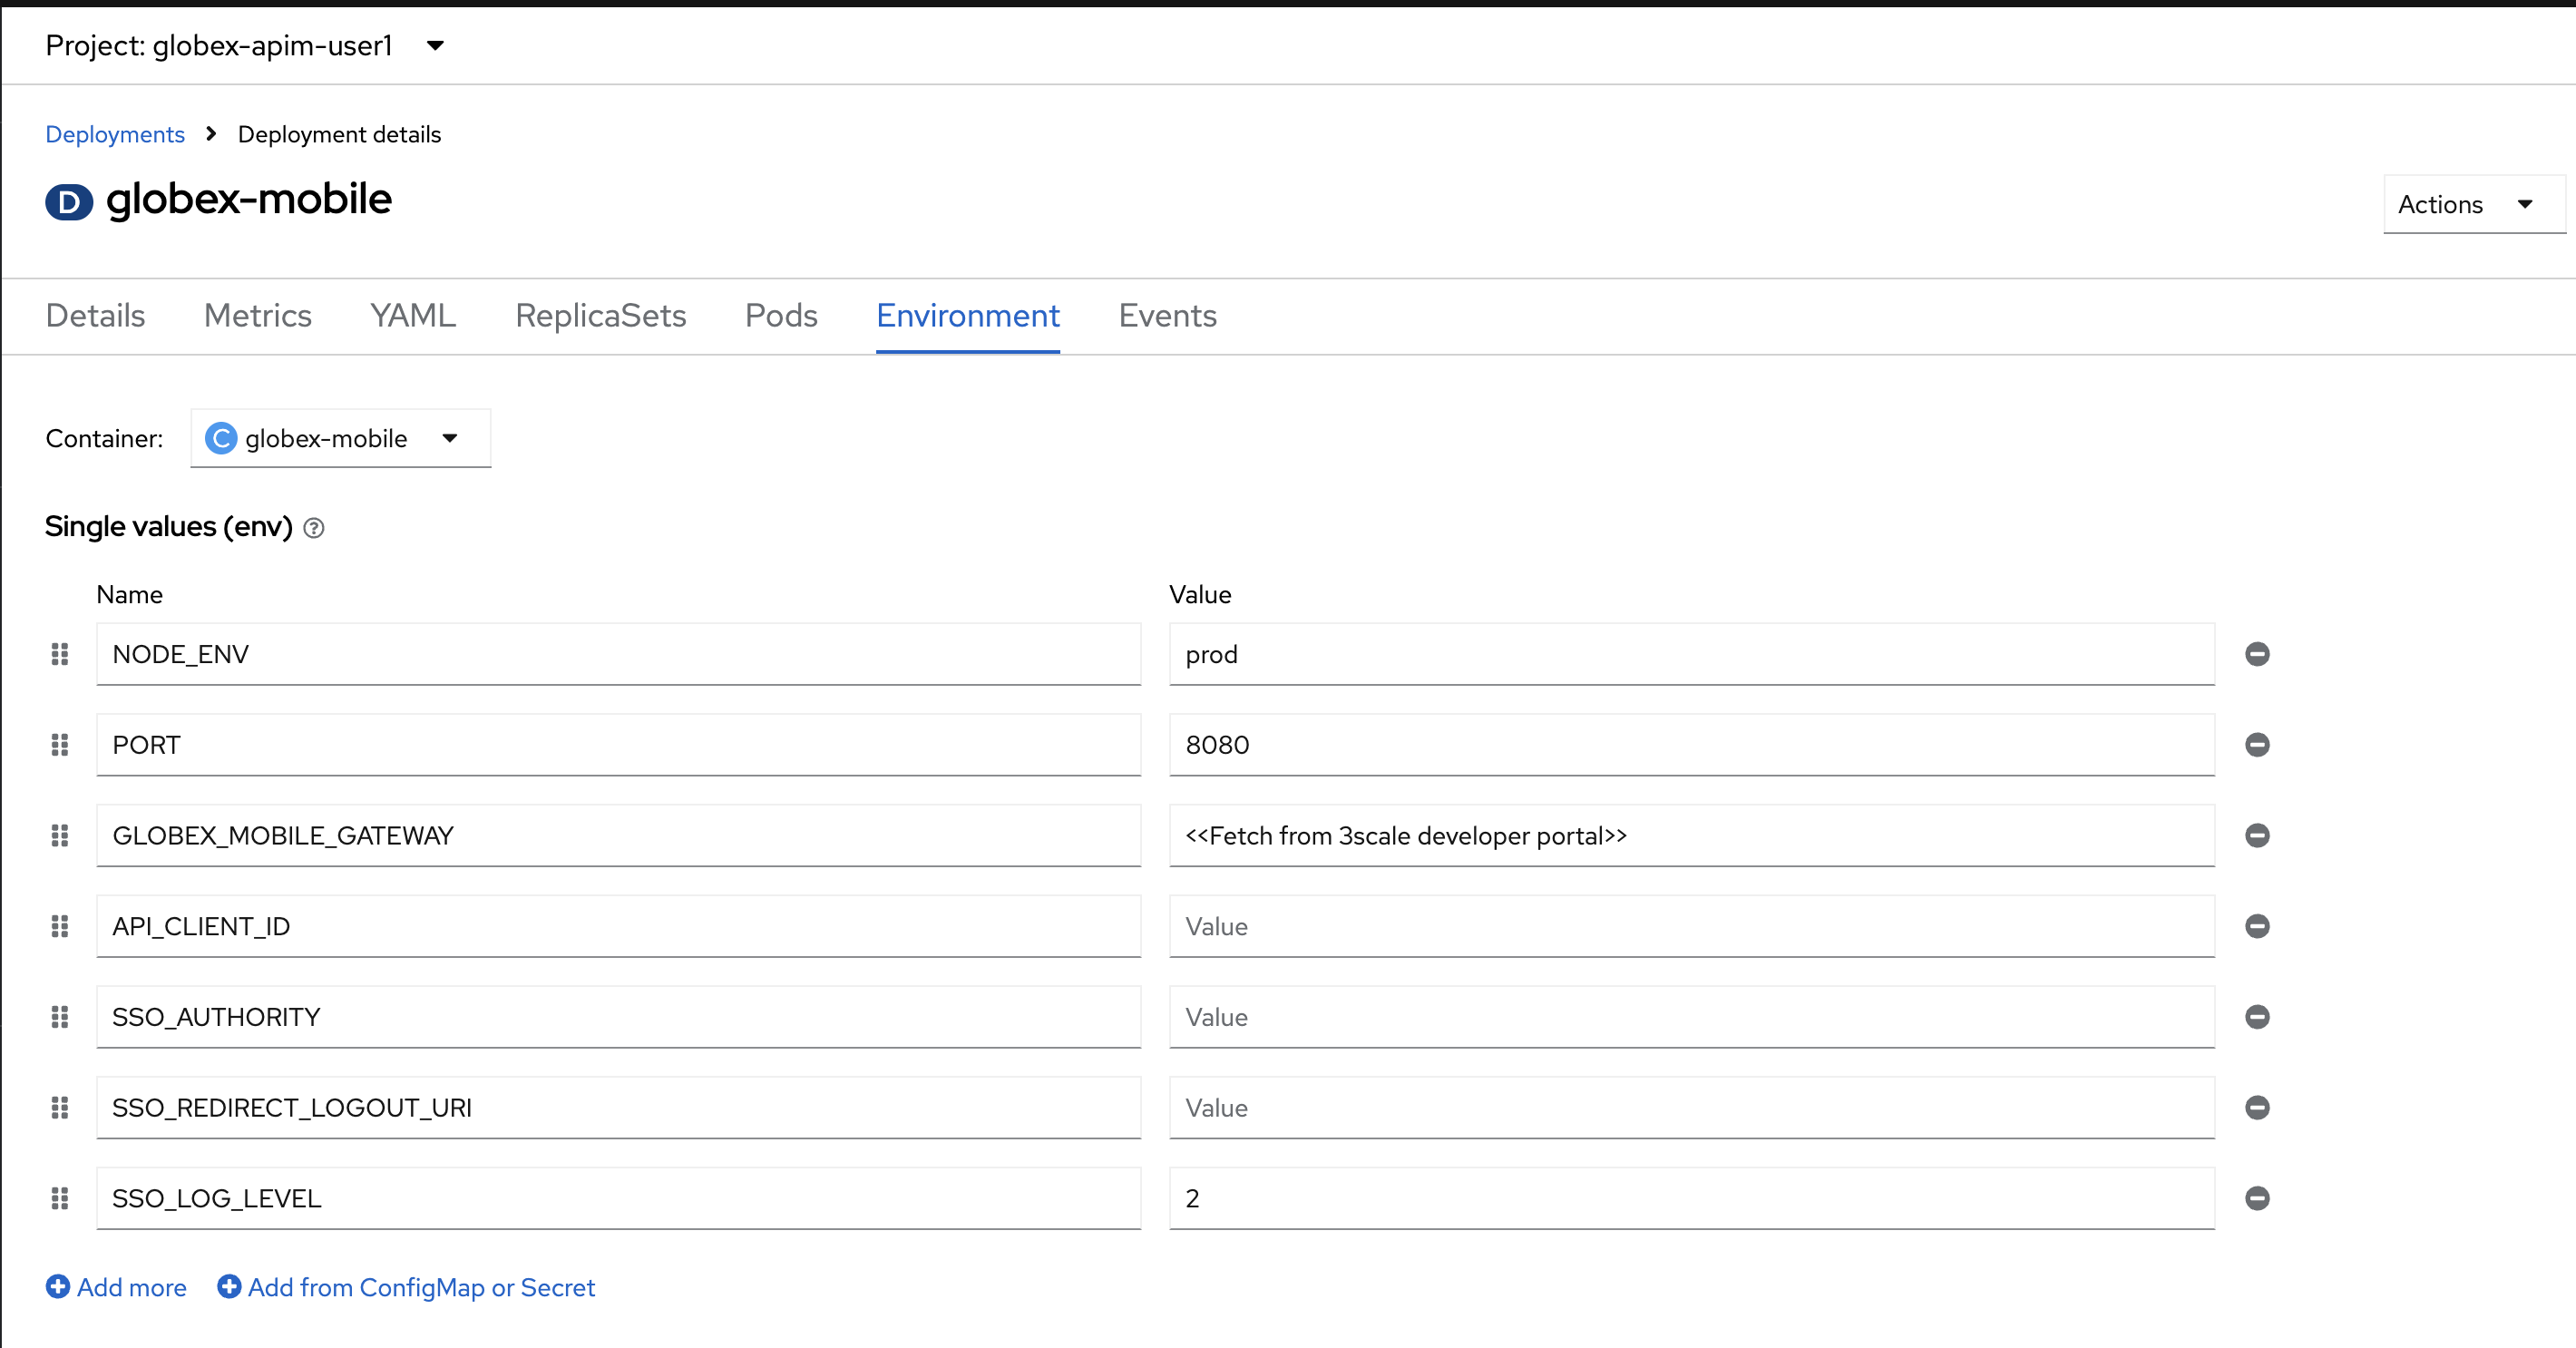
-
Update the following environment variables in the Environment tab as directed below
-
Update GLOBEX_MOBILE_GATEWAY with the below value
https://globex-mobile-gateway-product-3scale-{user_name}-apicast-production.{openshift_subdomain}:443In real life, the GLOBEX_MOBILE_GATEWAY is accessible from the Developer Portal - but it is provided above for the sake of convenience.
Click to view how to access this
-
Access the Developer Portal DOCUMENTATION which displays all the available APIs including the default API as well as globex-mobile-gateway-product
-
The API URL you need displayed under "Service Endpoint" in globex-mobile-gateway-product box
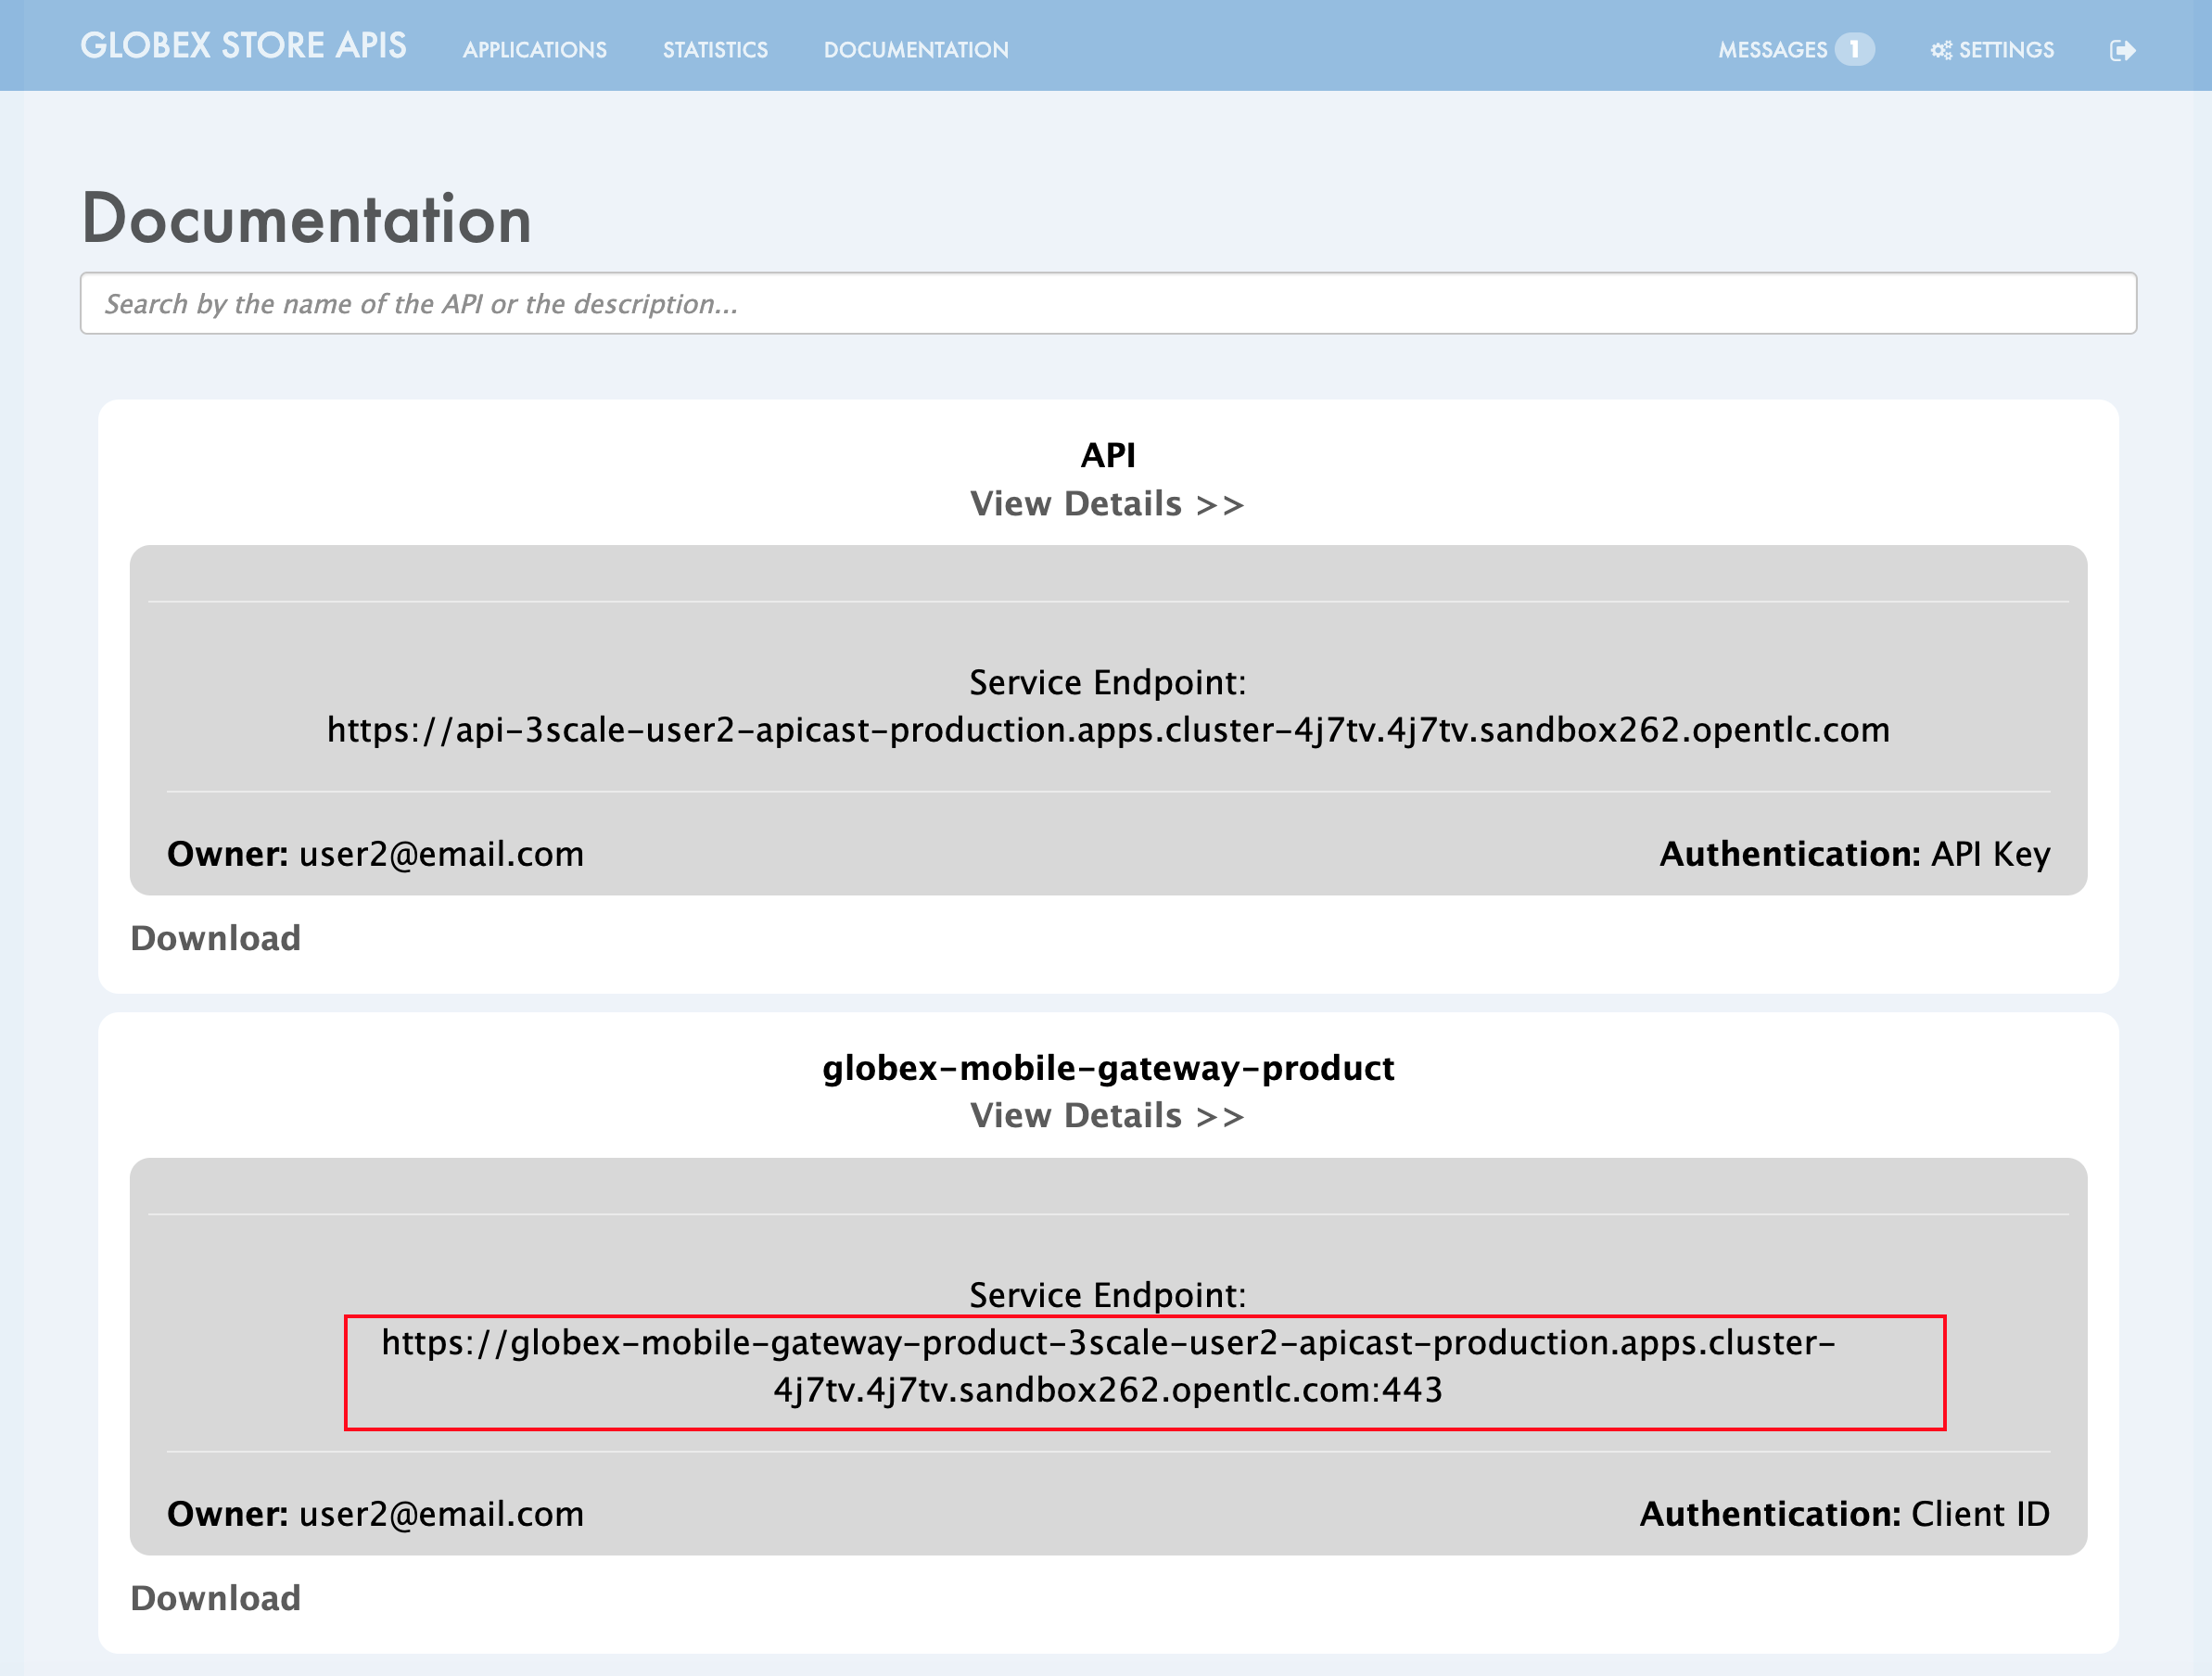 Figure 18. Developer Portal: Documentation Page
 -
-
Update API_CLIENT_ID with the Client ID in the previous step from being displayed in the Developer Portal.
Access the Applications section from Developer Portal. Choose the application you created for globex-mobile-gateway-product. You can then access the Client ID from this page. -
Update SSO_AUTHORITY with the below value (which is the Keycloak OpenID Well-known Configuration URL)
https://sso.{openshift_subdomain}/realms/globex-{user_name} -
Update SSO_REDIRECT_LOGOUT_URI with the below value (which is the Mobile App’s home page URL)
https://globex-mobile-globex-apim-{user_name}.{openshift_subdomain}/home
-
-
The Environment tab should look like below after the changes
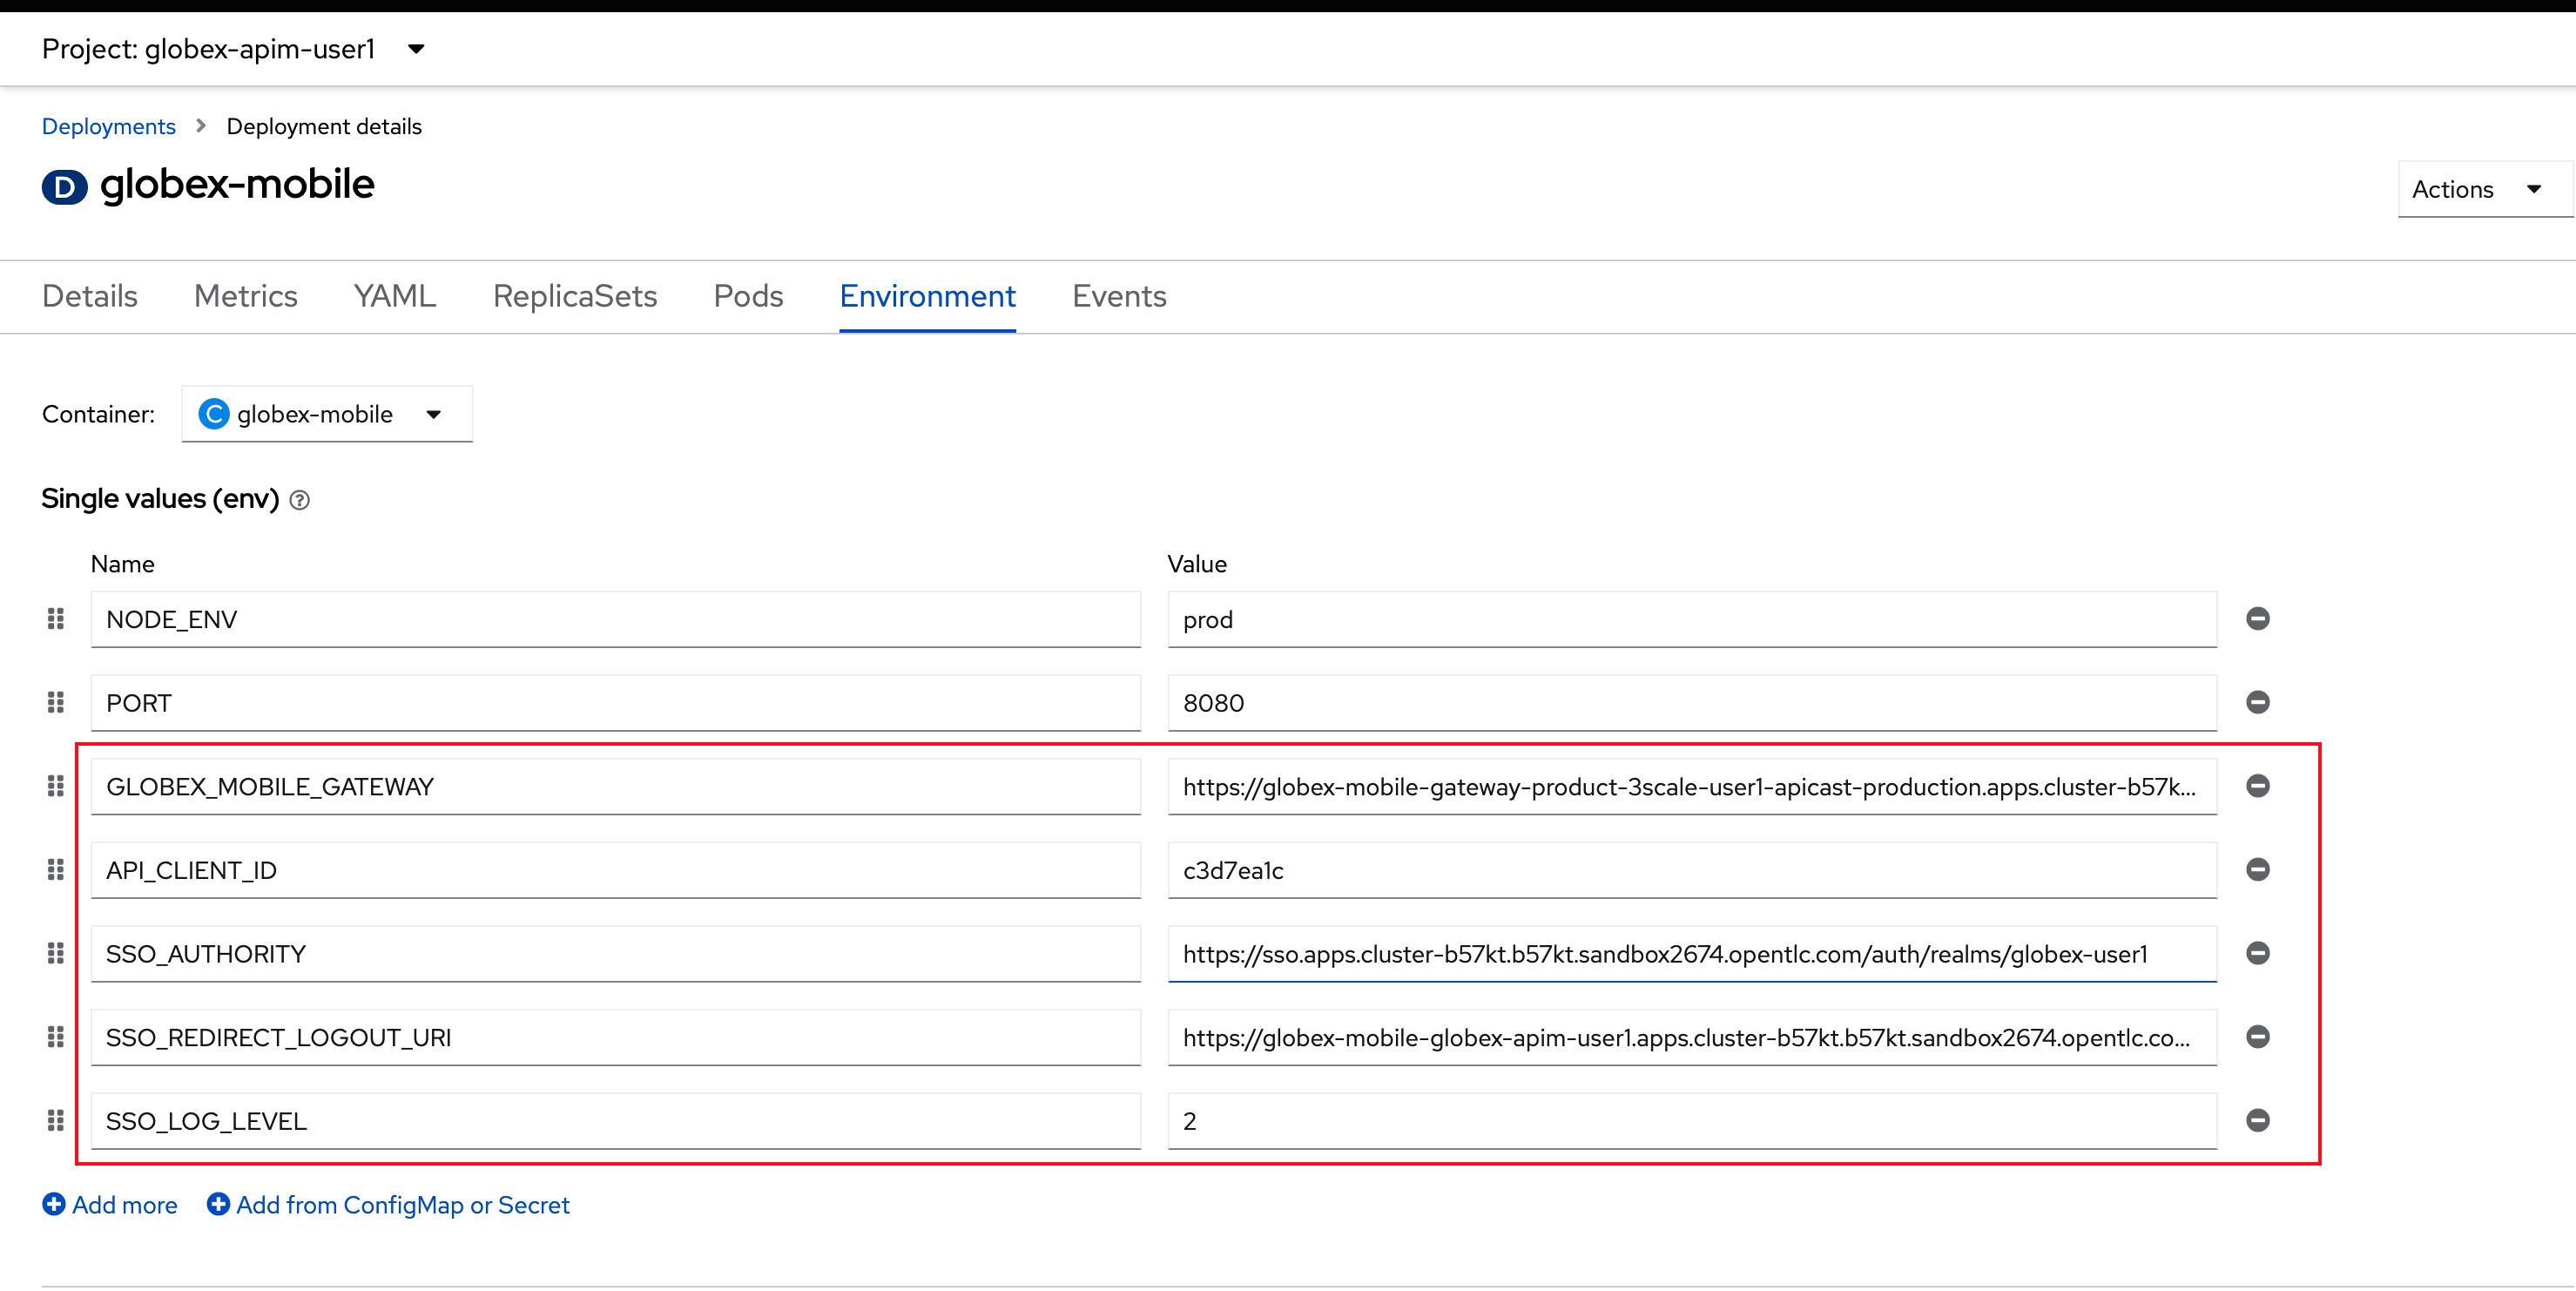 Figure 19. globex-mobile deployment on OpenShift
 -
Click on the Save button at the bottom of the page to save the changes. You will be shown a success message:
Successfully updated the environment variables.
8. Update Keycloak’s Web Origin to match Mobile App
There is one last step that you need to do before trying out the Mobile App. You need to update the Web Origin
-
Navigate to click on {sso_tenant_console}/#/globex-{user_name}/clients[Keycloak Clients List^,window="sso"]. Login if needed with ({user_name}/{user_password}).
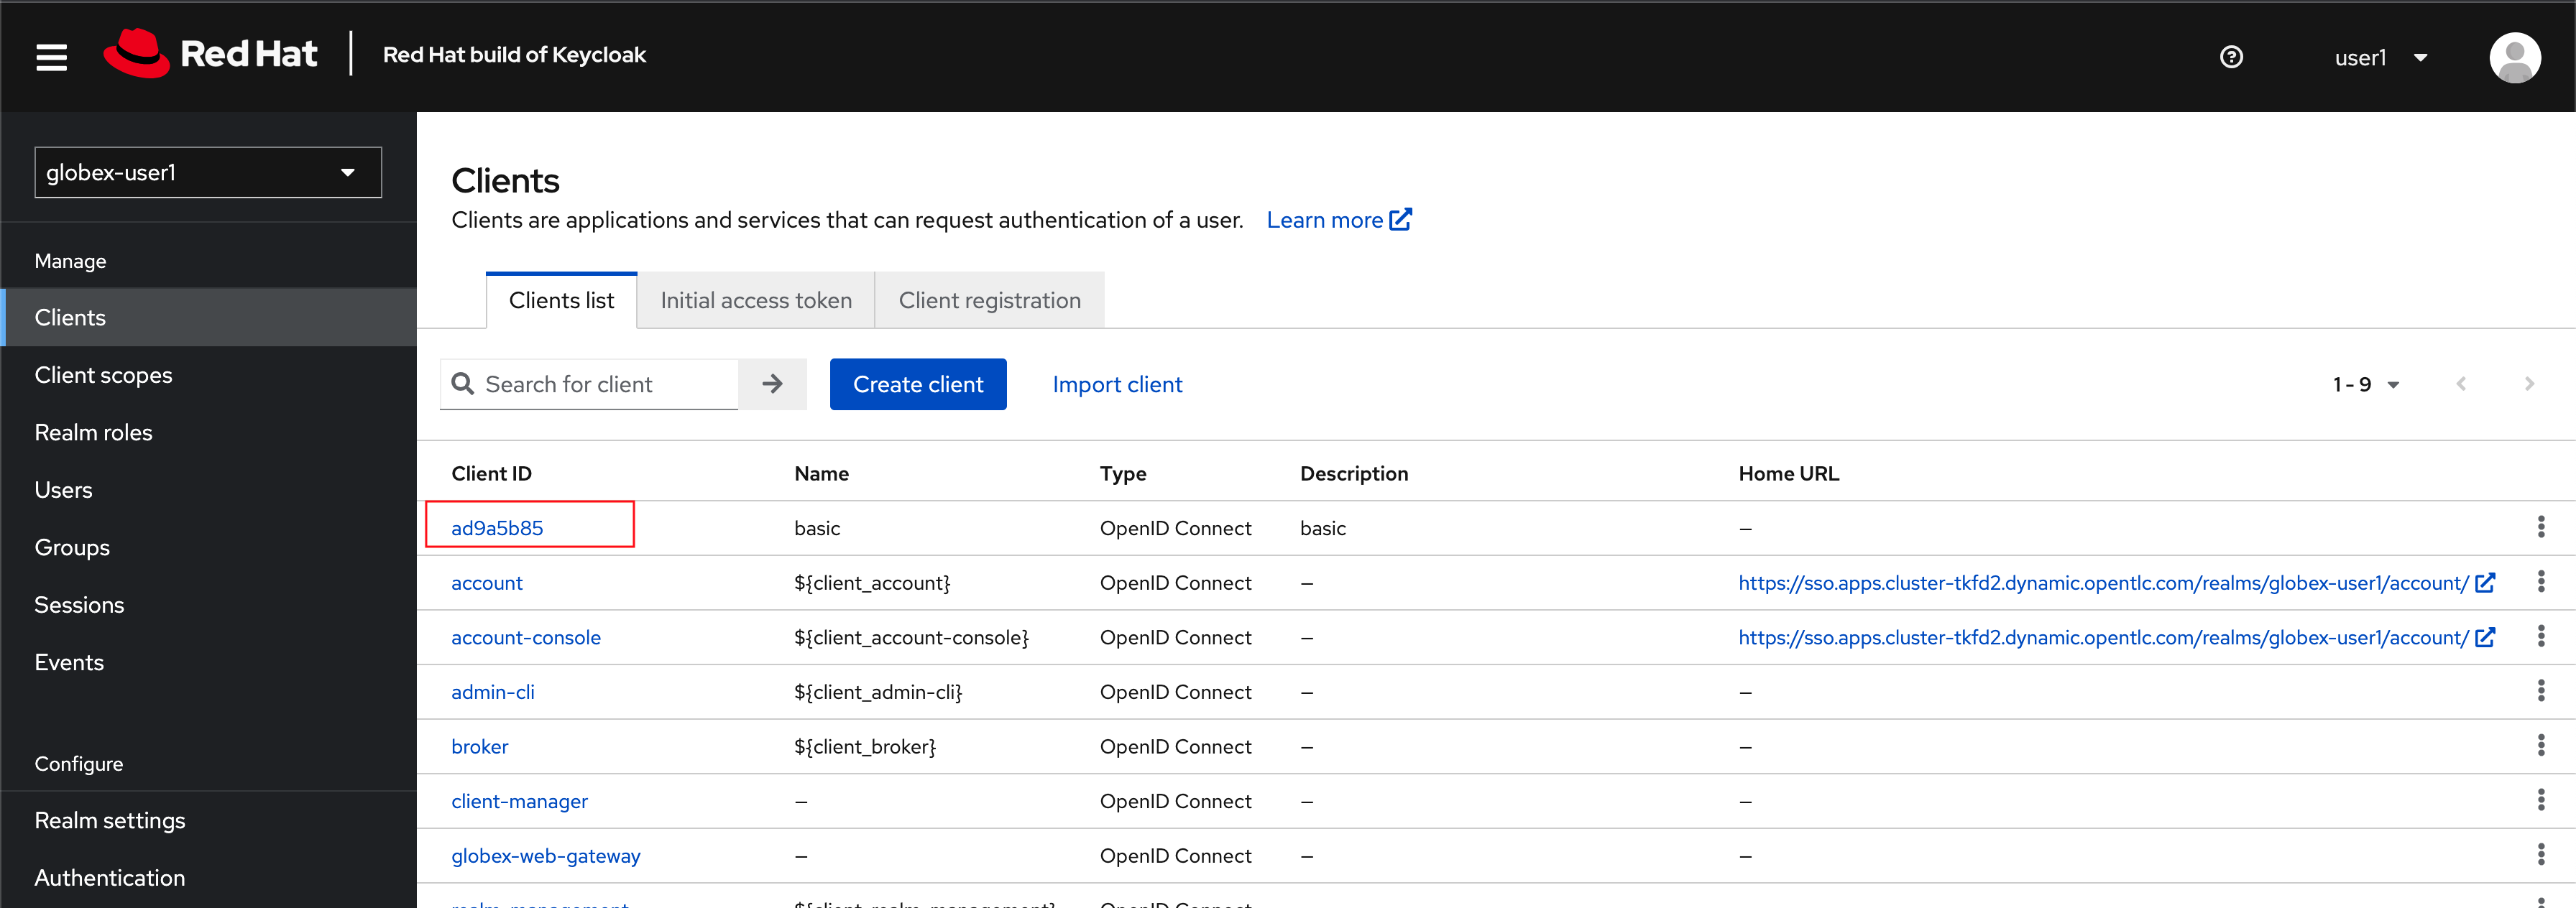 Figure 20. Keycloak Clients List for Mobile client
 -
Click on the new Client ID that was created when you signed up for Mobile Gateway Application
Where do I find this Client ID?
-
Navigate to the {globex_developer_portal}/admin/applications[Globex Developer Portal Applications^, window="devportal"]
-
The client ID is displayed against the
globex-mobile-gateway-productproduct.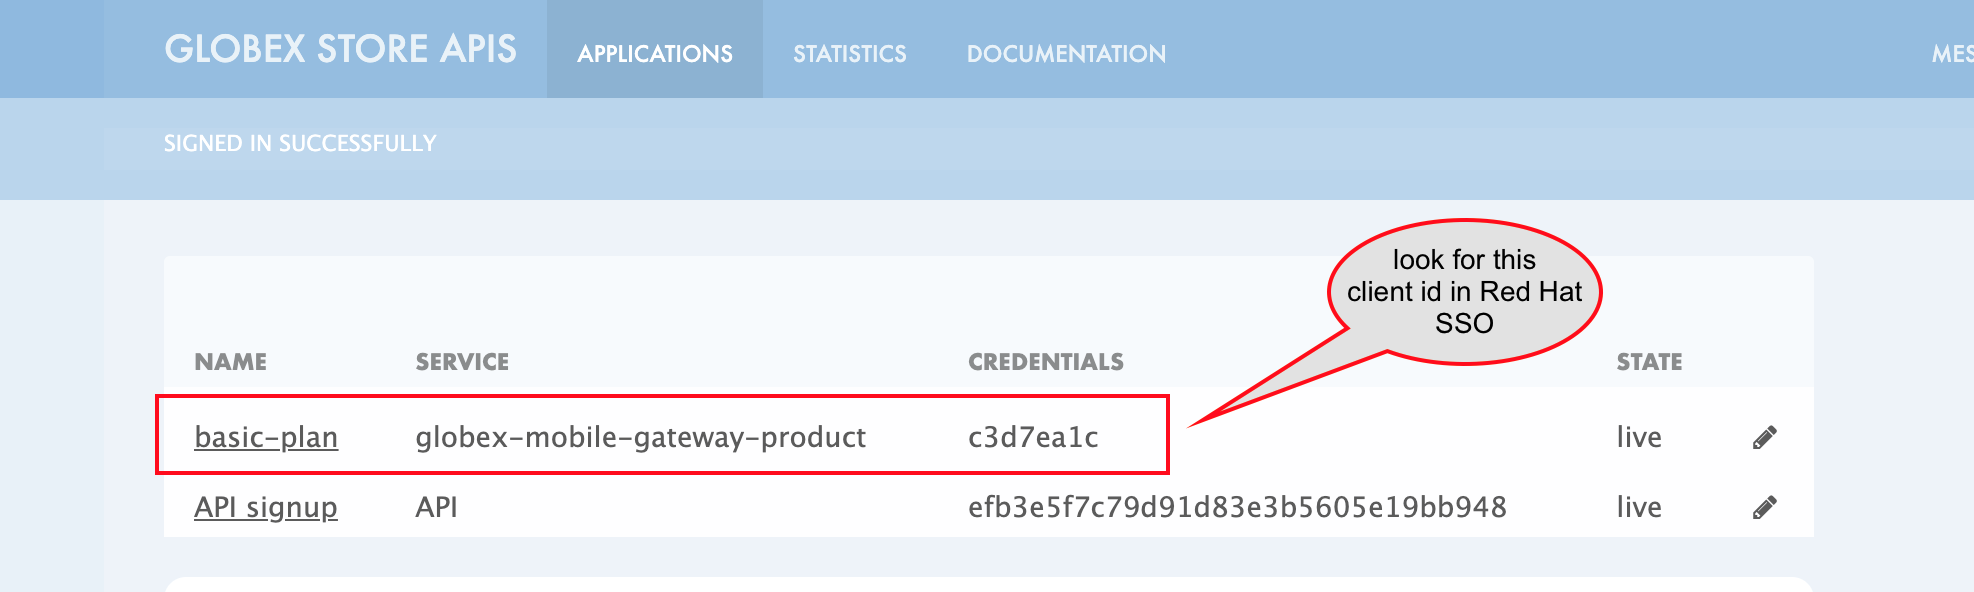 Figure 21. globex-mobile deployment on OpenShift
-
-
Close to the bottom of this page, you would see the Web Origins field.
-
Update this field with the following value and click on Save
https://globex-mobile-globex-apim-{user_name}.{openshift_subdomain}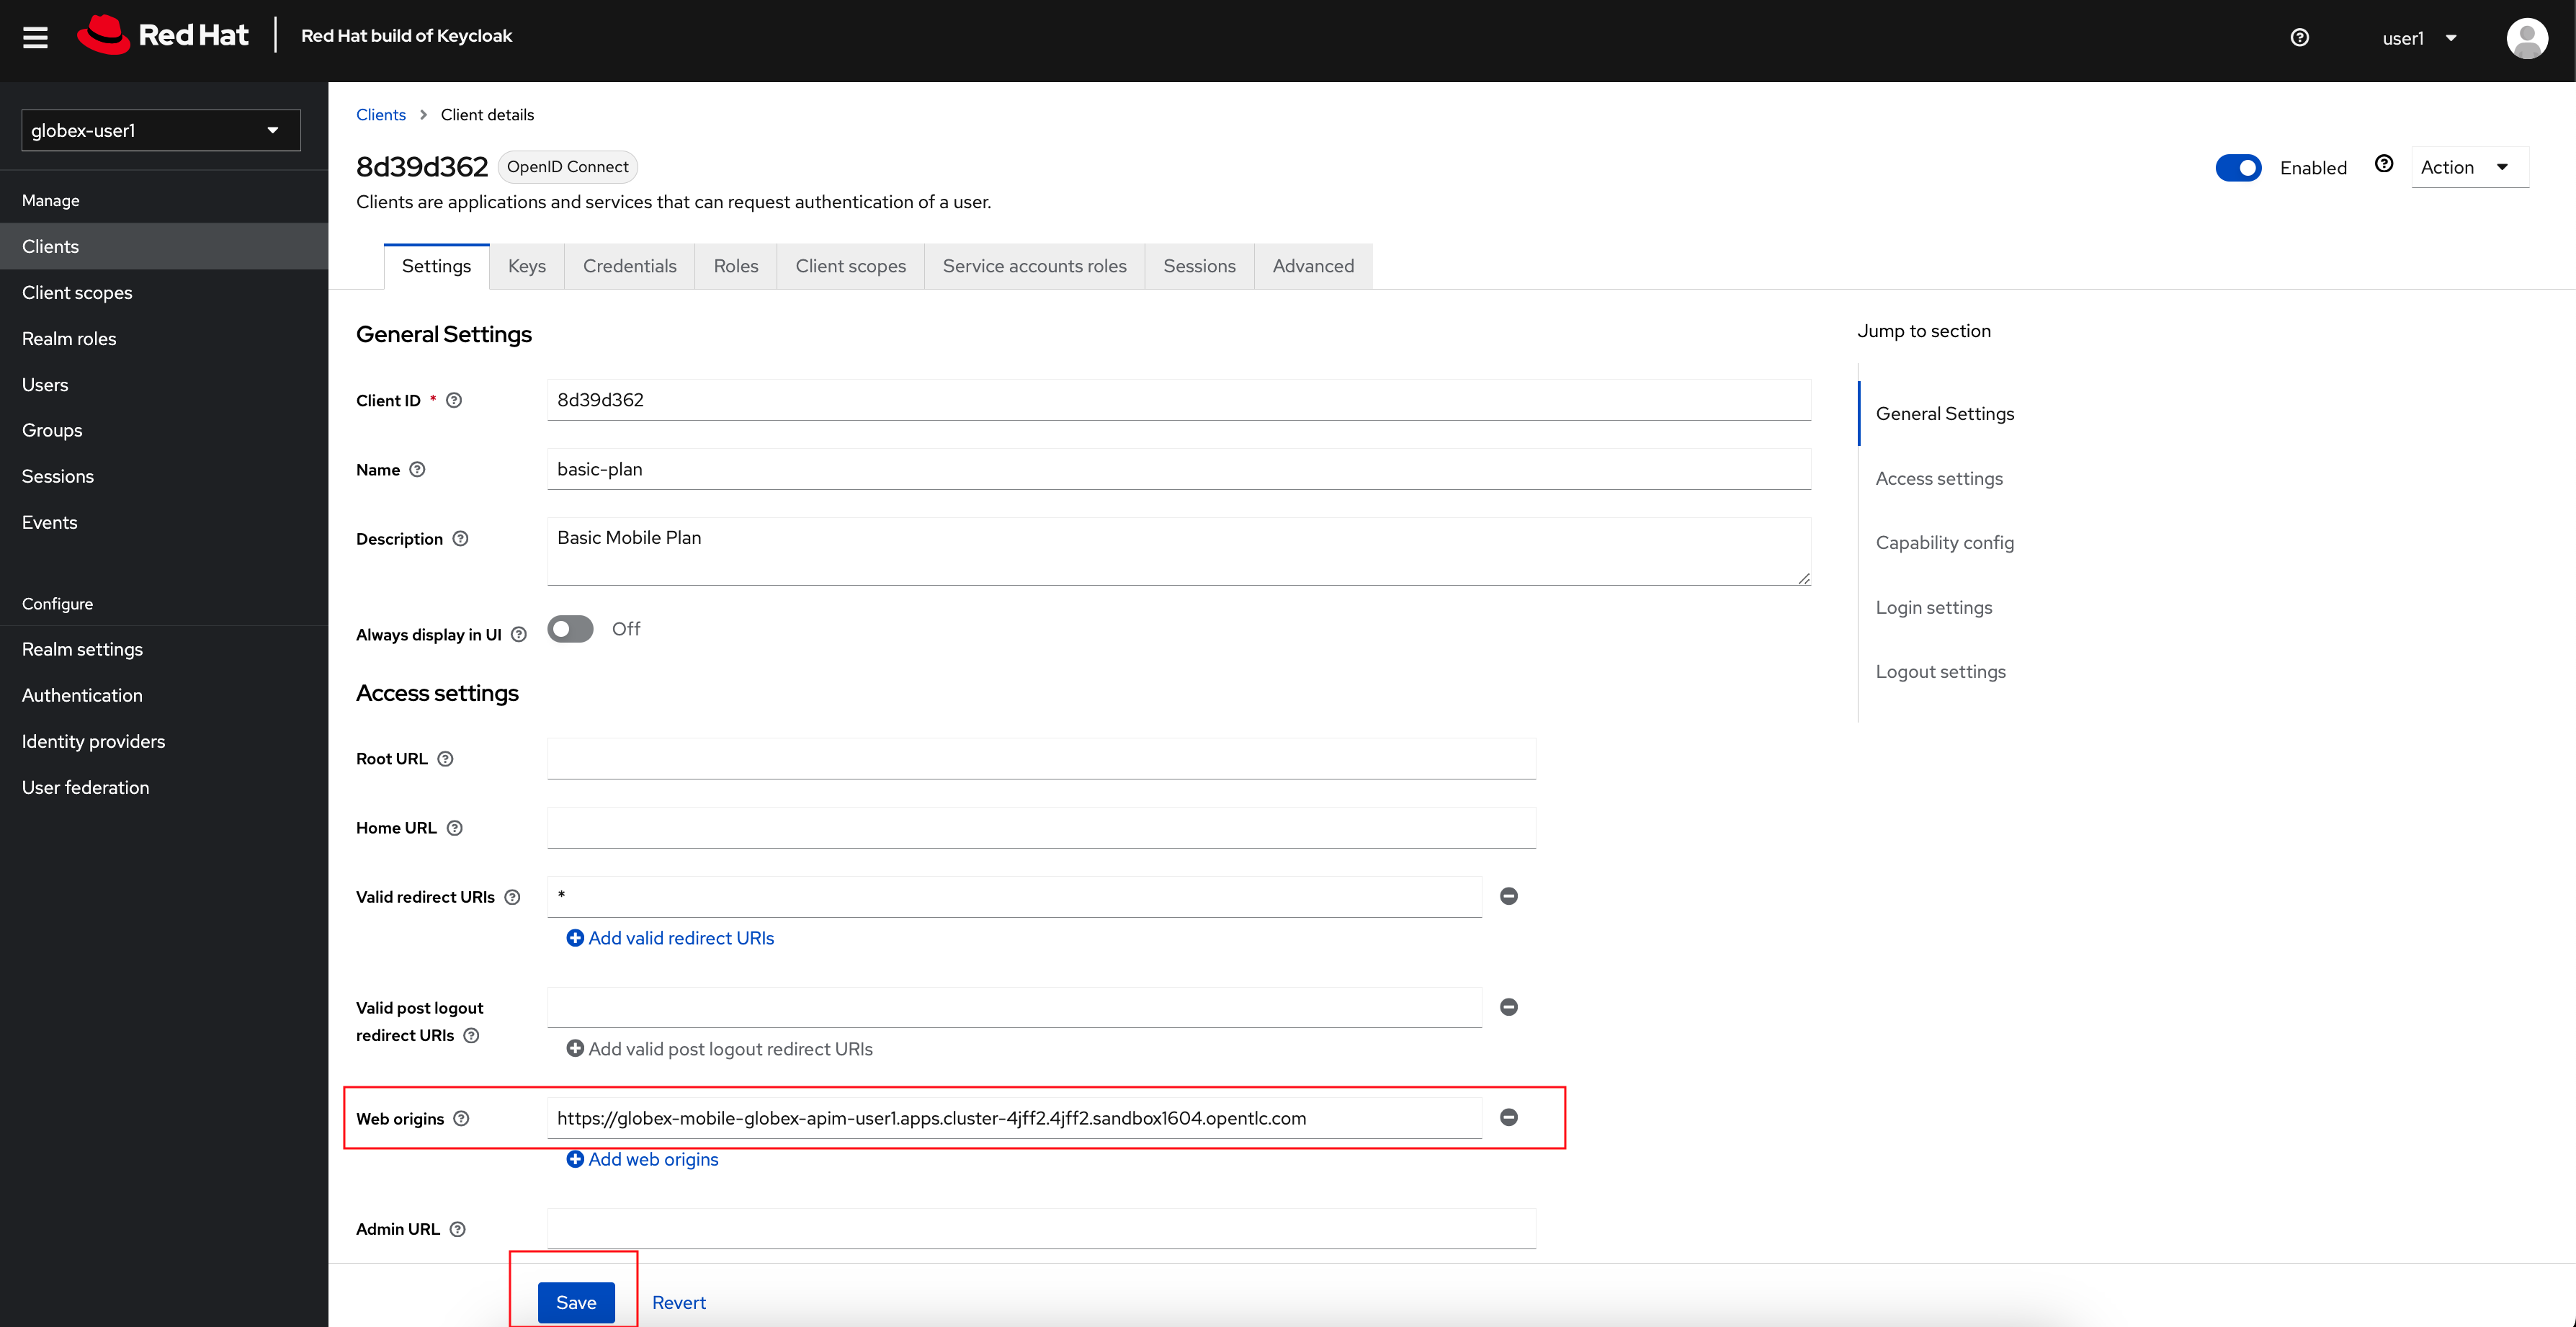 Figure 22. Keycloak: Update Web Origin value for the new Client ID, and click on Save.