Enable the Rocket.Chat to Matrix interaction
As previously described, the Rocket.Chat integration is already in place and users can already post questions on the GlobexSupport app which are channelled and available in the AMQ Broker.
In this first implementation activity you need to enable the end-to-end data flow between Rocket.Chat and Matrix (marked 1 in the diagram below).
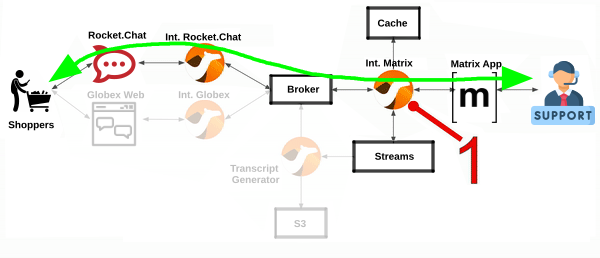
Events can already travel half the way up to the broker (AMQ), but the second stage, from the broker to Matrix, is still pending.
1. How Customers interact with Agents
Customers will choose Rocket.Chat or Globex’s chat widget to communicate with agents. They will do so in a private one-to-one manner.
From Rocket.Chat, a channel called globex-support-{user_name} will be available. This channel looks and feels like any other Rocket.Chat channel you can interact with. You can send direct messages and get responses. The user can enter their question/concern, which is channelled to the agent, and wait for a response.
On Matrix, where the agents operate, each new customer request will initiate a new conversation in a new dynamically created room. This room will remain open during the life of the conversation, until the customer has been attended and the conversation can be considered closed. At that moment, the agent manually leaves the room in Matrix, and the customer is notified in Rocket.Chat.
2. The role of Caching
Typical API interactions are of synchronous nature, a client sends a request and waits for a response. In systems architectures, synchronous exchanges are easier to implement, but are more resource costly.
| Synchronous calls may be thread-blocking, and under utilise the infrastructure during heavy traffic loads, possibly causing bottlenecks. |
Our use case however involves human conversations which may flow in any arbitrary order. An event-driven approach fits better.
Because event-driven architectures are a-synchronous (no waiting to do), they optimise performance (no thread blocking), at the cost however of increased complexity. Caching is a strategy (among others) to assist the event-driven approach and offer an elegant implementation.
In our use case, we need to propagate Rocket.Chat messages to Matrix, and vice-versa. However, we’re dealing here with private interactions between customers and agents, and we need to maintain separate conversations in parallel and prevent interferences between users. In contrast, when a single channel is used for all participants, all messages depart and land in static channels.
Caching allows us to keep the context of a one-to-one conversation between the customer and the agent. The context data will include information about the private channel in Rocket.Chat and the private channel in Matrix.
3. Implement the caching logic
What will I learn?
|
In the content that follows you will learn the following concepts:
|
|
Click above in "What will I learn" to reveal information. All along the workshop you will find folded information you can reveal to know more. |
Our cache technology is Red Hat Data Grid, which is based on the open source project Infinispan. Your environment should contain a dedicated instance of Data Grid in the globex-camel-{user_name} namespace.
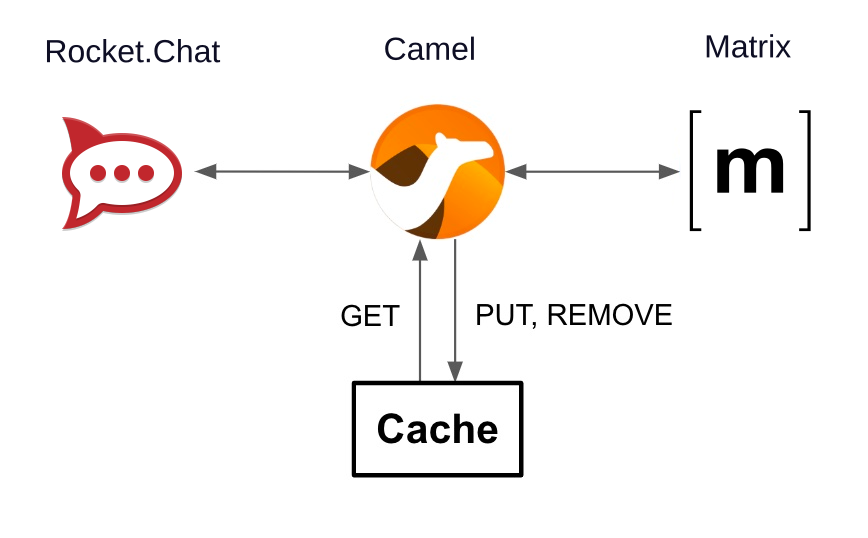
Your Matrix integration, implemented with Camel, requires access to Red Hat Data Grid (cache system) to push, fetch, and remove cache entries, in order to work out Rocket.Chat/Matrix users pairings while delivering messages back and forth.
Your first task is to define the Camel routes responsible to interact with Data Grid.
-
Navigate to the Dev Spaces terminal tab, and in the terminal execute the snippet below to find your working directory:
cd /projects/workshop-devspaces/workshop/module-camel/lab/matrix/The working folder contains a codefolder to support you on this exercise, as well as adeployscript to help you run it in OpenShift. -
In your terminal, use the
kamel(Camel K client) command below to create a new Camel source file where to define your Camel routes for the caching logic:kamel init routes-cache.yamlCamel supports various DSLs (Domain Specific Language). The main ones are YAML, XML and Java. With the command above, Camel K automatically generates a code example using the DSL chosen. -
Open the
routes-cache.yamlfile in your editor.-
Select from your project tree:
-
workshop → module-camel → lab → matrix → routes-cache.yaml
-
-
You’ll see how the file opens in the editor.
-
Delete the example route (full
fromdefinition) inroutes-cache

-
-
And replace the deleted route with the following snippet that defines the
PUT(in cache) operation:# # - route: from: uri: "direct:cache-put" # <1> steps: - marshal: # <2> json: {} - convertBodyTo: # <2> type: String - removeHeaders: # <3> pattern: '*' - setHeader: # <4> name: ${{{cache.operation}}} simple: ${{{cache.put}}} - setHeader: # <4> name: ${{{cache.value}}} simple: ${body} - setHeader: # <4> name: ${{{cache.key}}} simple: ${exchangeProperty.key} - to: uri: "infinispan://default" # <5> # #There is no need to save changes, Dev Spaces auto-saves file changes automatically. You could consider the Camel route above equivalent to a subroutine in any programming language. It executes the action of pushing a new entry in cache.
Click here for details of the above route
1 The fromelement uses thedirectCamel component, which is a special component that allows other Camel routes in the code to make internal invocations to this one.2 Next, a JSON marshaller renders the payload in JSON format. This implies the route expects the payload (body in Camel terms) to contain a Java data structure (Map). This one liner automatically converts the Java Map into JSON by using a Camel DataFormat. It then converts the body into a String for storage into the cache. 3 In preparation for the PUT operation, the removeHeadersinstruction ensures all (star symbol) residual headers are erased beforehand.4 Next, the route sets the 3 headers required to invoke the cache system. These are: the type of operation (PUT), the value (the payload/body), and the key (unique key to access the data). You’ll observe the setters are using a
${{{…}}}syntax to resolve the name and value from configuration parameters. The double bracket finds the parameter, the dollar/bracket belongs to thesimplesyntax in Camel.5 Finally, the route defines the infinispancomponent to connect and push the information to DataGrid using the key/value/operation headers provided.The
infinispancomponent requires no extra parameters because it has been pre-configured for you, it’s secured with TLS and Scram, and points to your DataGrid instance.
-
Let’s implement the
GEToperation.To the same file routes-cache.yaml, add the (copy and paste) the snippet below:
#
- route:
    from:
      uri: "direct:cache-get"                # <1>
      steps:
        - removeHeaders:                     # <2>
            pattern: '*'
        - setHeader:                         # <3>
            name: ${{{cache.operation}}}
            simple: ${{{cache.get}}}
        - setHeader:                         # <3>
            name: ${{{cache.key}}}
            simple: ${exchangeProperty.key}
        - to:
            uri: "infinispan://default"      # <4>
        - when:
            simple: ${body} != null          # <5>
            steps:
              - unmarshal:                   # <6>
                  json: {}
#
In a very similar fashion, the
GETroute definition performs the following actions:Click here for details
1 The fromelement is defined with thedirectcomponent to allow other Camel routes invoke it.2 Removes residual headers. 3 Sets the operation ( GET) and key to obtain the cache entry.You can consider the
${exchangeProperty.key}as a parameter the calling route needs to preset. Exchange properties are like variables you can define during the lifetime of a Camel transaction.4 Uses the infinispancomponent to request the cache entry.5 The whenelement checks if a value is returned (it might not exist).6 When true, it un-marshals the JSON body into a Java Map. Un-marshalling the payload into a Java structure allows for an easier handling of the JSON data in other parts of the Camel implementation.
-
The last cache operation to define is
REMOVE. Let’s define it with the definition below.Copy and paste the snippet below to the same file routes-cache.yaml:
#
- route:
    from:
      uri: "direct:cache-remove"             # <1>
      steps:
        - removeHeaders:                     # <2>
            pattern: '*'
        - setHeader:                         # <3>
            name: ${{{cache.operation}}}
            simple: ${{{cache.remove}}}
        - setHeader:                         # <3>
            name: ${{{cache.key}}}
            simple: ${exchangeProperty.key}
        - to:
            uri: "infinispan://default"      # <4>
Similarly, the
REMOVEroute definition performs the following actions:Click here for details
1 The fromelement is defined with thedirectcomponent to allow other Camel routes invoke it.2 Removes residual headers. 3 Sets the operation (REMOVE) and key to target. You can consider the
${exchangeProperty.key}as a parameter the calling route needs to preset. Exchange properties are like variables you can define during the lifetime of a Camel transaction.4 Uses the infinispancomponent to perform the operation.
You should see now included in your routes-cache.yaml file, the definition of all the 3 above routes. Your work is done here and you can resume with the tasks that follow.
4. Implement the Client to Agent flow
The interaction between customers and agents flows in two directions. The instructions that follow will help you to complete the logic that delivers events (messages) from clients to agents. Later, you will work on the reverse (agents to clients) processing direction.
As indicated in the module’s introduction, the integration with Rocket.Chat (where clients live) is already deployed and running in the environment. Customers posting messages in the globex-support-{user_name} channel in Rocket.Chat will translate into events delivered to the AMQ Broker.
The starting point of this task is to subscribe to the relevant address in the AMQ Broker to collect the customer messages. From that point, we will complete the implementation to connect Rocket.Chat and Matrix end-to-end.
4.1. Create the AMQ listener
What will I learn?
|
In the content that follows you will learn the following concepts:
|
-
In your terminal, execute the
kamelcommand below to create a new source file to process AMQP events:kamel init routes-from-amq.yamlThe new file has a YAML extension. Camel K automatically generates for you a skeleton using the YAML DSL (Domain Specific Language). -
Open the
routes-from-amq.yamlfile in your editor. -
Delete the example route (full
fromdefinition)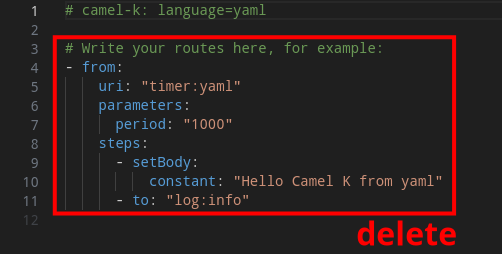
-
Replace (the deleted route) with the following snippet:
#
- route:
    from:
      uri: "amqp:topic:{{broker.amqp.topic.clients.rocketchat}}{{rocketchat.channel.id}}"  # <1>
      parameters:
        connectionFactory: "#myFactory"    # <2>
      steps:
        - to:
            uri: "direct:support-request"  # <3>
#
Click here for details of the above route
1 Subscribes to an AMQ address (using the AMQP protocol) 2 The component is defined with a pre-configured (provided) connection factory to secure and point the connection to the shared AMQ Broker. 3 And directs all events to the Camel route support-request(to be created in the next section).This route does not perform any processing because our goal is to maintain a pluggable architecture. It means that we can define additional Camel routes fetching events from other sources and direct them to the main processing logic.
Later, a second channel will also plug in to this logic to consume events from the Globex Web portal via its chat widget.
The section that follows helps you implement the route direct:support-request where all AMQP events are directed
4.2. Create the main processing route
The main route will process events originating in Rocket.Chat (and also coming from other sources, later in the lab).
What will I learn?
|
In the content that follows you will learn the following concepts:
|
In the same YAML file (routes-from-amq.yaml) created in the previous step, copy and paste the following snippet:
#
- route:
    from:
      uri: "direct:support-request"
      steps:
        - unmarshal:                                                # <1>
            json: {}
        - setProperty:                                              # <2>
            name: in
            simple: ${body}
        - to:
            uri: "direct:get-cache-entry"                           # <3>
        - setProperty:
            name: matrix-room                                       # <4>
            simple: ${exchangeProperty.cache.get(target).get(room)}
        - setProperty:
            name: user                                              # <5>
            simple: ${exchangeProperty.cache.get(user)}@${exchangeProperty.cache.get(source).get(name)}
        - setBody:                                                  # <6>
            simple: ${exchangeProperty.in.get(text)}
        - to:
            uri: "direct:matrix-send-message"                       # <7>
#
Click here for details of the above route
| 1 | Un-marshals the payload into a Java Map (for easier access) | ||
| 2 | Defines a property in to keep the original incoming data.
|
||
| 3 | Obtains the cache entry from invoking the get-cache-entry route.
|
||
| 4 | Sets a property with the target Matrix room where to send the message | ||
| 5 | Sets a property with the name of the user (customer) who sends the message | ||
| 6 | Sets the text message to be sent to Matrix | ||
| 7 | Delegates the message delivery to the route matrix-send-message |
In the next sections you will
-
Review the logic of the route
get-cache-entrywhich is referenced by the route created in the above step (in fileroutes-from-amq.yaml) -
Implement the route
direct:matrix-send-messagethat is invoked by the same route you created in the above steps
4.3. Overview of the get-cache-entry route
This route needs to perform a series of actions. Among those, it crucially needs to interact with the Cache system, and invoke some of the Camel routes you’ve completed earlier (PUT, GET and remove operations).
To speed up with the lab, this Camel route is already provided. Here we’re just doing an overview of the logic implementation.
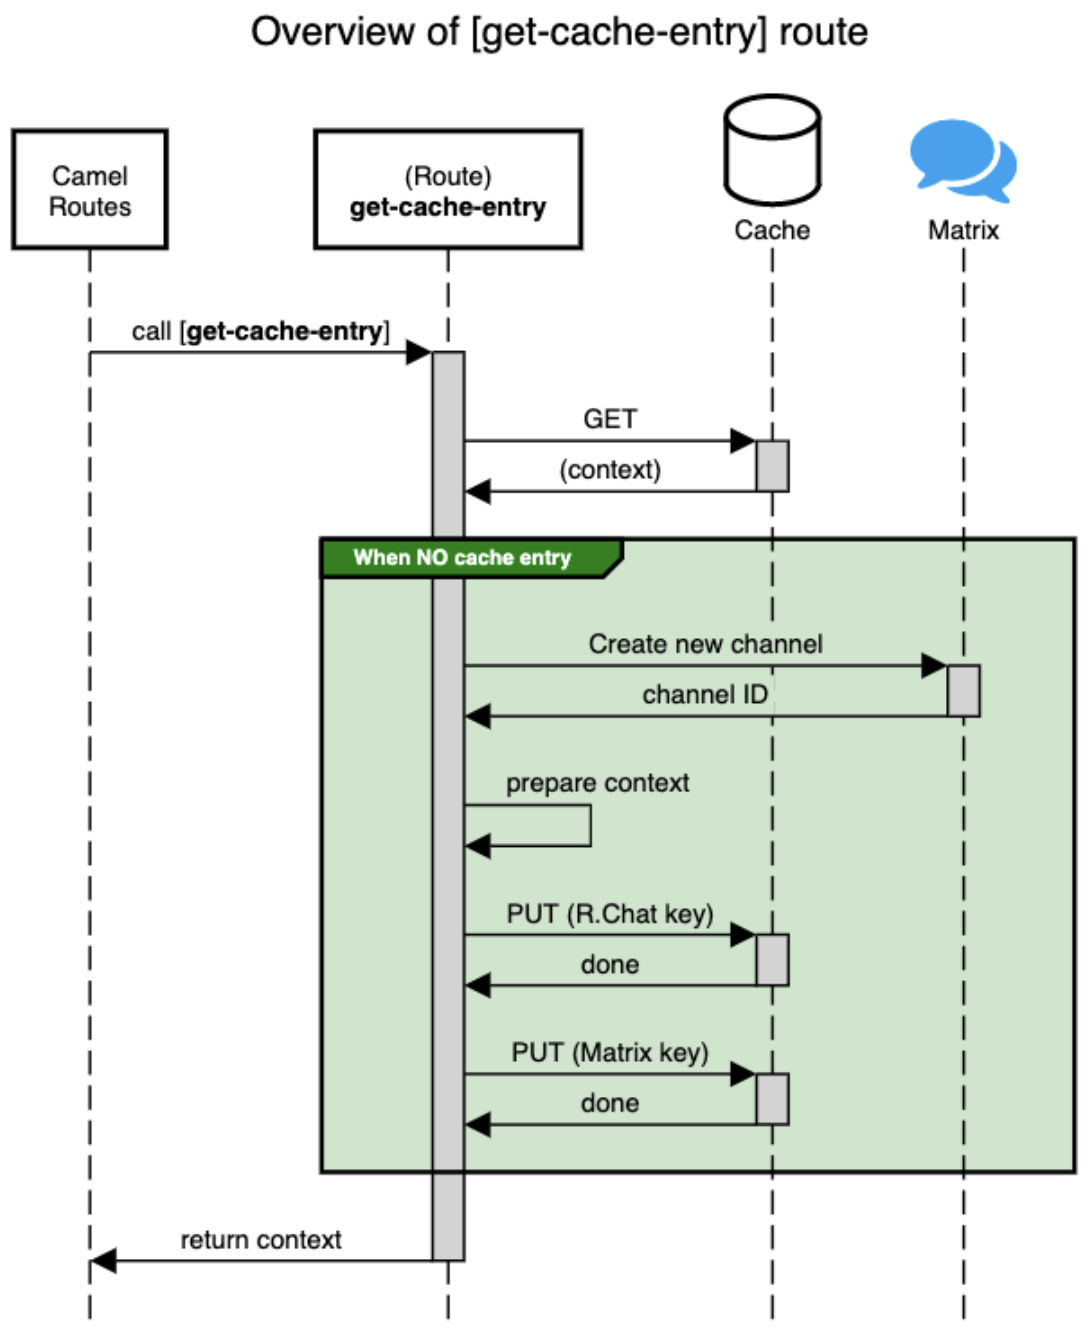
In the sequence diagram above you’ll see that:
-
It attempts to obtain a cache entry
-
If it doesn’t exist
-
It creates a new room in Matrix (new customer/agent interaction).
-
It prepares the context data.
-
Then, it creates new cache entries to keep Rocket.Chat and Matrix context data.
-
-
It returns, with the context information.
4.4. Implement the route pushing messages to Matrix
All the pieces are in place - You have the cache interaction resolved, and you have the logic to create new support rooms in Matrix. The final step is to send the actual customer message to Matrix so that an agent can respond.
What will I learn?
|
In the content that follows you will learn the following concepts:
|
Apache Camel has many connectors (components in Camel terms) available out-of-the-box, but one for Matrix doesn’t exist (yet). This gap however does not stop you in any way from integrating with Matrix, and in fact, you have many options for adopting an approach.
To give you a few ideas, Apache Camel is an open framework, meaning its API allows you to extend its functionality with your own components, data-formats, transformers, etc. You could develop a new Matrix component, and if you’re feeling generous donate it to the Camel community. Another strategy is to create Kamelets which are in effect components with additional intelligence, and typically address specific use cases.
In our lab, our choice is to simply invoke the API calls documented in Matrix to cover our needs. Let’s move ahead.
Still in the same YAML file (routes-from-amq.yaml), copy and paste the following snippet:
#
- route:
    from:
      uri: "direct:matrix-send-message"       # <1>
      steps:
        - setProperty:                        # <2>
            name: kafka-body
            simple: ${body}
        - removeHeaders:                      # <3>
            pattern: "*"
        - setHeader:                          # <4>
            name: Authorization
            simple: Bearer {{matrix.access.token}}
        - setHeader:                          # <4>
            name: Content-Type
            simple: application/json
        - setHeader:                          # <5>
            name: CamelHttpMethod
            constant: PUT
        - setBody:                            # <6>
            simple: '{"body": "${body}", "formatted_body": "${exchangeProperty.user} ${body}", "format": "org.matrix.custom.html", "msgtype":"m.text"}'
        - toD:                                # <7>
            uri: "{{matrix.server.url}}/_matrix/client/v3/rooms/${exchangeProperty.matrix-room}/send/m.room.message/${random(999999)}"
        - setBody:                            # <8>
            simple: 'you: ${exchangeProperty.kafka-body}'
        - removeHeaders:
            pattern: "*"
        - toD:                                # <9>
            uri: kafka:support.${env.NAMESPACE}.matrix${exchangeProperty.matrix-room.replace(":","-").replace("!","-")}
Click here for details of the above route
| 1 | Defines the from element with the direct component to allow other Camel routes invoke it. |
||
| 2 | Keeps a copy of the customer message (used later). | ||
| 3 | Removes residual headers. | ||
| 4 | Sets the HTTP headers authorisation and content-type needed for the API call. |
||
| 5 | Sets the HTTP method, which is PUT for sendng a message to Matrix. |
||
| 6 | Defines the JSON payload to be sent containing the customer’s text. | ||
| 7 | Performs the API call using Camel’s HTTP component.
|
||
| 8 | Prepares a payload message to be sent to Kafka.
|
||
| 9 | pushes the message to Kafka.
|
5. Run your code in dev mode
You have completed the processing flow from customers (in Rocket.Chat) to agents (in Matrix). The returning flow is still pending to implement, but you can already test what you have implemented so far.
Camel K features a special running mode called development mode (known as -dev mode-), which allows the developer to run/test the code in Kubernetes and make live code updates on the fly, as if they were working locally. Camel K deploys a test instance that is removed when you stop it.
Let’s run your code in dev mode to validate the flow works as expected.
-
From your terminal in Dev Spaces, execute the following command:
./dev.shThe dev.shscripts runs akamel runcommand with the flag--devmode indicating to run in development mode.
It also defines all the necessary support resources and parameters to run your integration.
You can ignore any warning stating "Unable to verify existence of operator id [camel-k] due to lack of user privileges".You should see in your terminal a log output similar to:
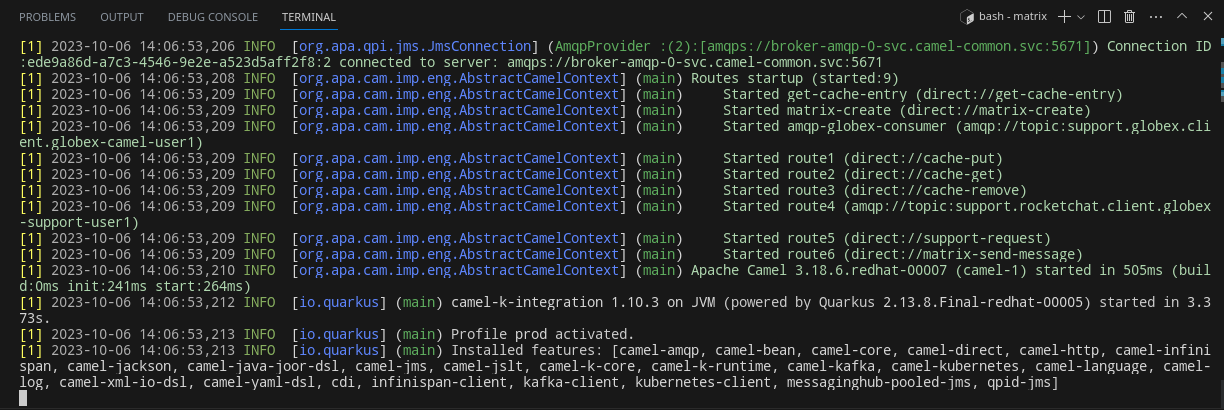
If the
dev.shcommand shows errors, you might have missed a step following the instructions or done some other human error.
If so, try again using a prewritten code by running the following command.
Note: This script executes prewritten code which has the same logic that you have built from scratch in the previous section../safe-dev.sh -
Observe your Topology view in OpenShift. You can open the console by clicking this Topology view link.
You’ll notice that running your code in DEV mode triggers Camel K's operator to deploy a new pod in your user namespace.
The Camel K operator automates the process of creating, building, deploying, and operating integration flows in Kubernetes environments. You should find, as per the picture below, marked in red, the matrix pod running your Camel K code in DEV mode.
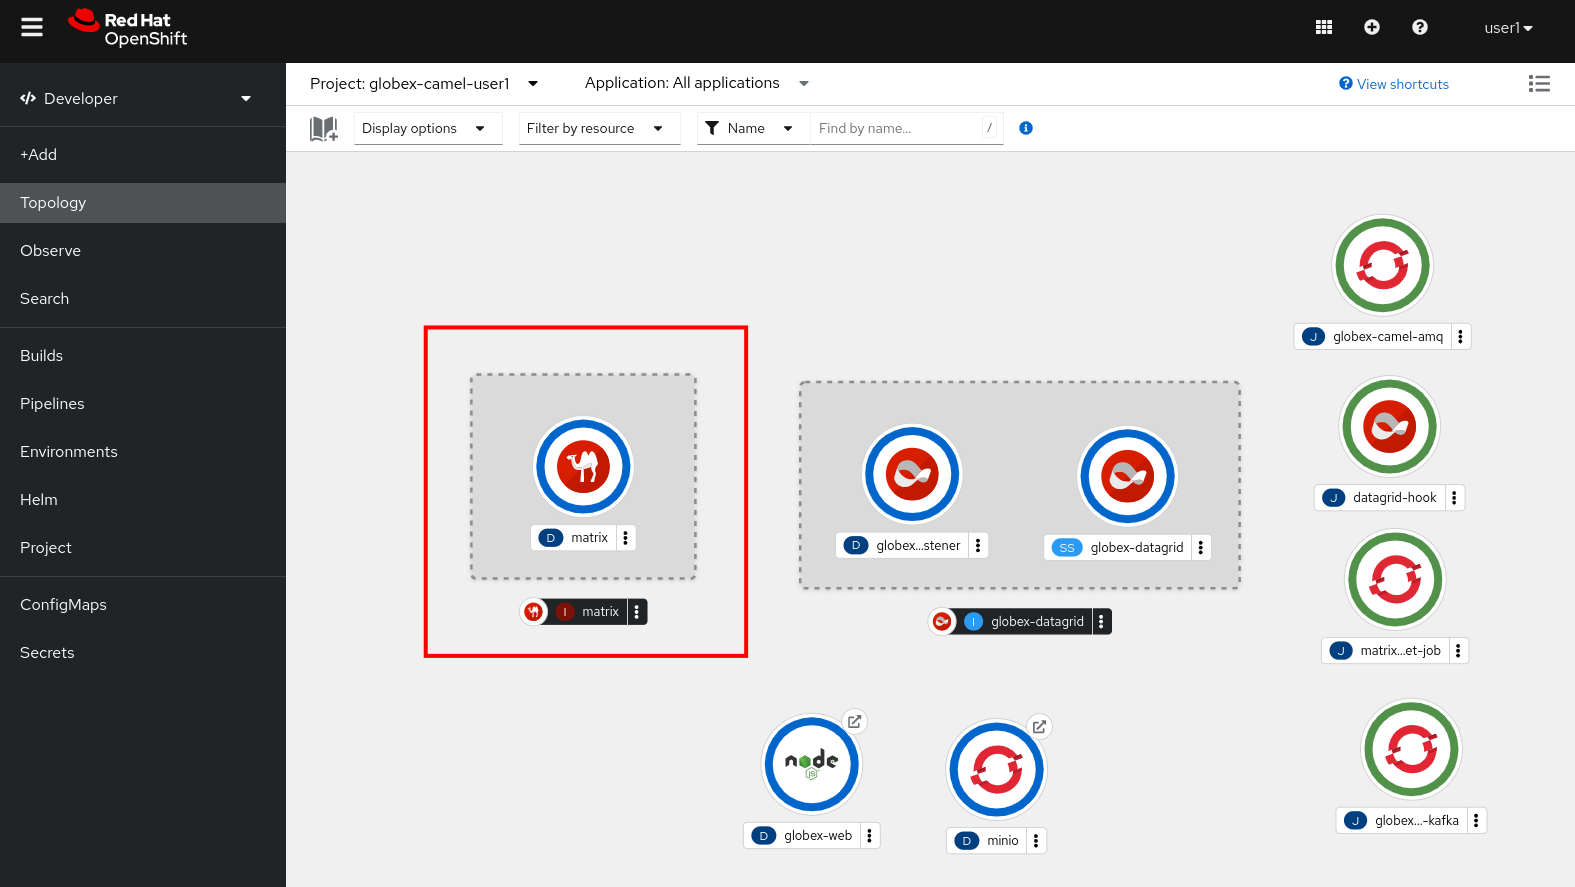
You’ll also see other pre-deployed pods to assist you in this learning module (running DataGrid, Minio (S3), and others). -
Log into the Rocket.Chat application. In a browser window navigate to Rocket.Chat workspace. Log in with your username and password ({user_name}/{user_password}).
Notice the globex-support-{user_name} channel in the channel list on the left side menu.
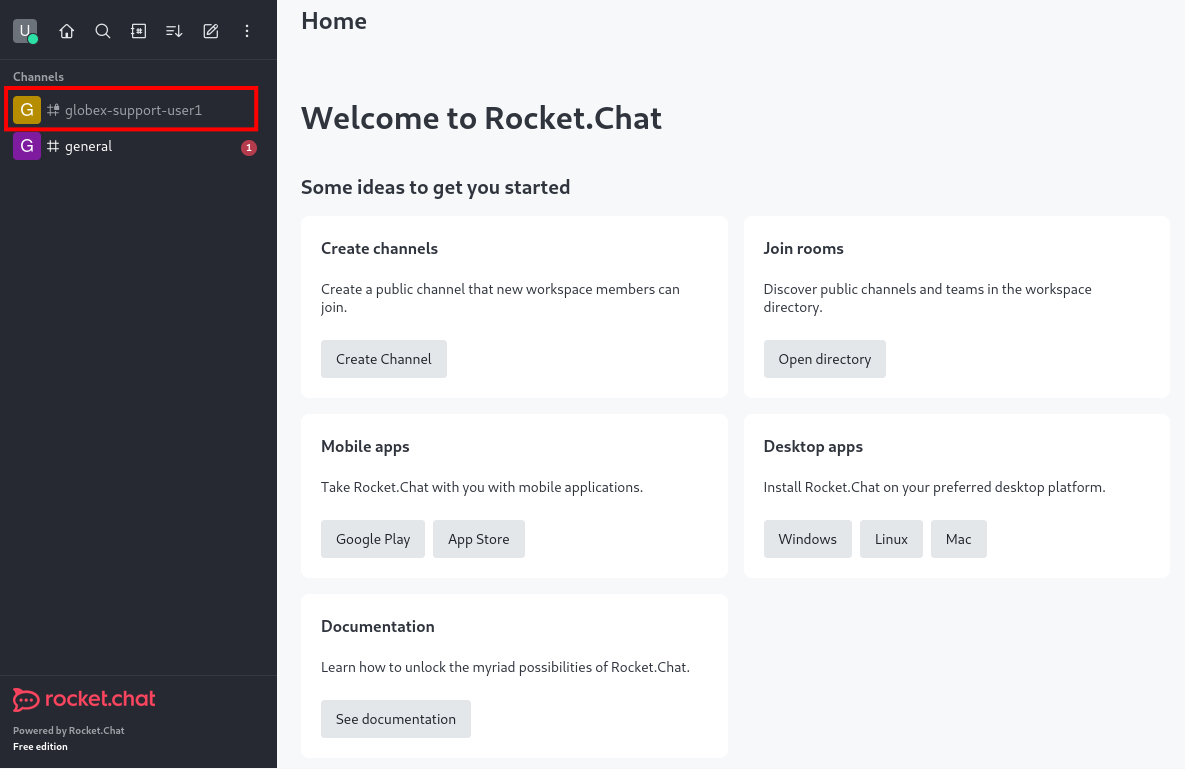
Leave the browser window open.
-
Open a new browser window or tab, and navigate to the Matrix’s Element chat application. Click on the Sign In button. Sign in with your username and password ({user_name}/{user_password}).
You might see a pop-up asking to enable desktop notifications. Click on Enable to enable notifications.
You should see the Matrix’s Element workspace.

Leave the browser window open.
-
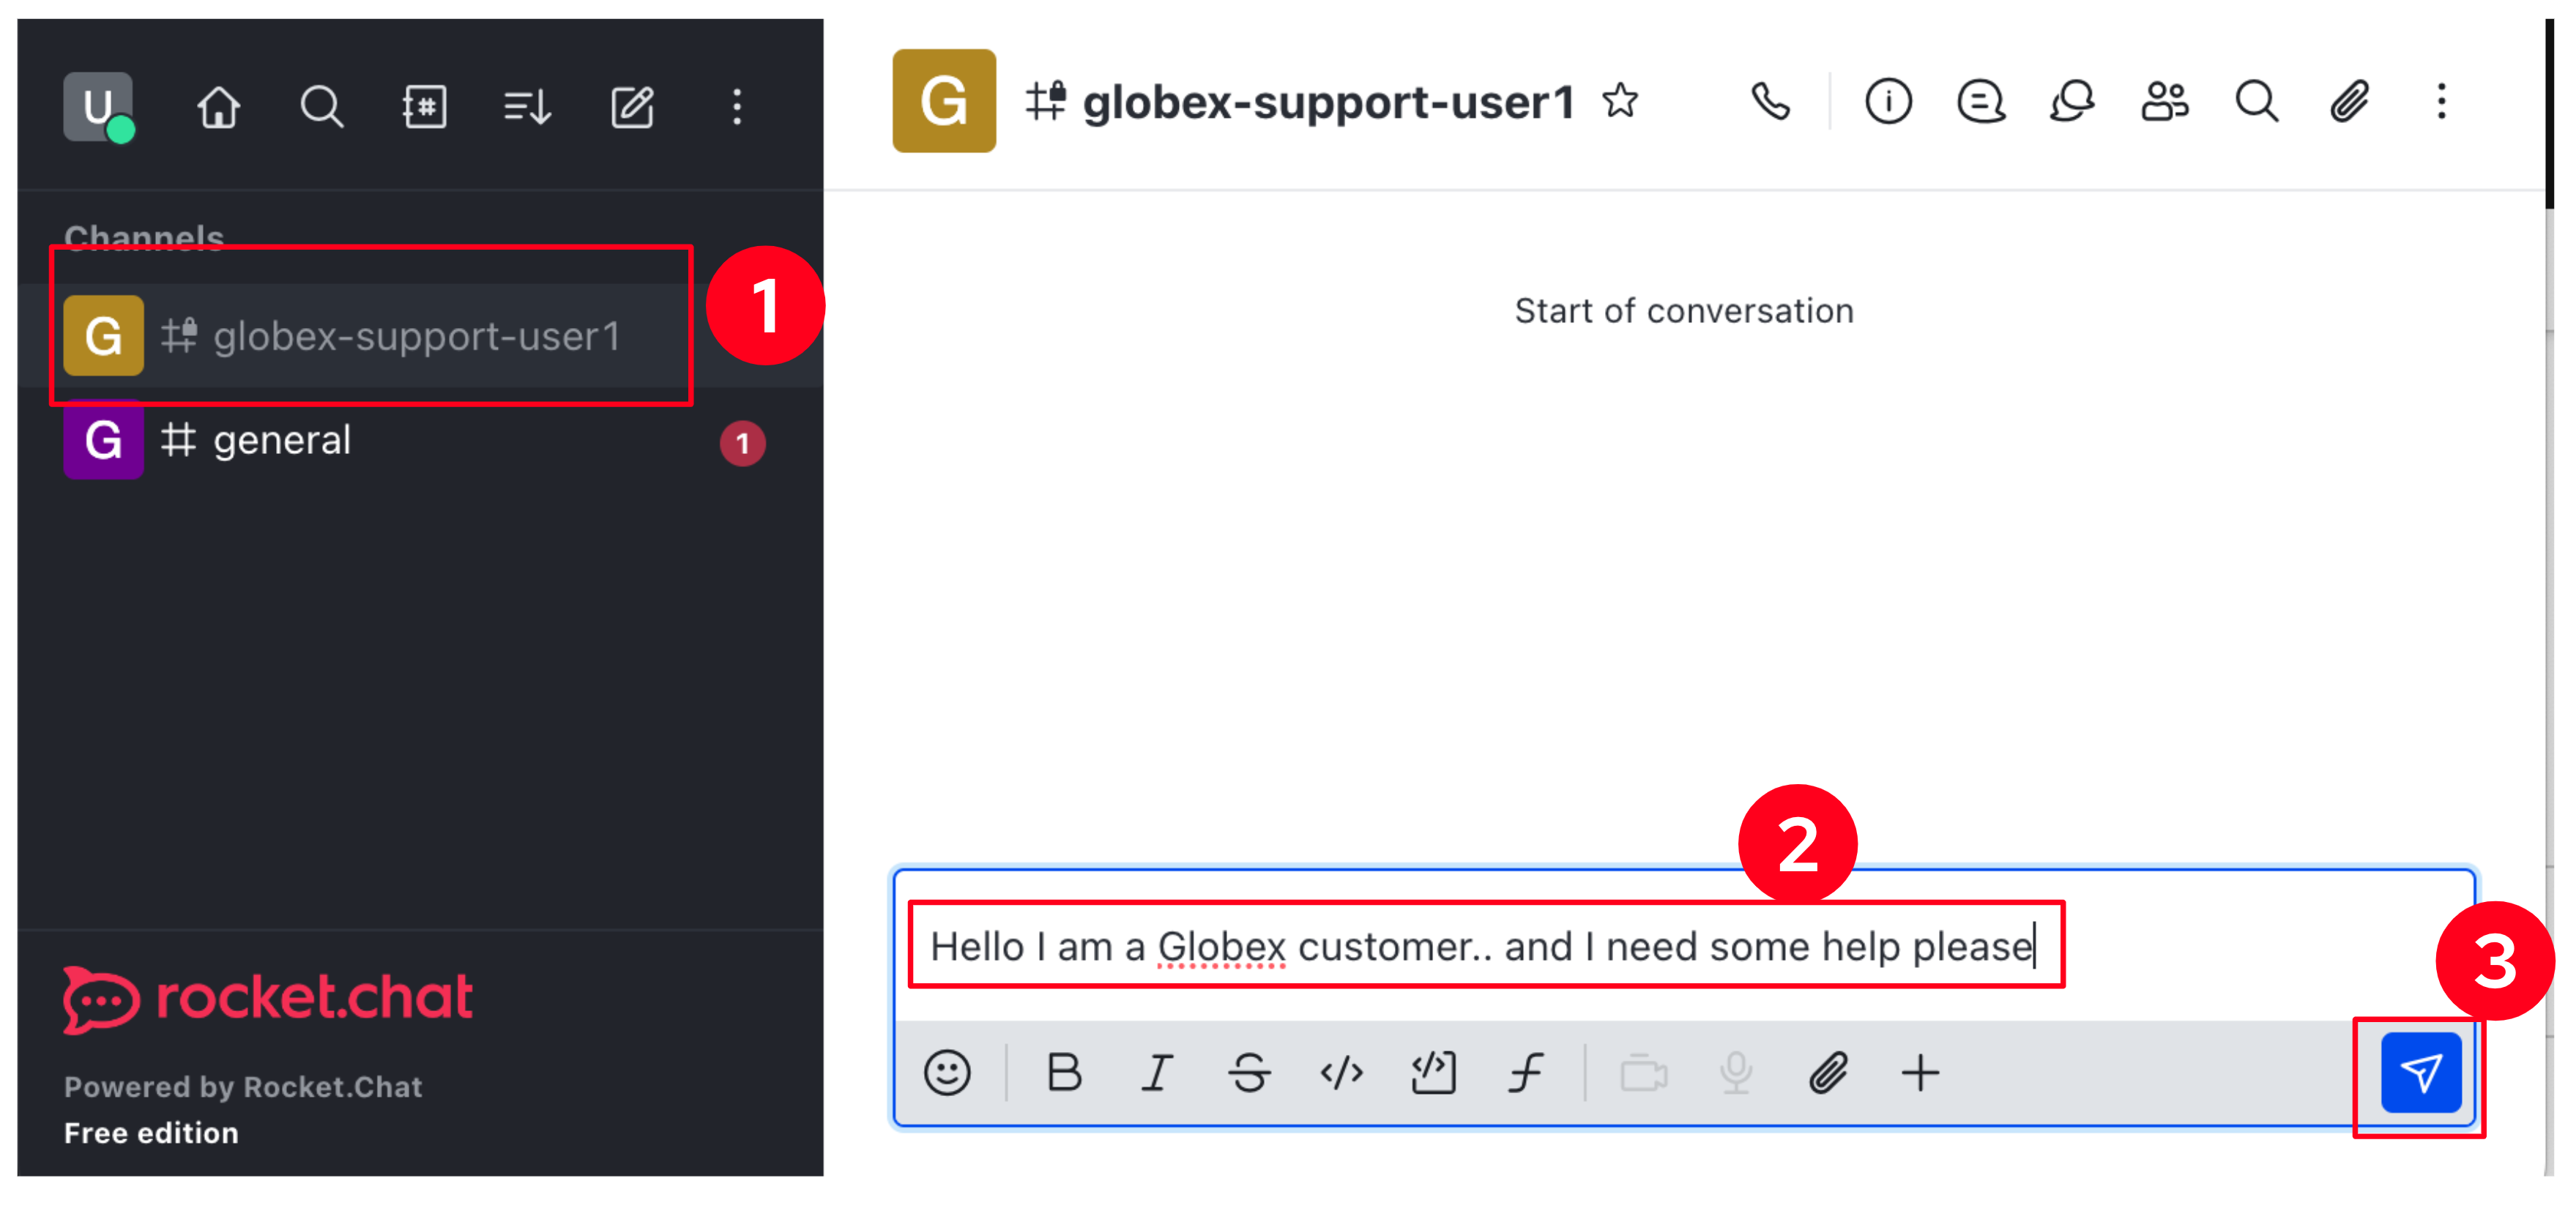
From Rocket.Chat, send a message…
As per the picture below, [1] select the globex-support-{user_name} channel in your Rocket.Chat window, [2] type in a test message, and [3], click the 'Send' button (or press Enter).
-
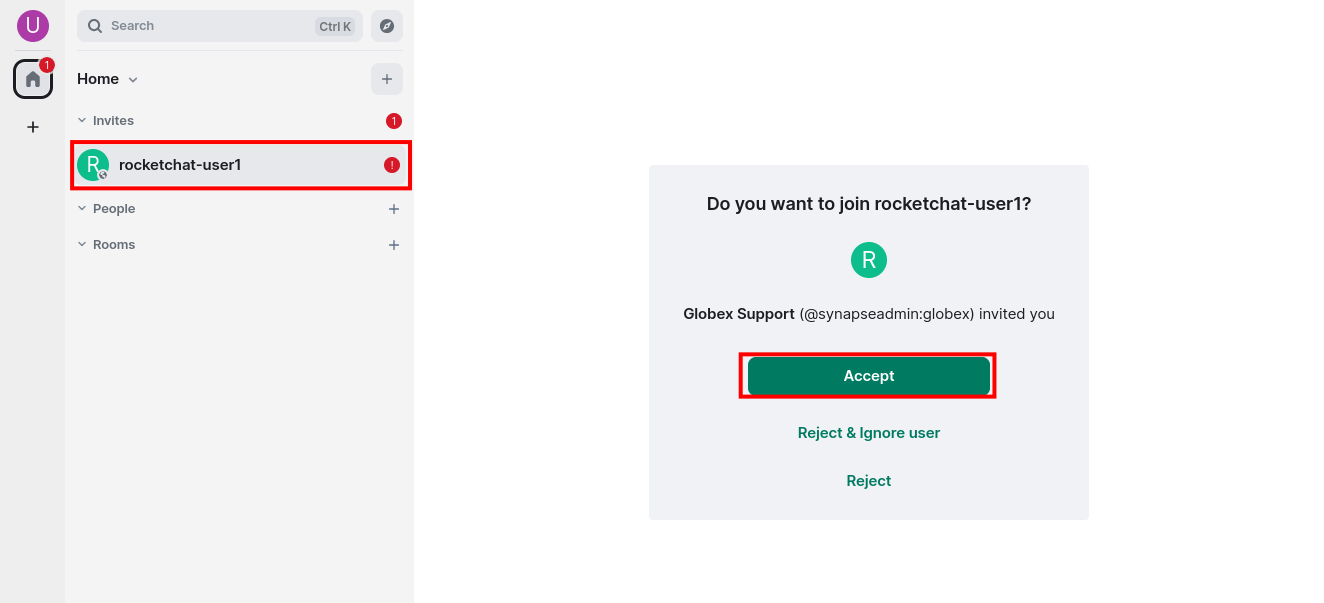
On Element…
You should see a new room created named
rocketchat-{user_name}-
Click on the new room.
-
You should see a dialog box asking if you want to join the room. Click Accept
-
You should see displayed the message sent from Rocket.Chat:
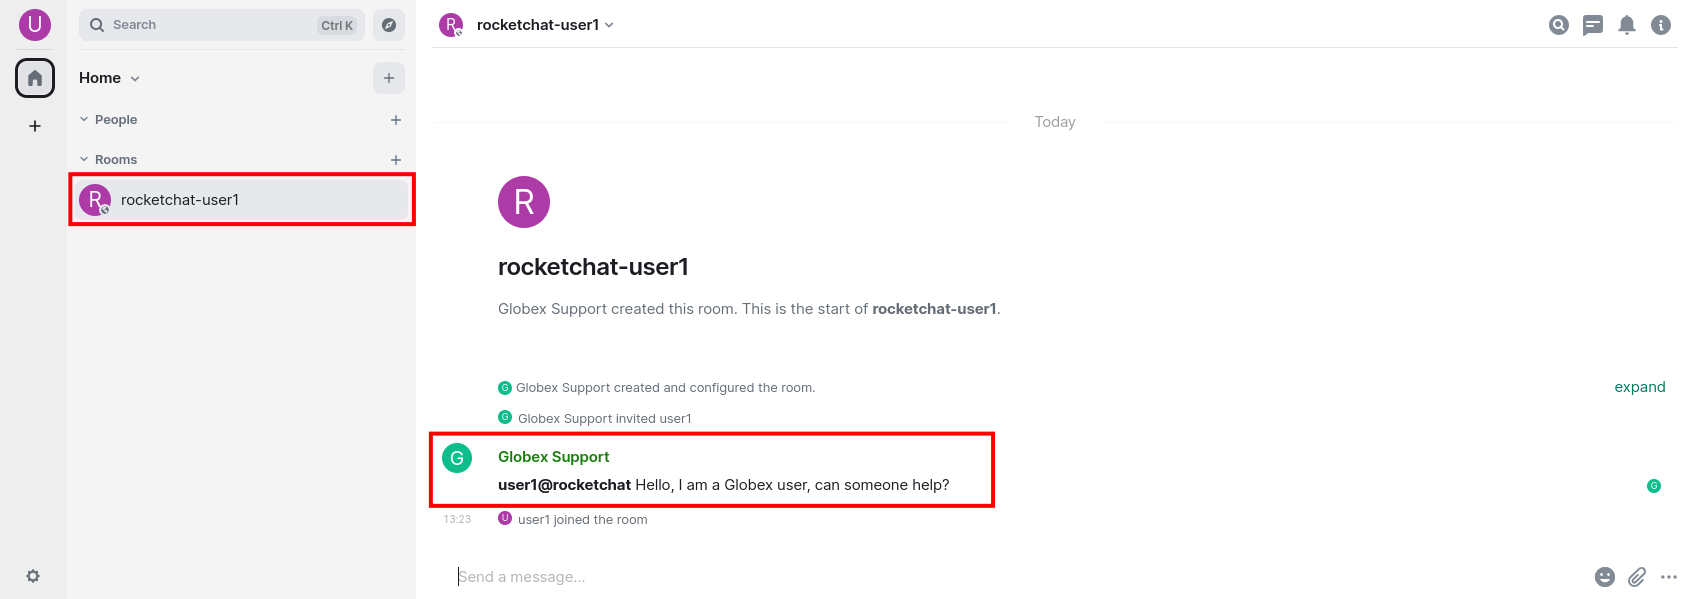
If you see the message in Element as above shown, then you’ve successfully completed this first exercise.
Note: You will not be able to view the message sent from Matrix’s Element chat in the the Rocket.Chat app because that reverse flow is not setup yet.
-
When you’re done, press Ctrl+C to stop the Camel K dev instance running in the Dev Spaces’s terminal.When you do so, you’ll notice the Matrix pod shutdowns and is no longer visible from your Topology view. |