Persist and Share a Session Transcript
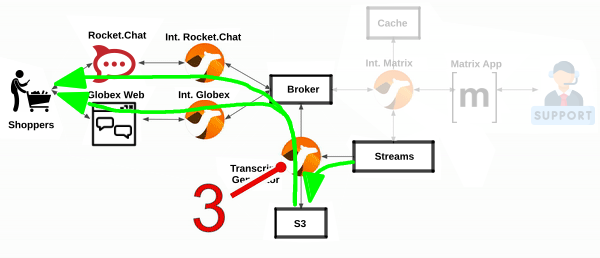
The last piece in the workshop’s architecture is an integration that uses storage to persist the conversation of every customer/agent session and shares a transcript. The diagram below illustrates the data flows that it enables.
All the Camel systems you have completed so far have focussed on interconnecting distinct instant messaging platforms. This lab however simulates the need to respond to government regulations (or policies alike) to meet legal and business data archival requirements.
Adding Kafka in the architecture was a strategical decision. Any type of message broker would also qualify, but we chose Kafka because of its unique ability to replay data streams.
The plan is to replay and process data streams from channel conversations and transfer them to a storage layer dedicated to meet the data retention requirements.
![]()
In the diagram above we see a number of instant messaging platforms interacting together via Kafka. The depicted Camel process represents the new integration to develop responsible to replay streams and push conversations to the storage system.
1. Understand the Transcript Logic
You saw, in some parts of the code, the processing logic pushing events to Kafka to keep record of each one of the interactions between the two actors (customers and agents). Also, when the support session closes, there’s logic to send a signal (via Kafka) to mark the end of the conversation (end of stream).
This orchestrated flow of events is not easy to follow and remember during the course of the workshop. However, in order to complete the implementation you’re about to work on, you really need to understand how the chat session was recorded in Kafka, and the order in which the new process needs to execute.
Do not despair, the following sequence diagram should help you to see it all, crystal clear. The illustration below shows the entire processing logic relevant to the integration you’re about to build in this last stage of the learning module.
![]()
The above sequence diagram represents a full interaction between a customer and the support agent, from the moment the customer contacts Globex support until the customer feels satisfied and the session closes.
In the diagram:
Click here for details
-
You can see all the chat messages being recorded in Kafka, including the end-of-session signal to mark the end of the conversation.
-
Camel receives the end-of-session signal, and triggers a stream replay to collect and process the information.
-
When all the messages have been collected and aggregated, it generates a PDF document that includes the full conversation transcript.
-
Then, Camel pushes the document to an S3 bucket to archive the conversation.
-
Finally, it obtains from the storage system a shared URL and sends it via chat to the customer.
Since all of the above happens in real time, that is, when the agent closes the session, the customer instantly receives the shared URL to access the transcript as part of the session closure.
2. Implement the Camel routes.
To speed up the exercise, we’ve provided some of the Camel routes so that you can concentrate on the main pieces of logic.
There are 3 Camel routes for you to complete:
-
The main processor driving the business logic.
-
The route responsible to push documents (the transcripts) to storage.
-
The route responsible to share the document URL to customers.
What will I learn?
|
In the content that follows you will learn the following concepts:
|
2.1. Implement the Main Processor
In the diagram from the previous section you can see the signal that initiates the processing. Signals are pushed to a dedicated Kafka topic that complies with the following name convention:
-
support.NAMESPACE.closed
This topic is different per student to prevent interferences during the workshop.
Your topic should be:
-
support.globex-camel-{user_name}.closed
Because the topic name above is dynamic (different per user), we’ve provided the Camel route definition that connects to Kafka and subscribes to your particular topic. Its only role is to consume events (signals) and route them to direct:process.
All you need to do is to implement the direct:process route.
If your terminal is busy showing logs from your previous exercise, or some other task, ensure you press Ctrl+C to stop it.
|
| Close in your editor all open files/tabs to ensure your IDE is clean. |
Start your implementation:
-
Run in your Dev Spaces terminal the snippet below to set the working directory for this task:
cd /projects/workshop-devspaces/workshop/module-camel/lab/transcript/The working folder contains a codefolder to support you on this exercise, as well as adeployscript to help you run it in OpenShift. -
In your terminal, use the
kamel(Camel K client) command below to create a new Camel source file where to define your Camel routes for the caching logic:kamel init transcript.xmlWe’re choosing the XML DSL this time, so that you have a taste of all major Camel DSLs (YAML, Java and XML). -
Open the
transcript.xmlfile in your editor.Select from your project tree:
-
workshop → module-camel → lab → transcript → transcript.xml
-
-
Delete the sample Camel route in
transcript.xml
-
And replace with the following one:
<!---->
    <route id="process">
        <from uri="direct:process"/>                                                  <!-- 1 -->

        <setProperty name="client">                                                   <!-- 2 -->
            <simple>${body}</simple>
        </setProperty>

        <log message="Initiating KAFKA processor for: ${exchangeProperty.client}"/>   <!-- 3 -->

        <setProperty name="continue">                                                 <!-- 4 -->
            <simple>true</simple>
        </setProperty>

        <loop doWhile="true">                                                         <!-- 5 -->
            <simple>${exchangeProperty.continue}</simple>

            <pollEnrich>                                                              <!-- 6 -->
                <simple>kafka:support.${env.NAMESPACE}.${exchangeProperty.client}?autoOffsetReset=earliest</simple>
            </pollEnrich>

            <when>                                                                    <!-- 7 -->
                <simple>${body} == 'done'</simple>
                <setProperty name="continue">
                    <simple>false</simple>
                </setProperty>
            </when>

            <log message="source is: ${header.source}"/>
            <log message="got message: ${body}"/>

            <aggregate aggregationStrategy="myStrategy">                              <!-- 8 -->
                <correlationExpression>
                    <constant>true</constant>
                </correlationExpression>
                <completionPredicate>
                    <simple>${exchangeProperty.continue} == false</simple>
                </completionPredicate>

                <log message="aggregation done: ${body}"/>                             <!-- 9 -->

                <to uri="pdf:create"/>                                                 <!-- 10 -->
                <log message="PDF created."/>

                <to uri="direct:store-pdf"/>                                           <!-- 11 -->
                <to uri="direct:get-shared-url"/>                                      <!-- 12 -->
                <to uri="direct:share-transcript"/>                                    <!-- 13 -->
            </aggregate>
        </loop>

        <log message="KAFKA processor done"/>

    </route>
<!---->
As you can observe the XML DSL reads similar to the YAML and Java DSLs. XML is more verbose, but not padding strict the way YAML is, and simple in content than Java.
Click here for details of the above route
1 The fromelement defines thedirect:processentrypoint where the Camel Kafka consumer will direct the incoming events.2 Next, a property (processing variable) keeps the value (from the body) that uniquely identifies the full customer/agent conversation which originates from the Matrix channel ID created for the session. 3 A log statement helps tracing the execution. 4 A property continue(defaulted valuetrue) helps controlling the processing loop (see [5]).5 A loop defines the processing logic to iteratively collect all the conversation Kafka events. 6 For each loop iteration, a poll enricher consumes the next event available in the Kafka topic. Camel’s
<pollEnrich>is an implementation of the Content Enricher EIP (Enterprise Integration Pattern). It allows Camel to run a consumer mid-way in the route (normally reserved only in thefrom).Camel is very versatile. The same logic could also be implemented, for instance, by dynamically creating and terminating routes at runtime.
7 Each Kafka event is evaluated: when the payload is marked as done, the propertycontinueis set tofalseto stop the loop cycle.8 An aggregator allows the route to collect events and merge them into a single one. Camel’s
<aggregate>is an implementation of the Aggregator EIP.The key
completionPredicateis a parameter that controls when the aggregation finishes, and when it does, it wraps the result and triggers the execution to process it (steps [9] to [13]).9 A log statement helps visualise when the result processing of an aggregation begins. 10 Using Camel’s PDF component, the aggregated result (full conversation) gets rendered in a PDF document. 11 Calls a route store-pdf(to be implemented) responsible to push the document to an S3 bucket.12 Calls a route get-shared-url(provided) in order to obtain (from the Storage system) a direct URL to access the document that can be shared with the customer.13 Calls a route share-transcript(to be implemented) that sends a message to the customer sharing the document’s URL.
The next section will assist you in implementing the route, invoked in step [12], responsible to store the transcript.
2.2. Implement the store-pdf route
This Camel route prepares the payload and invokes the S3 subsystem to store the PDF document in an S3 bucket.
In the same XML (transcript.xml) file, copy and paste the following snippet:
<!---->
    <route id="store-pdf">
        <from uri="direct:store-pdf"/>                                       <!-- 1 -->

        <setProperty name="store-key">
            <simple>transcript_${date:now:yyyy-MM-dd_HH-mm-ss}.pdf</simple>  <!-- 2 -->
        </setProperty>

        <setHeader name="CamelFileName">                                     <!-- 3 -->
            <simple>${exchangeProperty.store-key}</simple>
        </setHeader>

        <setHeader name="CamelAwsS3Key">                                     <!-- 3 -->
            <simple>${exchangeProperty.store-key}</simple>
        </setHeader>

        <setHeader name="CamelAwsS3ContentType">                             <!-- 3 -->
            <simple>application/pdf</simple>
        </setHeader>

        <toD uri="aws2-s3:pdf.bucket"/>                                      <!-- 4 -->
        <log message="PDF stored"/>
    </route>
<!---->
Click here for details of the above route
| 1 | The from element defines the direct:store-pdf entrypoint the main processor invokes. |
||
| 2 | The property store-key defines the naming convention for all transcripts stored in S3.
|
||
| 3 | To store an object in S3, the following headers need to be defined:
|
||
| 4 | The Camel component aws2-s3 is used to push the document to the S3 bucket pdf.bucket. |
When the transcript is stored in S3, the main route obtains an access URL from the storage system to share with the customer.
The last of the Camel routes you need to complete implements that task, follow to the next section.
2.3. Implement the share-transcript route
This Camel route prepares the payload and invokes the S3 subsystem to store the PDF document in an S3 bucket.
In the same XML file (transcript.xml), copy and paste the following snippet:
<!---->
    <route id="share-transcript">
        <from uri="direct:share-transcript"/>                                       <!-- 1 -->

        <log message="context is: ${exchangeProperty.context}"/>                    <!-- 2 -->

        <setBody>
            <simple>${exchangeProperty.context}</simple>                            <!-- 3 -->
        </setBody>

        <to uri="direct:recycle-context"/>                                          <!-- 4 -->

        <log message="AMQP to send out: ${body}"/>

        <toD uri="amqp:topic:support.${exchangeProperty.source}?connectionFactory=#myFactory"/>  <!-- 5 -->
    </route>
<!---->
Click here for details of the above route
| 1 | The from element defines the direct:share-transcript entrypoint the main processor invokes. |
||||
| 2 | A log statement helps visually trace the execution. | ||||
| 3 | The session context is placed in the body in preparation for the next step [4].
|
||||
| 4 | An internal call to the route recycle-context (provided) renews the context in preparation to send a message back to the customer.
|
||||
| 5 | Sends the shared URL over AMQP to the AMQ Broker.
|
You’re done with the implementation part.
3. Deploy and test your code
With the Camel K client kamel you can deploy your integrations with one command. Camel K will take care of collecting all your sources, containerizing them and deploying an instance.
Let’s deploy your code .
-
From your terminal, execute the following command:
./deploy.shThe deploy.shscript executes akamel runcommand that defines all the necessary support resources and parameters to run your integration.Outputtranscript (main) $ ./deploy.sh No IntegrationPlatform resource in globex-camel-{user_name} namespace Integration "transcript" created -
You can inspect the logs by running the following command:
kamel log transcript
|
If you encounter errors or unexpected results, you might have missed a step following the instructions or done some other human error. |
-
Using Rocket.Chat (for example) and Matrix…
-
Initiate and simulate a customer/agent conversation, as done in previous exercises.
-
Then, to close the session, from Matrix, right-click and leave the room.
Leaving the room should kick-off the transcript process.
-
-
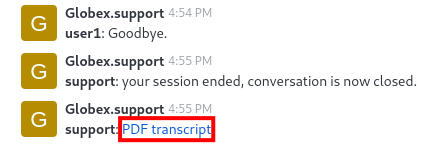
Finally, in Rocket.Chat, you should see a notification informing the session has ended, plus a link to your transcript, as shown in the picture below:
-
Confirm to leave the channel in Matrix.
-
From Rocket.Chat, click on the PDF transcript link.
-
Well done, you have successfully created a Camel application to store and share transcripts for support sessions, compliant with government regulations, attached to the Multichannel Platform.
The deploy.sh command made the Camel K operator run your code in an OpenShift pod named transcript, which you can see in your environment, if you open your Topology view.
You can also use the kamel client from your terminal to obtain information about all of your deployed Camel K instances:
kamel gettranscript (main) $ kamel get No IntegrationPlatform resource in globex-camel-user1 namespace NAME PHASE KIT matrix Running globex-camel-user1/kit-chcc8ts5v3ov25mqg460 globex-support Running globex-camel-user1/kit-chccj045v3ov25mqg470 transcript Running globex-camel-user1/kit-chdltr45v3oq6up8l3sg
And you’re done !!
4. Congratulations
Congratulations! With this you have completed the Camel workshop module!
|
Please close all but the Workshop Deployer browser tab to avoid proliferation of browser tabs which can make working on other modules difficult. |
Proceed to the Workshop Deployer to choose your next module.