Plug in the Globex Web Chat
All the work done so far has enabled bi-directional communication between customers and agents between Rocket.Chat and Matrix. Our open architecture approach allows us to easily plug in new communication channels.
Your next task will be to complete and deploy a Camel K integration that connects our Globex Web portal with the support service. The Globex Web portal has a chat widget from where customers can also contact support agents for assistance.

One approach to be consistent with our event-driven approach, is to decouple both flow directions as follows:
-
Camel will expose an API to accept customer messages to agents
-
Globex web application will define a callback entrypoint to listen for agent response.
Both processing flows should be fully decoupled, but will coexist in the Camel K definition and deployed together.
1. Understand the decoupled architecture
One fundamental architecture consideration is that if we want an easy to plugin platform where other communication systems or services need to plugin with ease, a standard data model as a common interface is needed.
This implies that instead of applying platform specific data transformations (eg. Rocket.chat data model to Matrix data model), we apply the following data transformations:
-
System specific to standard data model (e.g. Rocket.Chat/Globex to AMQ Broker)
-
Standard data model to system specific (e.g. AMQ Broker to Rocket.Chat/Globex)
The illustration below describes data exchanges via AMQ:
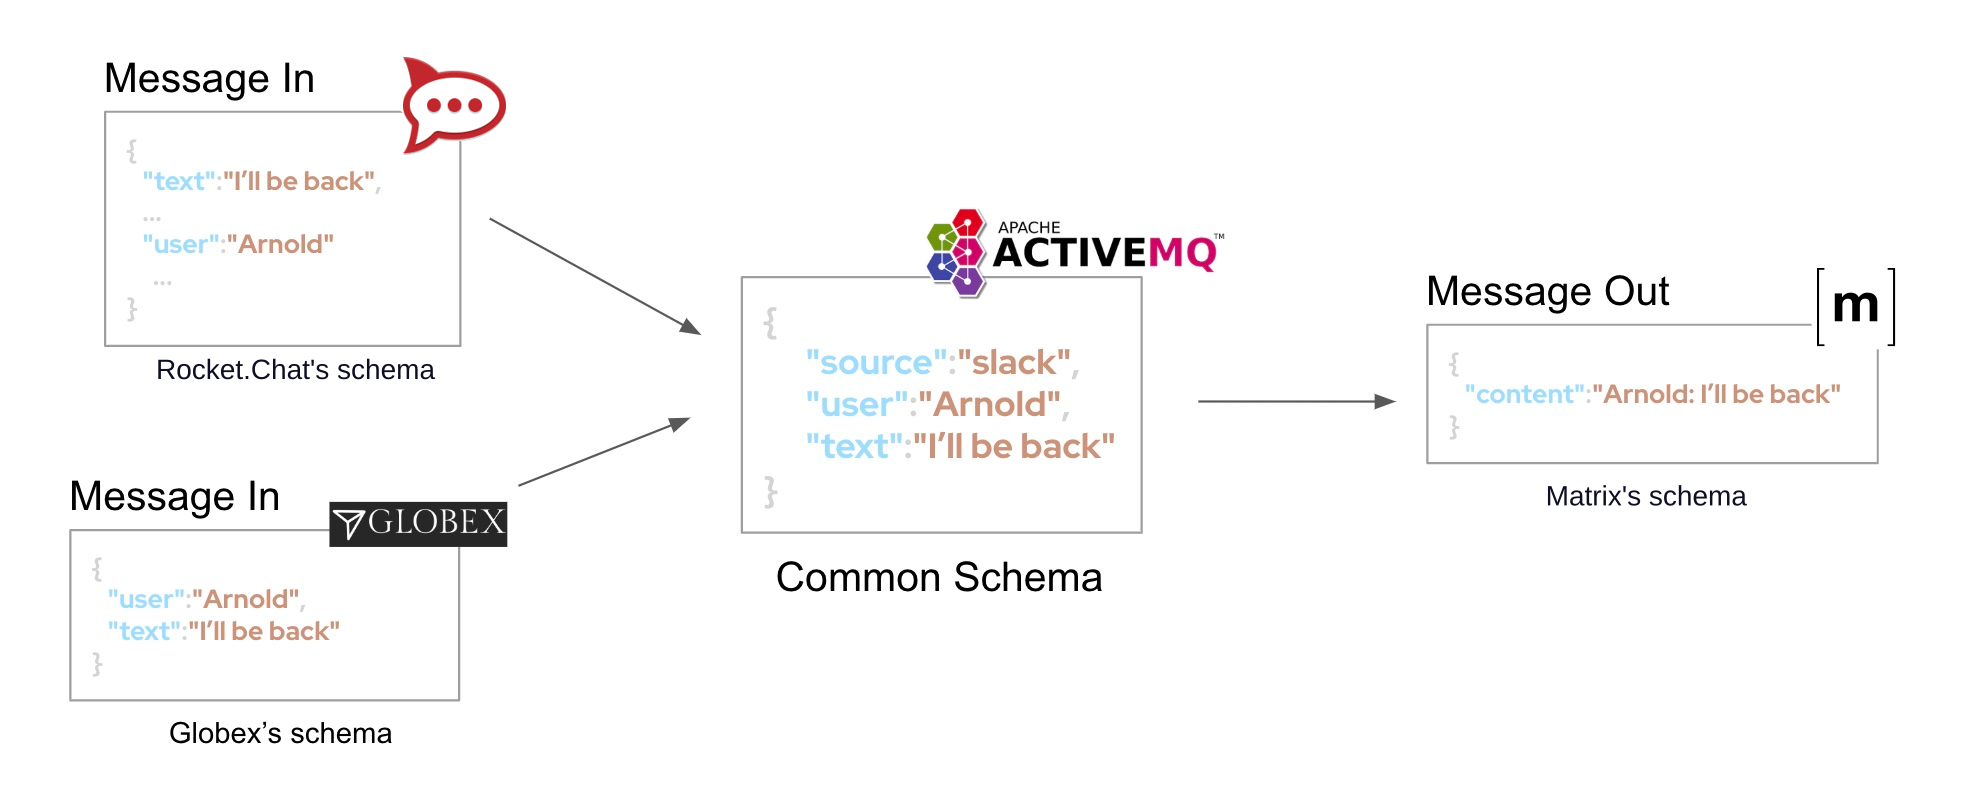
In the diagram above we can see how Rocket.Chat is already integrated, via AMQ, to Matrix. The common data model easily helps us integrate Globex with the platform.
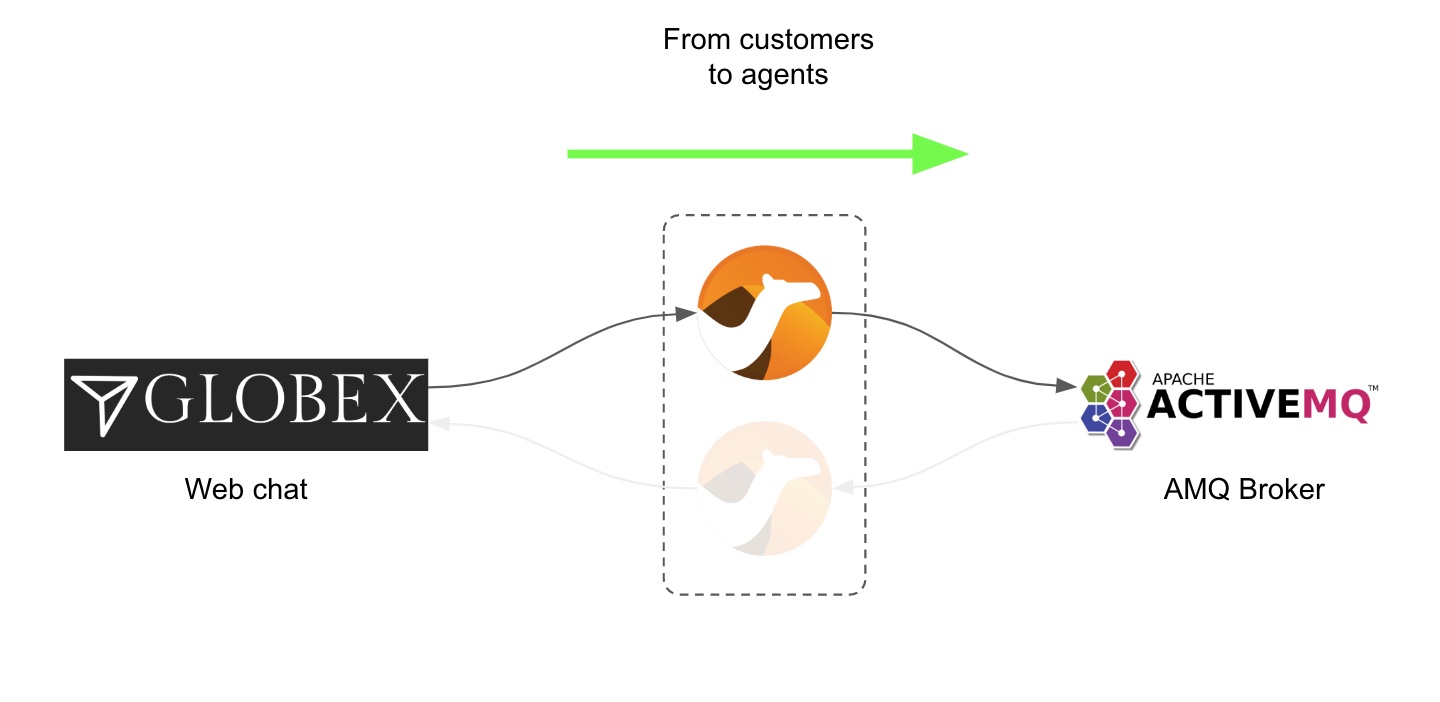
2. Implement the customer to agent flow
Your first task in this section is to define the Camel route that will expose an API that Globex will use as an entrypoint to push messages from customers.
The flow is relatively simple, all is required is listen for HTTP requests, process them, and push AMQP events the shared AMQ Broker, left to right in the diagram below:
2.1. Code the Camel route
If your terminal is busy showing logs from your previous exercise, or some other task, ensure you press Ctrl+C to stop it.
|
| Close in your editor all open files/tabs in Dev Spaces to ensure your IDE is clean. |
Start your implementation:
-
Run in your Dev Spaces terminal the snippet below to set the working directory for this task:
cd /projects/workshop-devspaces/workshop/module-camel/lab/globex-support/The working folder contains a codefolder to support you on this exercise, as well as adeployscript to help you run it in OpenShift. -
In your terminal, use the
kamel(Camel K client) command below to create a new Camel source file where to define your Camel routes for the caching logic:kamel init routesglobex.javaThis time we’re choosing the Java language to showcase how all DSLs follow the same structure when defining Camel routes. -
Open the
routesglobex.javafile in your editor.Select from your project tree:
-
workshop → module-camel → lab → globex-support → routesglobex.java
-
-
Delete the sample Camel route in
routesglobex.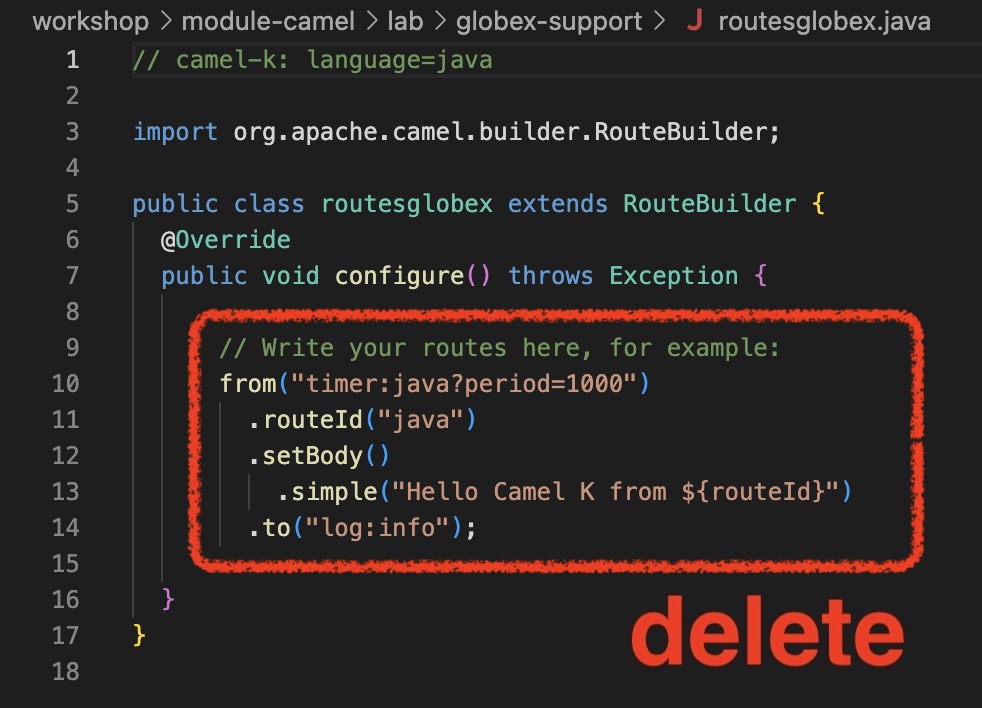
-
And replace with the following one:
//
      from("platform-http:/support/message")                      // <1>
        .setProperty("clientid", simple("${env.NAMESPACE}"))      // <2>
        .convertBodyTo(String.class)                              // <3>
        .to("jslt:request.jslt?allowContextMapAll=true")          // <4>
        .toD("amqp:topic:{{broker.amqp.topic.clients}}${env.NAMESPACE}?disableReplyTo=true&connectionFactory=#myFactory");  // <5>
//
Observe how the route above is defined with a Java based DSL using the fluent builder style. Except minor differences, the structure is almost identical to other DSLs (XML/YAML).
Click here for details of the above route
1 The fromelement uses the Camel componentplatform-http, which wires the runtime’s HTTP listener to capture all the incoming requests to the givensupport/messagepath.This is a simple code-first approach to define APIs. This type of definition is handy for rapid development and convenient for this workshop. For production systems a better approach is 'api-first' where an API contract (OpenApi) specifies the interface between client and server, and Camel provides its implementation.
2 Next, a property (processing variable) is set to define the client identifier integrating with the communication hub. As we have many distinct students in this workshop, we use the namespace that uniquely identifies your system from others. 3 In preparation for the transformation that follows we convert the incoming payload into a String.The JSLT transformer (next step) requires a
Stringinput, however theplatform-httpcomponent may encapsulate the payload in a different Java object.4 The JSON input is transformed using a JSLT stylesheet ( request.jslt), to map its values to the Hub’s common data model.The JSLT transformer is a powerful JSON to JSON data mapping tool. JSLT is inspired in XSLT (XML transformer), the most powerful transformation tool for XML.
5 Finally, the adapted JSON payload is sent using the amqpCamel component to the AMQ Broker. From the broker, the Matrix Camel K instance consumes the events and forwards them to the team of agents.the call uses
toD(Dynamicto) to evaluate at runtime the target AMQP address using the environment’sNAMESPACEvariable.
The route definition above includes a jslt action. The section that follows will help you to define its transformation definition.
2.2. Define the flow’s JSON data mapping
As previously described, it is now the time to transform the JSON payload from Globex (source), to the platform’s unified data model (target). We need to create the JSLT stylesheet that defines the data mapping.
-
From your terminal, execute the command below to create a new (empty) source file that will contain the JSLT definition:
touch request.jslt -
Open the
request.jsltfile in your editor. -
Copy and paste the following snippet:
{
  "user": .user,           // <1>
  "text": .text,           // <1>
  "source": {              // <2>
  	"name" : "globex",     // <3>
   	"uname": "globex."+$exchange.properties.clientid, // <4>
   	"room" : .sessionid    // <5>
    }
}
You’ll notice the JSLT feels like natural JSON, except it includes expressions that assign a value to the fields. Expressions use a syntax similar to jq.Click here for details of the JSLT definition
1 Directly maps the fields userandtext(as is).2 Defines a sourcenode with:3 the field nameset to a static valueglobex.4 the field uname(unique name) as a concatenation of the stringglobex.with the dynamic value obtained from the propertyclientid, previously evaluated in the Camel route.5 the field roommapped with the incomingsessionidfield.Look at JSLT definition and notice how it fully describes a complete JSON to JSON data mapping. It is very visual, intuitive and easy to work with. You see the inputs in use, and the output data shape that will be generated.
Other transformation methods generally involve more complex code, very difficult to follow and maintain.
You have now the processing flow ready to move events (messages) from Globex (customers) to agents. Now you need to complete the reverse flow to bring agent responses to customers texting from Globex.
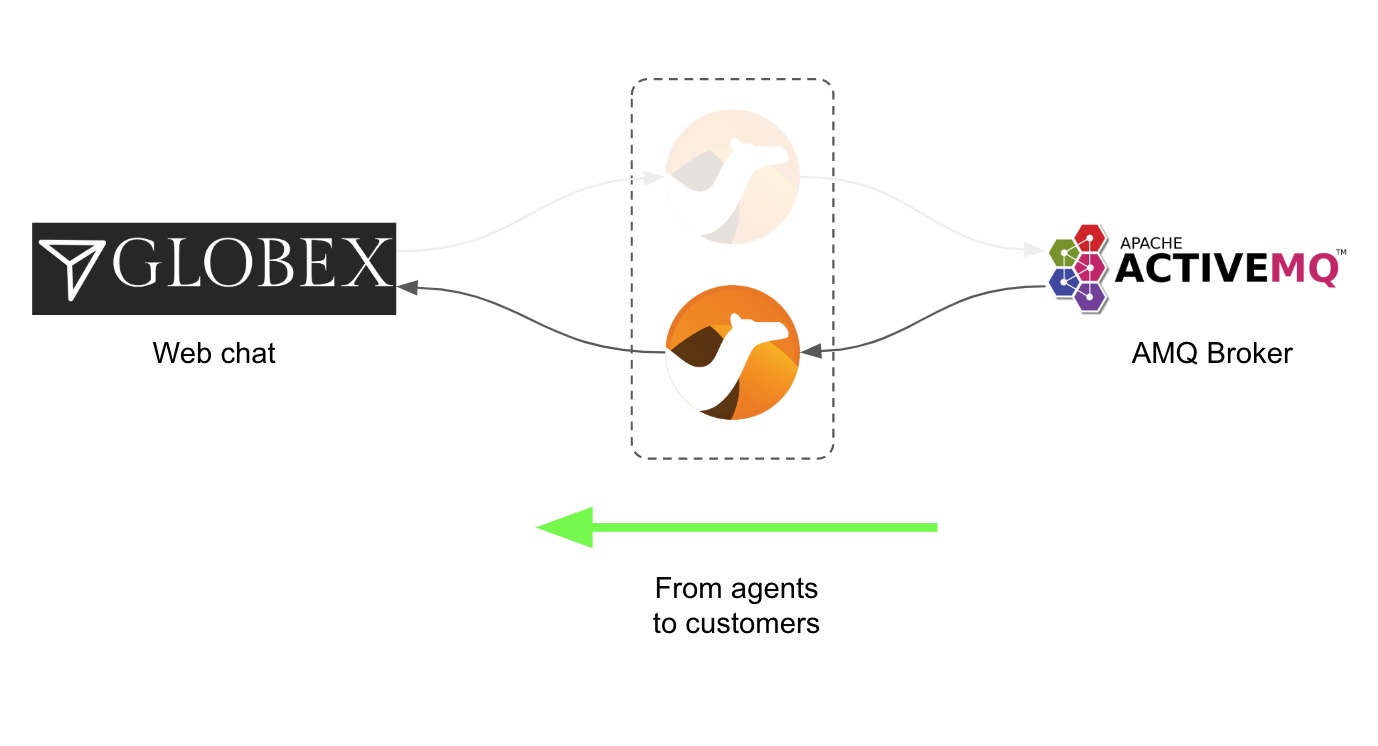
3. Implement the agent to customer flow
Again, the flow is very straightforward, it just needs to consume AMQP events from the shared AMQ Broker in the environment and push them via HTTP to our local Globex instance, right to left in the diagram below:
Because the AMQ Broker in this workshop, used to exchange events between customers/agents, is shared with other students, we just need to ensure isolation is preserved between all the AMQ consumers/producers (from all students).
|
For simplicity, this exercise provides a Camel AMQ listener that dynamically subscribes to your dedicated address and directs all messages to the |
|
If you feel curious on how this Camel AMQP consumer is implemented, open in your editor the |
In the routesglobex.java Java file, copy and paste the snippet below:
//
      from("direct:support-response")                      // <1>
        .convertBodyTo(String.class)                       // <2>
        .to("jslt:response.jslt?allowContextMapAll=true")  // <3>
        .to("{{client.callback.url}}");                    // <4>
//
Click here for details of the above route
| 1 | The from element uses the Camel component direct to allow the AMQP listener (provided) to handover events consumed from the AMQ broker. |
||
| 2 | In preparation for the transformation that follows we convert the incoming payload into a String.
|
||
| 3 | The JSON input is transformed using a JSLT stylesheet (response.jslt), to map its values from the common data model to Globex’s specific model. |
||
| 4 | Finally, the mapped JSON payload is sent via HTTP to Globex’s callback URL, configured in the properties file. |
The route definition above includes a jslt action. The section that follows will help you to define its transformation definition.
3.1. Define the flow’s JSON data mapping
Let’s transform the JSON payload from the common data model (source) to Globex’s (target). Create as described the JSLT stylesheet that defines the data mapping.
-
From your Dev Spaces terminal, execute the command below to create a new (empty) source file that will contain the JSLT definition:
touch response.jslt -
Open the
response.jsltfile in your editor. -
Copy and paste the following snippet:
{
    "agent": .agent,             // <1>
    "text": .text,               // <1>
    "sessionid" : .source.room,  // <2>
    "pdf":  .pdf                 // <3>
}
Click here for details of the above JSLT definition
1 Directly maps the fields agentandtext(as is).2 Sets the sessionidwith the sourceroom.the
sessionidis part of the context the caching system keeps during the lifetime of the customer/agent interaction.the
sessionidrepresents the internal Globex customer session identifier. Globex needs to get the session back to push the agent’s message over the right websocket open by the customer’s chat session.3 Maps a pdffield (when available)Later in the lab, you’ll work to generate the value mapped in this definition.
4. Deploy and test your code
With the Camel K client kamel you can deploy your integrations with one command. Camel K will take care of collecting all your sources, containerizing them and deploying an instance.
Let’s deploy your code .
-
From your terminal, execute the following command:
./deploy.shThe deploy.shscripts executes akamel runcommand that defines all the necessary support resources and parameters to run your integration.Outputglobex-support (main) $ ./deploy.sh No IntegrationPlatform resource in globex-camel-{user_name} namespace Integration "globex-support" created -
You can inspect the logs by running the following command:
kamel log globex-supportIf you encounter errors or unexpected results, you might have missed a step following the instructions or done some other human error.
If so, try again using the prebuilt code by running the following command. This code does the exact same logic that you implemented in the above steps../safe-deploy.sh
-
From Globex…
The Globex Web application has been pre-deployed in your user namespace so that you can easily open it and use it to test your exercise. -
Open the Chat window
You can open the Globex Web application following this direct link.
Or, by finding it in your Topology view.
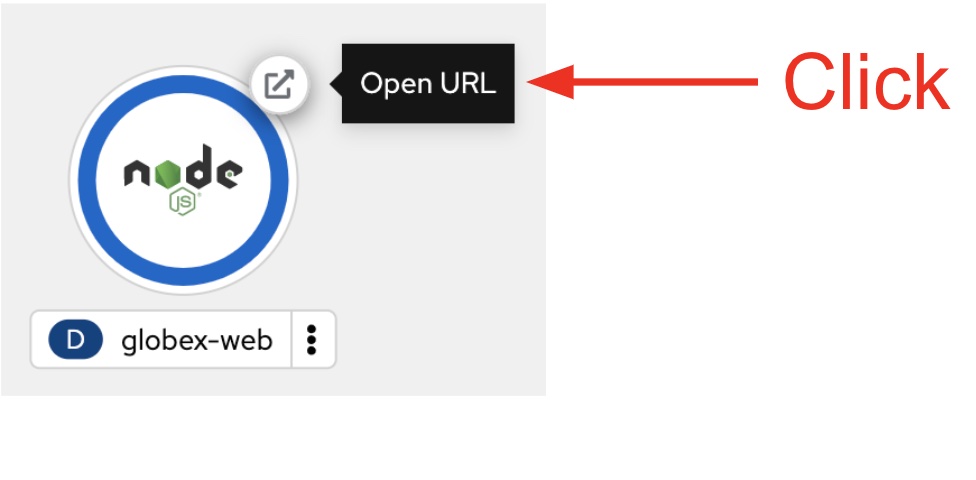
-
When the web application opens, click
Loginin the upper-right corner of the screen:
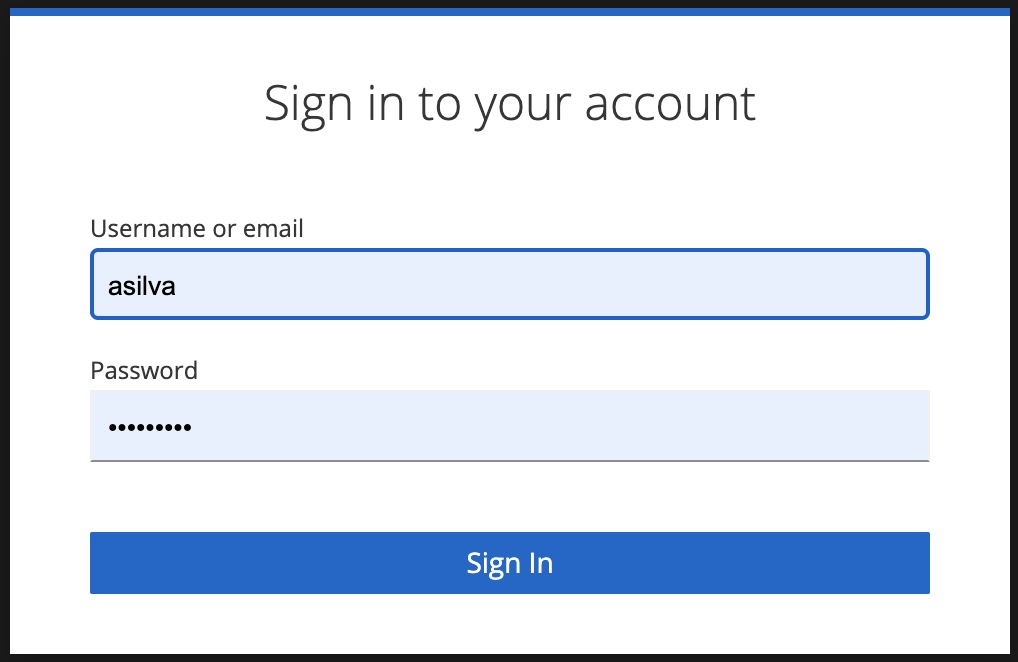
-
Enter the following credentials:
-
asilva/openshift
-
-
Once in, open a support chat session by clicking one of these two options:
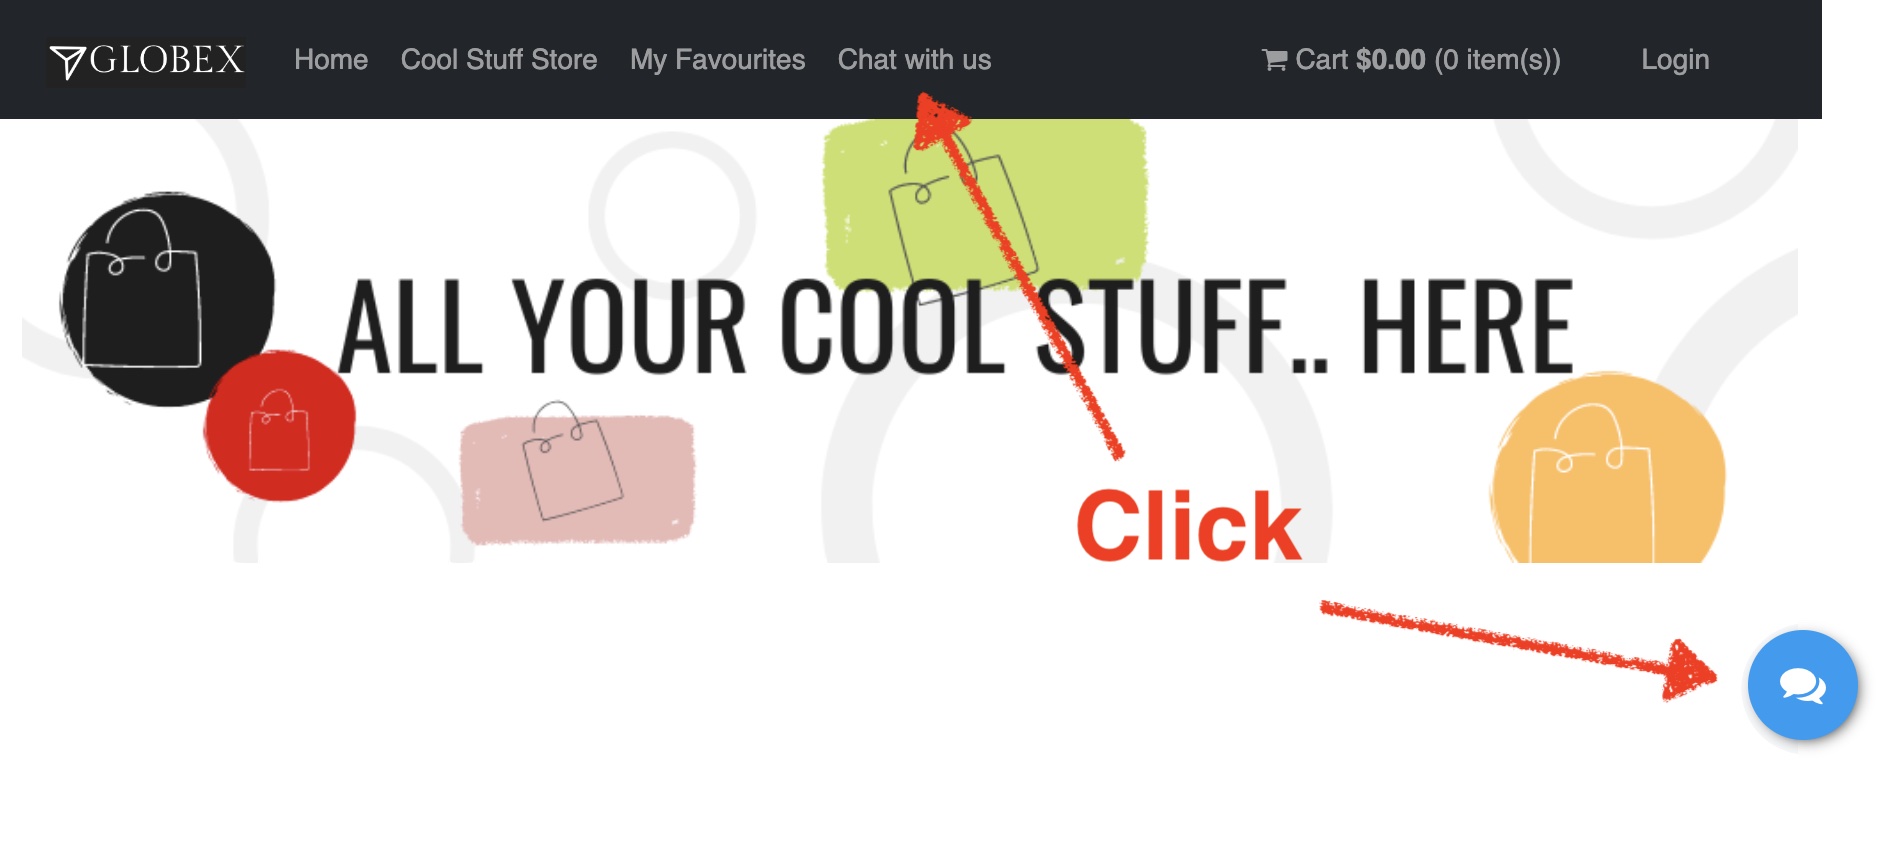
-
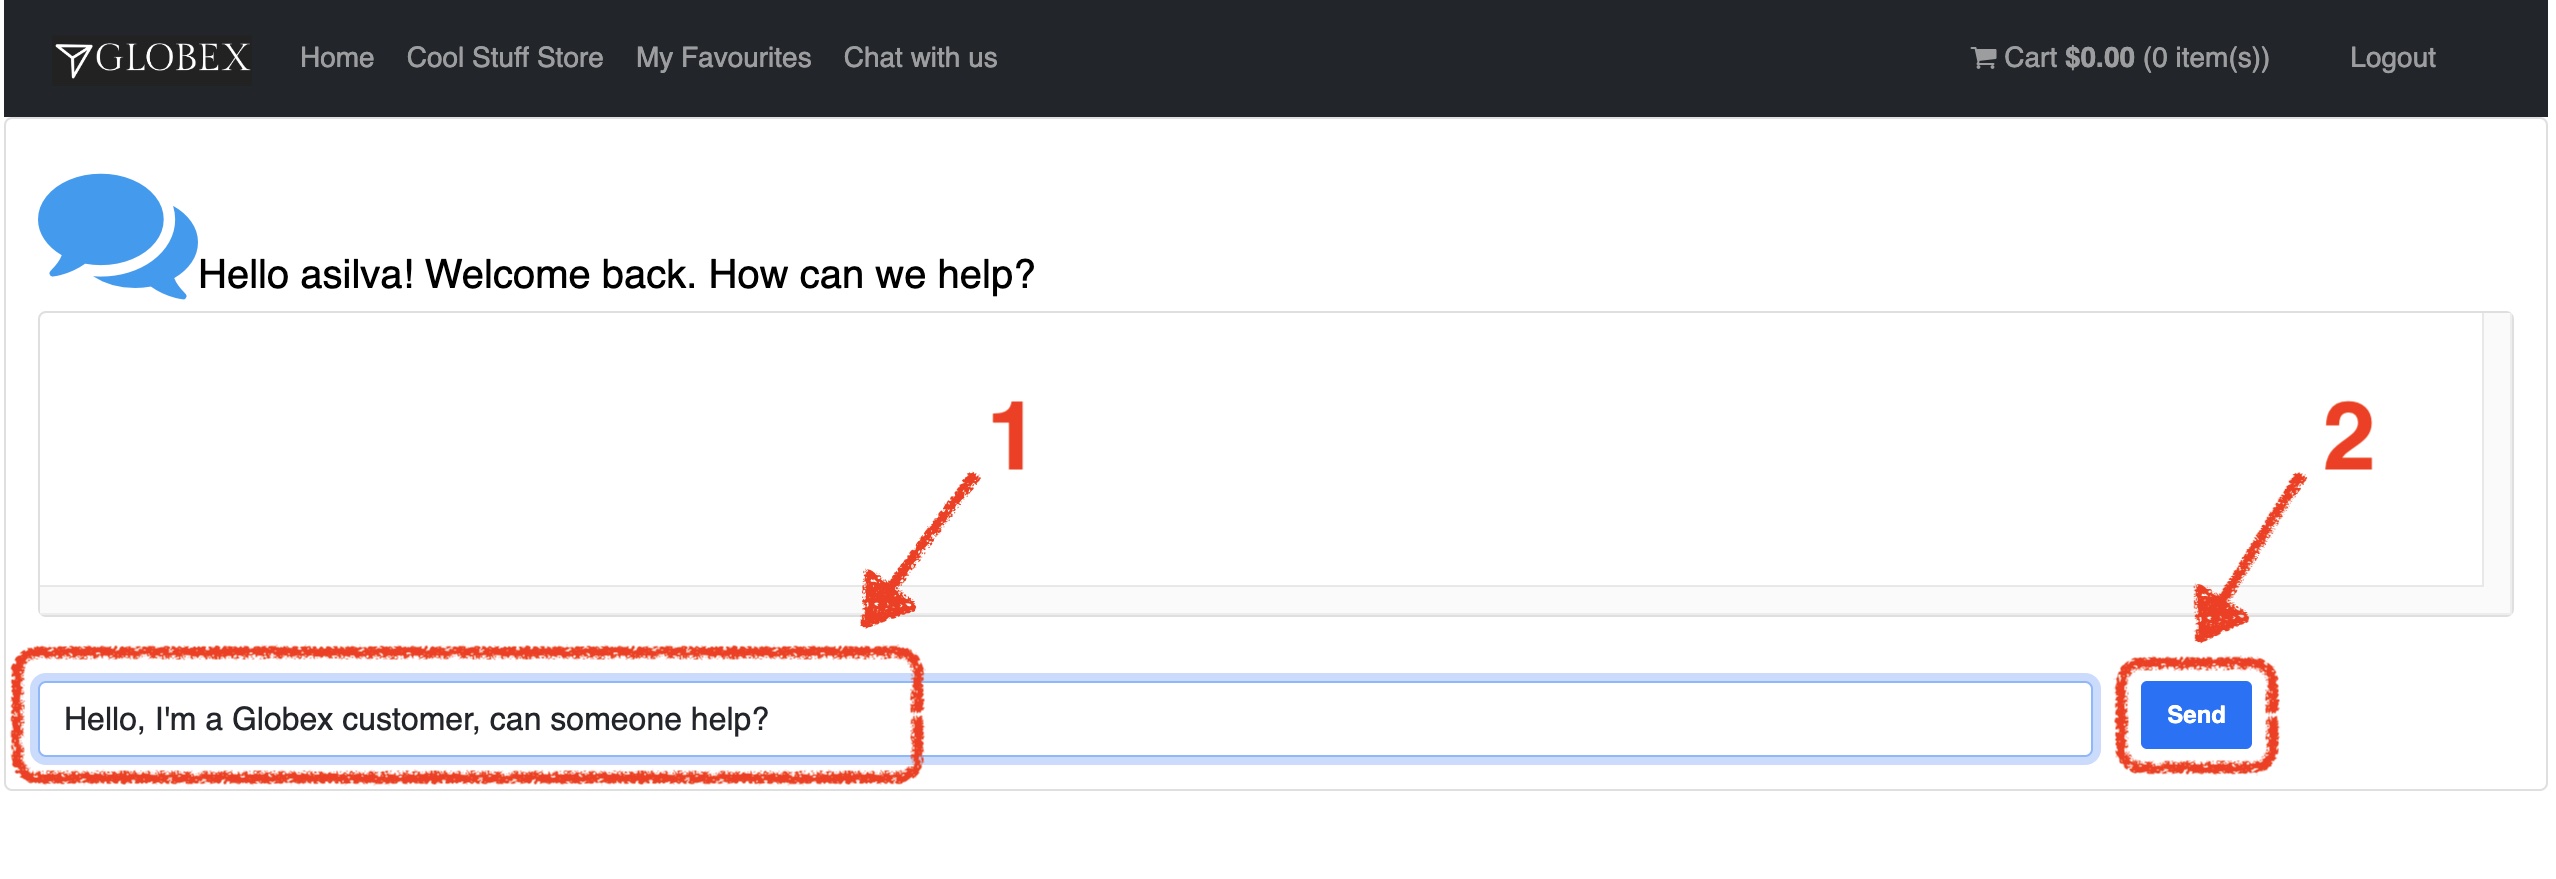
From the chat window:
-
Type in a test message.
-
Click the 'Send' button (or press Enter).
-
-
-
From Matrix…
-
You should see a new room
globex-{user_name}created. -
Click on the newly created room
globex-{user_name}and accept the invitation to join the room to display the messages. -
Type a message, for example:
-
My name is Bruno, how can I help you today?
and send it.
-
-
-
Back from Globex…
You should see the agent’s message sent from Matrix appear in your chat session window.
-
Exchange a few more messages to simulate a conversation.
-
Then, from Matrix, to close the session, follow these steps, as per the illustration below:
-
Right click on the room
globex-{user_name} -
Click
Leave -
Confirm your action to leave the room.

-
-
In Globex, as above on the right hand side, you should see a notification informing the session has ended.
Well done, you have successfully integrated the Globex Web application into the Multichannel Platform.
The deploy.sh command made the Camel K operator fully deploy your code in an OpenShift pod named globex-support, which you can see running from the Topology view.
You can also use the kamel client from your terminal to obtain information about your deployed Camel K instances:
kamel getNo IntegrationPlatform resource in globex-camel-{user_name} namespace
NAME PHASE KIT
matrix Running globex-camel-{user_name}/kit-chcc8ts5v3ov25mqg460
globex-support Running globex-camel-{user_name}/kit-chccj045v3ov25mqg470